I did say I’d write about my first silhouette cuts, right? Sorry it’s taken a while. Since they don’t quite fit into my regular posting schedule, I need to carve out time to write them. So here it is! Eventually I will write a log of trouble-shooting issues with the cameo.
Once you’ve got your file ready, you are all set to start cutting! I admit that these are not quite the first cuts. There are a few reasons for this, mostly being that I ran into some issues my first few times. And since I was working at night, the light was terrible for picture taking. So, these are really the nearly first cuts. Don’t worry, the last post in this short mini series will talk about some of the trouble-shooting I did with my machine.
One issue I had to deal with was working from an SD card. I didn’t have room in my office for the silhouette yet, and my mobile computer was having problems with the software. For ‘ease’ I just decided to use the sd card. It isn’t hard to use, but I ended up saving the files both to the card itself as well as in a folder named ‘studio’. Only one of each design showed up, so I’m not exactly sure which one it was, even after troubleshooting. I’ve since been able to hook it up to my computer, and that is much easier!
Loading the machine was pretty simple, but I made what seems to be a pretty typical mistake. First, remove the blue paper and press your cardstock gently onto the sticky side of the mat.
Next, place your mat up next to the rollers and choose “Load Cutting Mat”. This is important, unless you are not using the cutting mat don’t choose “Load Media”! I”ll show you why in the next photo. I didn’t need to move the rollers at this point, which made lining it up a no brainer. Not that changing the rollers is hard.
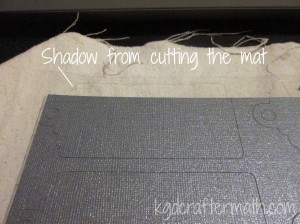
I chose the “Load Media” option, and it cut up my mat a bit. Not enough to destroy it, but enough to make me mildly annoyed.

Inserting the blade and changing it’s settings is super simple. There is a turn key right on the machine. Drop the blade into the turn key and then turn the top until it’s at the number you’ve set. Then drop it into the holder and click that baby shut.
With the mat properly loaded and the blade in place, I was able to cut out my first sheets! For the tags, I needed to cut 2 pieces: the plane colored background and the fancy scroll work. Each of those was done in a different color. This is important now – for the blue sheet I needed to leave it in place for the next step.
When set this project up, I also added a sketch to the plain side of the tag. This required an extra step when cutting. First I cut the plain tags. Once the tags were cut, I left the cutting mat in place. So, no unloading. Next, I switched out the blade for my pen (I chose glitter green) and set it to draw. It needs to stay in place so that it aligns correctly.
Sadly, I wasn’t happy with the results. The pen didn’t draw consistently. I’ve asked around and some people have this problem, but others don’t. Of the 8 pens I have, this is the only one that it’s an issue for. So, I switched it up and used the black glitter pen.
Once the cut was done, weeding began. Weeding is the process of removing all the extra paper that you don’t need. I’m glad that I did this as my first project, because the weeding was really easy. Once or twice the paper didn’t cut right, but that ended up meaning I just needed to re-cut a new piece.
These were so easy to make, and I had extra paper left over from the wall boxes I did. I used that left over paper to make more cards of different colors! Here’s all three of the variants I’ve made so far.
Well, that was my first cut! For the most part, pretty easy. One more part to talk about in another post, and that’s trouble shooting. Then I’ll go through and link them all up together for easy reference. Thanks for reading, and I hope this is helpful if this is you’re first time with the silhouette!
This post is part of my First Cuts Series! Want to read the rest? Here’s the whole group of them!
Silhouette Cameo: The Unboxing
Silhouette Cameo: Installing the Software and Shapes
Silhouette: First Contact with the Software
Silhouette: First Cuts
Silhouette: Trouble Shooting

I like to link up here.
Affiliate links help me keep this blog running. Thanks for using them!
All opinions expressed on this blog are always my own.

This is an impressive project for your first cuts: you tackled cuts AND sketches all in one…which is way more than I could have done starting off. This is such a great series – - especially for beginners. I’ll definitely be directing people here who have a new Silhouette and don’t know where to begin!
Thanks Lauren! I do have a bit of a habit of tackling projects that have multiple aspects to them. I guess I just like the challenge! But to be fair, I had read quite a few of your posts ahead of time, which made me feel a little more prepared.