

I received free product from Expressions Vinyl to use for this post. All opinions are my own, and any love confessed is true and real.
In the midst of all my Cricut madness, I wanted to take a step away this morning to show you the tutorial for the leather notepad holder I customized for Earl’s birthday! If you follow me on instagram or Facebook, you’ve already seen the teaser. Today I’m going to show you how to make it! It’s a rather simple project, since we’re just doing some customization. And that’s not all! I’ll be even be giving away a gift certificate to Expressions Vinyl at the end of the post!

Of course, I must first start with the inspiration! The design that you see on the leather is actually Earl’s name in Galifreyan. You may have heard me talk about Dr. Who before. The Oncoming Hope has a really good article on which episodes you should watch if you have never seen it before. Or you can just start at the beginning of the 2005 reboot. What I love about Galifreyan script is the geometric simplicity of the designs. It’s just stunning to me. And for a work piece, the geekery is understated enough that it won’t set off alarm bells unless the viewer knows what they are looking at. Just perfect. Ok, let’s get started on learning how to make this!
Materials

Indoor Vinyl (I choose red from Expressions Vinyl , since it was a color that set off well from the leather)
Transfer Tape
A leather notepad holder to customize. (Mine is from Saddleback Leather.)
Lumiere Rusted Metal Leather paint.
Paint dauber.
I also used my Silhouette Cameo and the Galifreyan translator from Sherman’s Planet.
Step 1: Create your translation.
First you need to download and unzip the translator program to your desktop. Double click on Gallifreyan.jar to run the program. Then type in your name or phrase into the top of the screen. I’ll do Earl the favor of not putting his full name here, so you can see what my blog name looks like in the app. You need to make sure to replace any “C”s with a K or an S.
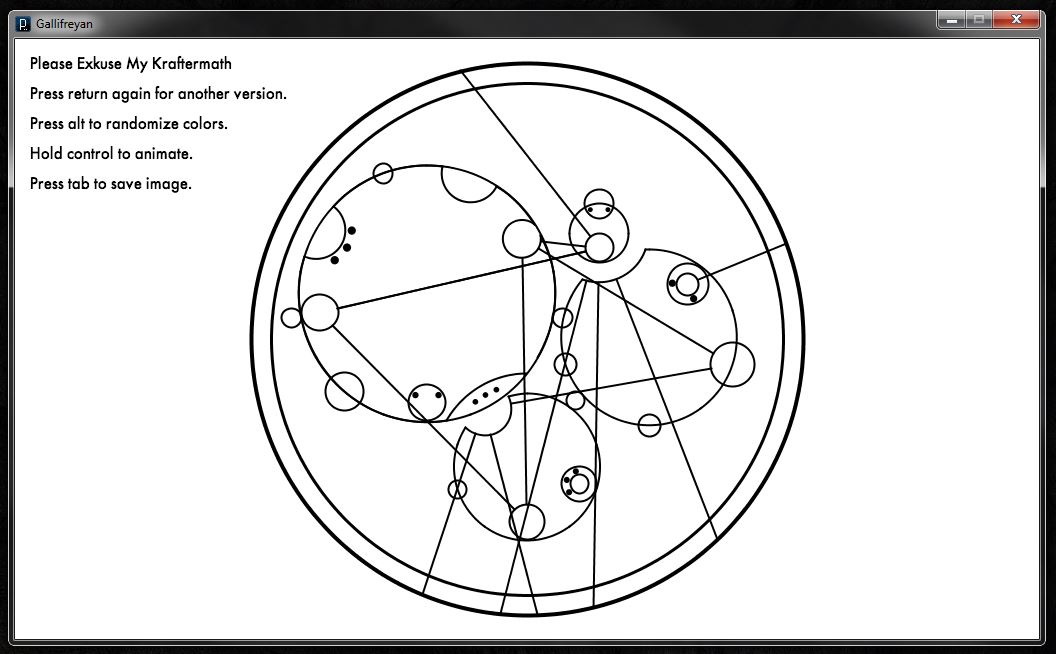
Hitting tab will save the image to the folder where the program resides as a .png. You can hit enter to move the lines around, but if you see something you like, save it! You won’t likely see it again.
Step 2: Create your cut file in Silhouette Studio
I’ve switched to working with Earl’s name again, so you’ll notice the pattern looks different. To add it to your workspace, drag and drop the image from the folder and onto the Silhouette Studio workspace. It will load into the program.

Now go to trace and drag your trace area around the pattern. For single color traces like this, I turn off the high pass filter and set the threshold to a point where the whole pattern is highlighted. Then trace the pattern.

Once the pattern is traced, you can delete imported image. I filled the shape with black. Next, I measured how much space I could take up with the image. To re-size, go to Object – Transform – Scale Options. You can lock the aspect ratio and scale up the object in the scale panel.

I also wrote out his name in the Jane Austin font and sized that appropriately.

Step 3: Cut and weed your vinyl
Now, I’ll admit, even though there are presets in the Studio settings, I always like to double check my vinyl settings. And here’s something I love about Expressions Vinyl: they have a chart for you to find your cut settings at! I find myself starting with their number and doing a test cut every time now, and they are almost always spot on. It’s my little security blanket. The vinyl cut like a charm.
Once your vinyl cuts, weed out all the parts you don’t want. Since we’re using the vinyl as as stencil, this means that you’ll be removing all the lines and dots from the pattern.
Step 4: Placement
Oh, I’m so excited. This is where the magic starts. First you’ll want to place the transfer tape on top of your vinyl.

Peel the backing off of your vinyl, and place the piece on the leather.


The indoor vinyl is perfect for this project! It has just enough stick to stay put, but not too much to gunk up the leather.
For the larger piece, first I figured out where I wanted it to go. To apply the vinyl, I found it worked better to have the transfer paper partially on it’s backing and partially on the vinyl. It almost felt like I was rolling it off.

To apply it to the leather, I peeled off half of the vinyl backing, placed the notepad holder on the unpeeled part, and gently pressed the vinyl where I wanted it.


And I just followed the same procedure for the other side, removing the transfer tape when I was done.

Step 5: Paint
You all remember the pouncing from my Stencling Sherlock post, right?

Of course you do. How could you forget? Well, that’s the same motion you’ll be doing here. Make sure not to lay it on too thick, or else it will stick to your vinyl when you go to remove it. The A below is a bit too thick. And even though it may look like it needs a heavier coat, it probably doesn’t. Of course, you can always add a second coat. You may find that the rounded part of the exterior doesn’t want to stay perfectly put. That’s ok, just do the best you can. You can’t even notice where mine was being fussy.

Then, just peel the vinyl away… and voila!


You’re left with an elegant, customized piece you would be proud to tote anywhere. All courtesy of a bit of vinyl. And I’ll be honest here, I’ve racked my mind about how I would do this without the vinyl stencil, and I just can’t think of another way to get such clean lines. It really is the vinyl and the transfer tape that made this project such a success in my mind.
Wanna try your hand it it? Why not enter the giveaway below! You could win a $25 gift card to Expressions Vinyl!
Can’t wait to get started? Head on over to Expressions Vinyl to pick out your material and use the code KGDCRAFTERMATH to get yourself a 10% discount! The code is valid until April 7th, so go get buying and creating! I’ve been very impressed with their shipping, if you were to buy it today I wouldn’t be surprised if you had it in time to use this very weekend!
Good luck! And don’t forget to comment on this post with what you would make with your Expressions Vinyl to earn an extra entry!


I like to link up here.
Affiliate links help me keep this blog running. Thanks for using them!
All opinions expressed on this blog are always my own.
That project is awesome! I’ve been wanting to buy some colored vinyl to create some wall art in my kitchen and living room.
Thanks Jeri! Wall art is a fun project! We created a kitchen back splash that way. I would suggest using the indoor vinyl for that – it removes without peeling the wall when you’re done with it. Good luck!
Your project turned out beautiful. Thanks for the tutorial.
Glenna @ My Paper Craze recently posted…It’s Kind of a Big Deal… A Liebster Award Nomination!
Thanks so much Glenna! I really liked making it. 🙂
Such a cool notebook… I don’t know anything about Dr. Who (nor do I have time to get into another TV show), but I love the design… so cool!
Laura @ The Experimental Home recently posted…Monday Mess Movement featuring The Pretty Pickle
That’s one of the things I love about Gallifreyan – you don’t need to know what it is to appreciate the designs. Thank for stopping by Laura!
This came out so great! I love that you even incorporated Dr. Who. If anyone could do that its you! Where can I find leather paint. I’ve never even heard of it…Off to google.
Michelle recently posted…Tip Tuesday- Repairing a Mac Book Pro Charger
Michelle, there are several places you can get it. The paint I purchased came from JoAnn’s by the fabric paint, but you can also check your local leather store if you have one. Or Google ;). Just read the instructions for the paint you’re looking at to see if it lists leather as an option.
Love the finished look. And now I’m even more curious about Dr. Who. I might have to watch an episode someday.
Thanks Margaret! If you’re a fan of scifi, you’ll enjoy it. Of course, you don’t have to be a fan of scifi to enjoy it either. Simply put, it’s about a British man in a box who travel through space and time. Lots of shenanigans happen.
I need to make some clothing tags for the items I am making and this would work out well if I won.
I have to say I had a weird thought as I read of your design inspiration. It was this . . . what if when you reach 80 years old, one of your grandchildren happens to see Earls notepad holder and knows what it says and then starts babbling in that language. OK, I am weird, I know, but it was just a quick passing thought I wanted to share with you.
There are so many things I love about this Karen.
1. The idea that this is still going to be around on his desk when we’re old. (Of course, I hope so!)
2. The idea that this fictional language, which so far as I’m aware is only a written one, will one day have an oral component.
3. That my grandchildren would know it well enough to speak it.
Thanks for making my day brighter!
This turned out so great. But I wish you would have told us how he liked it! Btw, I was totally trying to place an EV order today at work and it was being fussy. So I decided I’d wait til I got home and voila! Here you are with a giveaway AND 10% off. Thank you!!!!
Oh yeah! And what would I make? Goodness. I’ve got so many projects in the works right now I’m not sure what I’d make! Possibly another decal for my car or laptop. Or maybe some wall art for my mom…she’s been bugging me to for awhile now… Or maybe some Mother’s Day presents… The possibilities are endless, right?
Heather recently posted…Influenster #UniVoxBox Unboxing
Heather recently posted…Influenster #UniVoxBox Unboxing
Silly me Heather! I can’t believe I forgot such an important detail! I’ll be sure to add it above as well, but I think he loved it. Earl isn’t always the most expressive person. So I’m taking his lack of criticism (he tries to be helpful by pointing out all the flaws in things) and his “Yeah, I like it” to mean he loved it. Especially since he showed it off the next day. Love that you’ve got so many ideas floating in your head for projects!!
Gosh, it looks so darn professional! Haven’t even started mine yete, hopefully it’ll be done in time for blog conference season!!
Trisha D. recently posted…Custom Blogger Redesign + Branding for The Glittered Barn LLC
I’m so excited to see what you do with yours Trisha! Promise me you’ll share pictures!!
Wow, Kristy! This turned out be-a-utifully! I’m so impressed that you did this all with a vinyl stencil, too. I have no doubt Earl will treasure this personalized geekified gift for quite some time. Another incredible project (and feature photo) from you, girlie. She’s on a roll, folks! She can’t be stopped!
Lauren @ The Thinking Closet recently posted…Chill Pills Gag Gift & Silhouette Giveaway
Yay for impressive feature photos! I really think that the tile backdrop is doing my photos wonders. Now I just need to pick up a few more so that I’ve got several colors to play with! For <$2 at home depot, I can't go wrong! And honestly, this project could not have been done without the vinyl stencil. I can't imagine how I would have been able to get those crisp, clean lines!
Kristy,
Your project turned out great. I bet your hubby was happy with his birthday gift. Karen Marie Kedzuch
Dragonfly & Lily Pads
Thanks Karen! All signs point to yes on the happy part. (He’s not the most expressive person).
WOW What a great tutorial, Kristy! I VERY much appreciate your many step by step photos. For a newbie like me, having even the smallest detail photographed helps so much. Until I’m more knowledgeable about handling vinyl & have some experience to draw from, I need to know everything!
Dee L recently posted…Simple and Creative Eggs for Easter 2014
Thanks Dee! Even though I’ve worked with it before, I still like seeing all the photos. Visual reinforcement for the win! Plus, even though I learn a lot by reading, I’m still a very visual and hands on learner. I’m glad you like the photos too!
To etch some glasses.
Glass etching is so much fun! Good luck in the giveaway! *fingers crossed*
Great project! If I won I would love to make some super hero emblems for my son’s room!
How fun! I’ve seen some great inspiration with superheros, especially since Avengers came out!
My husband I would love to do something similar for him.
Rachelle, I’m sure he would love it! Mine did, and I think he really likes having something with a little bit of personality in it for work.
[…] that you’ve got your Gallifreyan name all ready to cut, check out the gorgeous notepad holder Kristy made with hers at Please Excuse my […]