

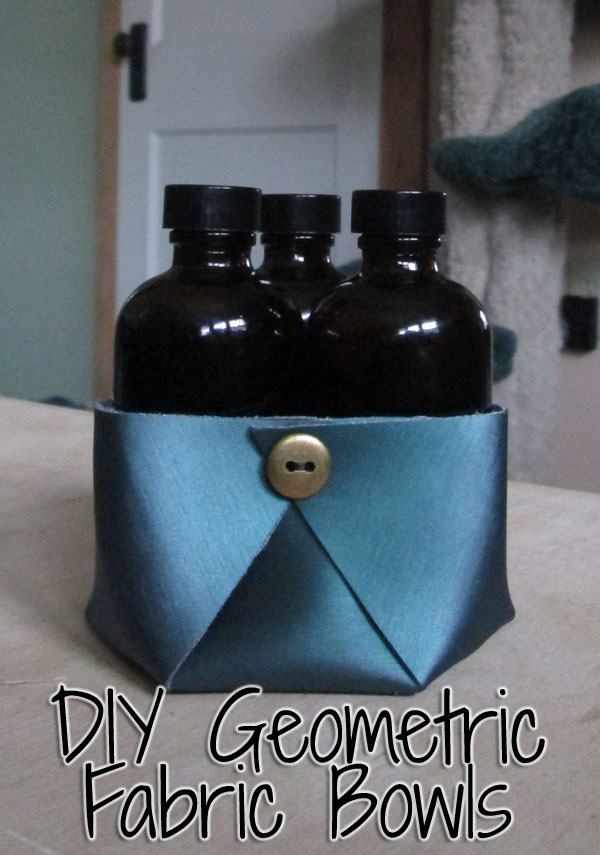
Ready for a finished tutorial on a Monday? I hope so, ’cause that’s what we’ve got today! Today’s post is part of the Silhouette challenge, so don’t forget to check out all the other great blog posts linked at the bottom! First, I’ll start you off with a picture of the lovely bowls that Earl and I made this weekend, then a bit of back story, and finally I’ll finish off with the tutorial on how to make them. Here’s your picture!
I know what you’re thinking: “That’s a sewing project, Kristy, it’s not a silhouette project.” Au contraire mon ami! The silhouette does so much more than just paper. But, you already knew that. What you might not have known is that you can use it to score the nice felt backed vinyl you can find at your fabric store. That’s what makes this a silhouette project!
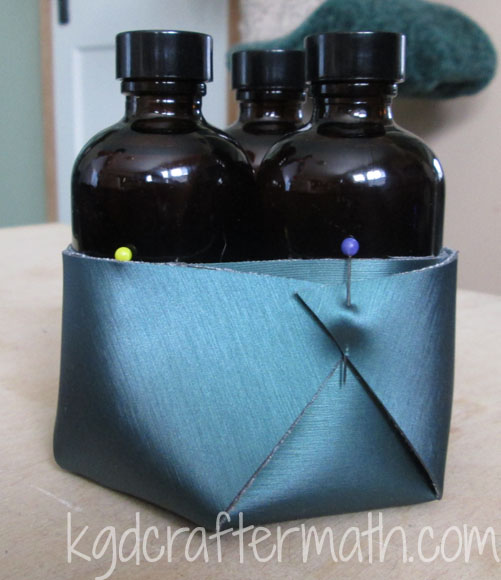
But first, the inspiration! As you all know, I never create in a vacuum, and I like to give credit where credit is due. This project started as a problem. You see, Earl and I are making something in those 8 oz bottles modeled above for Christmas. No, I won’t tell you what, they’re presents. But, each person we’re giving them to is getting 3, and I wanted a way to hold them together. I thought about all sorts of different ways to create baskets or bowls, and even knit up a bowl to felt. The bowl took me 3 hours to knit though, and I need to make 24 of them, so that was a no go. I went to pinterest for inspiration, and what did I find but these gorgeous leather bowls by Between the Lines! They even had a link to their inspiration, which was a heavy felt bowl!
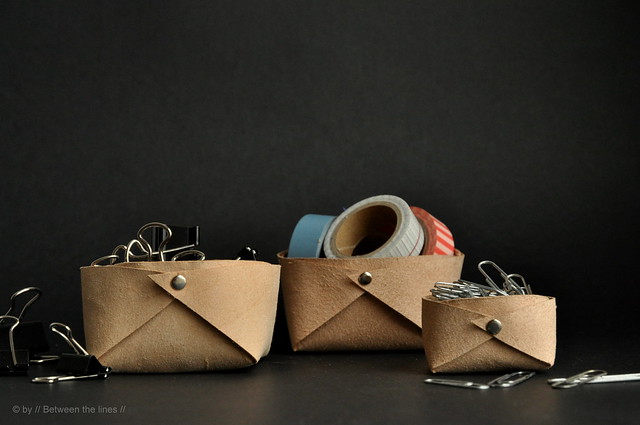

I can’t find the original blog post for the felt ones, but the picture explains the concept relatively well.
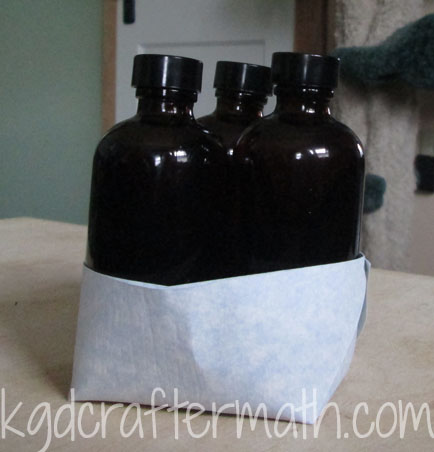
I fell in love with them instantly. They are beautifully made, very simple to do, and fit what I need just right. There was one problem though: leather is expensive. I just can’t afford to get as much as I would need for 24 bowls. For that matter, industrial felt is also wicked expensive. I tried to stiffen some felt myself, but I wasn’t really happy with the result. My biggest concern was that since I used water soluble glue, it could easily wash out if the bowl got wet, which is not inconceivable considering the contents. My silhouette also failed to cut through the felt, and I knew I wanted to use it to cut out the bowls. (FYI – silhouette can cut felt in general, just not the stuff I was using. Check out Cutesy Craft’s post on the topic for more info!) See, I don’t know about you, but cutting geometric shapes is not my forte. We ended up doing the hexagon bowls, and even with a pattern, I would have screwed it up, and the bowls would have come out lop sided. Clothing patterns? No problem. Straight lines? With angles that aren’t right angles? You want me to do what now? Yeah… that’s not happening.
This prompted a visit to SR Harris, my local fabric outlet. I love SR Harris because they have a wide variety of good quality fabrics, and almost everything is 50% off. To be honest, I went in looking for heavy duty felt. I didn’t find it. I did find some really nice felt backed vinyls, and the price was perfect! All told, I purchased 1 2/3 yds for ~$15. I also went through their buttons and counted out 72 of the same button. O.o This was no small feat, as all their buttons are mixed in plastic containers. So… many… buttons… I went home, did some testing with the fabric, and verified that yes! The silhouette will (mostly) cut through it! With my material in hand, an some nifty graphics, I set forth to make my own bowls!


Ok, back story over, now it’s tutorial time! If you want to make your own geometric bowls, here is how you do it. I did hex bowls that end up to be about 4″x4.5″x2.5″. You can download the cut file and .pdf patterns here.
The Materials

Fabric. Each hex I cut measures ~ 8.5×9.75 I used a total of 1 2/3 yds for 28 bowls
Buttons (Optional – I used 3 for each hex)
Cutting mat and straight edge
Rotary blade
Fabric scissors
Silhouette mat (I used a 12×24)
Thread (I used a heavy duty upholstery thread)
Something to attach the buttons (I thought about using twine, but ended up using the upholstery thread.)
Step 1: Prep your fabric


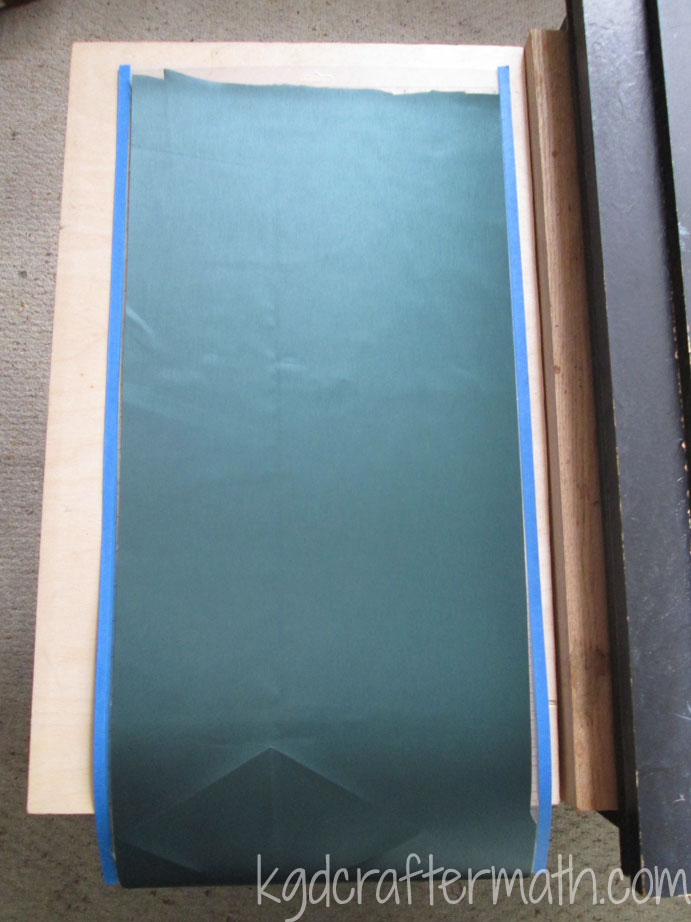
As much as I would love to just send the fabric through the silhouette as is, You just can’t send 1 yd of fabric through the silhouette. I cut all of my fabric into strips that were 12″x36″. Yes, the strips are longer than the cut mat, but that’s ok. Honestly, it’s just the 12″ width that matters. And yes, that’s Earl helping out with the project! He usually does. *warm fuzzies* 🙂
Step 2: Set up your cut file.
We tested everything in paper first, and found that we liked the ~8.5×9.75 hex size best. Any smaller and the three bottles wouldn’t fit. We also discovered that the pattern worked best when the inner base was .45% of the full shape. If the sides are smaller, the corners don’t meet. I imagine you could do larger sides if you wanted. With the above size hex, the walls hit right around the 2/3 mark of the bottles, which was pleasing to the eye. I did try the square bowl as well, but the bottles didn’t really fit well and end up warping the square. The larger the hex is, the more you can pull the sides in to make the flower like shape in the inspiration post (assuming you want a small opening). I liked the straight edge look of the hexes we made.


I also did some math to figure out the best way to fit 12″ strips on our vinyl and get as many hexes as possible. I can fit 4 hexes on a 12×36. You can download my cut file here. Both the square and hex shapes are there. You could theoretically do this with any even sided geometric shape. Anyone want to do an icosahedren (20 sides)? What matters for the sides is the ratio of center to wall, so it’s easy to re-size the cut file for your needed size. I staggered 2 hexes on the cutting area – you’ll see how to get 4 out of that in a moment. You can use 9″ strips as well, you just won’t be able to stagger them. (Note that the inner color does not cut, and is just there for sizing purposes.)

Step 3: Cut one side of your vinyl
When laying the felt backed vinyl down, make sure the felt side goes onto the mat. If you do it the other way, the blade doesn’t cut through the vinyl. After aligning the fabric, send it through the silhouette. You will notice that the blade doesn’t cut all the way through, but it does score through most of the fabric. This was the key for me – it made the whole process *so* much easier. My mat ended up slipping a bit after 4 successful cuts (which told me it wasn’t the fabric), but my Silhouette friends set me straight and suggested I used painters tape on the sides of the mat. It worked like a charm. Thanks guys!
I forgot to tell you my cut settings! I used the fabric blade set to 10, Speed at 3, and Thickness at 33.


Step 4: Cut the second side of your vinyl
Remember I said you could get 4 out of the vinyl? This is how I did it. Once the first side was cut, I removed the fabric and flipped it so that the uncut side was now at the top of the sheet. Since the hexes are staggered, this places the already cut hexes in a staggered fashion to where the new hexes will be cut. Then I sent the fabric through the machine and cut out the second 2 hexes. Here are some pictures to help explain. Of course, none of this is necessary if you are just making one bowl. Also, make sure to double check all your measurements so you don’t have an overlapping cut!
If you can fit more than 4 shapes along the length of your fabric, you can re-position the fabric by pulling it upward instead of flipping it and then start a new cut. Stay tuned, as I’ll go over that this Friday.


Step 5: Cut out your fabric with scissors
Now that everything is scored, it’s really easy to go through with a fabric scissor and cut along all the score lines. Just cut in from one of the sides to a score line, fold the fabric, and follow the score. Make sure to cut along the outside of your shape as well as along the radiating lines towards the middle.


Step 6: Assemble the inner part of the bowl
Ok, now we’ve hit the sewing part. But don’t worry, it’s really easy. If size matters, do the following steps with pins first to make sure you will have the right size opening. Here is my pinned version (look at the next few pictures to see how I got there).
First, you need to sew together the ends of every other triangle to make the inner wall. Pull the corners together and overlap them. The more overlap you have,the more petal like it will appear, but the smaller opening you will have. You can see the amount of overlap I used below. Earl did a fit test on all of the boxes to make sure he wasn’t making them too small before sewing. On the inner triangles, Earl stitched across the overlap since it will be hidden later. You might have to finagle a bit to get it to go through the way you want. The overlaps don’t have to make a straight line either, so if they tilt in a bit that’s OK. Do this for all 3 of the inner wall triangles.


Step 7: Assemble the outer wall.
For the outer wall, you are going to pull. up the remaining triangles. The overlap here is going to be less than the previous step. I made sure all my edges were straight and hand stitched the buttons on with doubled up upholstery thread (5 passes) to secure the bowls together. I chose to stitch right through both the inner and the outer wall, since the size of the two walls is so close. You could just stitch through the overlap and not the inner wall if you had a larger difference between the walls. For me, it was more important that the basket was sturdy.


Fin!
That’s it! Your bowl is done! Aren’t they just so elegant in their simplicity?

Here’s some mid-project craftermath. I’ve still got some buttons to sew, so it doesn’t seem fair to call it completely over yet.

Of course, we’re making 24 total, so that was a lot of bowls. O.o Once we got into a rhythm, they went by pretty fast. Cutting the bowl took less than 5 min (silhouette + hand cutting), sewing it took maybe another 2-3, and the buttons took the longest at ~5 min. So, 20-30 minutes a bowl. A heck of a lot better than 3 hours+ a bowl! We’re not done yet, but here’s a bit of what we did do! They kind of look like lots of tiny hats. 🙂

I’m really happy with the outcome, and so excited to give these as gifts. Of course, the real gift is what’s inside those bottles! Sorry, you will have to wait till *after* Christmas to find out. I know, I’m such a tease. I’m also really glad that I was able to use my silhouette with these; the straight, accurate lines really make a difference for this project!
Thanks for checking out my geometric bowls. Be sure to look through some of the links below for more inspiring projects!

Want to Check Out More Silhouette Projects?
My Silhouette Challenge buddies are all sharing projects today on their blogs, so peruse the links below for a blog-hopping good time.
Silhouette Challenge: Time Zone Bathroom Art by Nearly Handmade
Santa’s Christmas Countdown by Tried & True
Nautical Anchor Pillow Tutorial by The Thinking Closet
Christmas Card Ornament with Free Cut File by unOriginalMom
Thanksgiving and Christmas Dual Sign by Architecture of a Mom
Itching to Etch by Get Silvered
Snowman Tag ~ Silhouette Challenge by Whats Next Ma
Thanksgiving Sign by Chicken Scratch NY
DIY Horse Silhouette Pillow by Rain on a Tin Roof
Sketching on Fabric by The Sensory Emporium
Paper Leaf Garland by Lil’ Mrs. Tori
DIY Blessing Board – Silhouette Challenge by One Tough Mother
Christmas Pillow by Create & Babble
Glass Painting with Reverse Stencils by Givemeapaintbrush
Chalkboard Thankful Tree by Cutesy Crafts
Bottoms Up! MYO Wine Tag by From Wine to Whine
‘Happy Holly-days’ Tags for the Swap by An Elegant Touch…
Thank You for Dinner (Card) by Everyday Paper
Advent Star Christmas Countdown by My Favorite Finds
Paper Carnival by Home At Eight
Silhouette Cameo Tutorial: Dual Sided Business Cards by Black and White Obsession
In Case of Emergency Baby Bag Tags by Tossed Salad Life
Christmas On My Mind by Creative Turn
Jingle all the Way! by My Paper Craze
Christmas Lights Garland by Making Home Base
We Are Thankful by 4 You With Love
Seattle Skyline Silhouette by Sowdering About in Seattle
DIY Stenciled Mugs by Coley’s Corner
Do you have a Silhouette machine?
Looking for Silhouette inspiration, support, trouble-shooting? Interested in joining us for our group posting event next month? Then, we’d love to have you join our Silhouette Challenge Facebook group. To join, simply fill out the new member request form, and Lauren from The Thinking Closet will get you squared away.


I like to link up here.
Affiliate links help me keep this blog running. Thanks for using them!
All opinions expressed on this blog are always my own.
These are awesome! I’m definitely going to remember this for gift baskets. Great job!
Thanks Kirsten! I hope that you can find a great use for them. They are really easy to re-size to fit whatever you want as well, though if you were to go much bigger than the ones I made you wouldn’t be able to use the Silhouette for the straight lines. 🙂
Wow. Just wow. I never would have thought to make fabric bowls! They are awesome!
Thanks Rachel! I’m so glad I found that leather tutorial, it helped me so much in finding something I could do for my bottles!
Thing I loved about this post:
-Your writer’s voice – – so friendly and welcoming. It’s like we’re just chatting over coffee!
-Your backstory! I write backstories to my posts, too, so I loved learning more about your inspiration and process of choosing your supplies.
-I’ve never heard of felt-backed vinyl before! Thanks for blowing my mind with that little detail.
-I’d totally dig through an assortment of buttons to find 72 of the same type like you did. In fact, I feel like that’d be a FUN challenge!
-I love that Earl helps you with your projects; what a guy!
-The outcome! They look SO SO SO elegant. And modern. And unlike any bowl I’ve ever seen before. I cannot wait to hear what the contents will be…you definitely have piqued my interest!
Thanks for joining us for this month’s Challenge and for inspiring us with your creativity, Kristy! As well as all the work you’re doing behind the scenes to help our group run smoothly. I appreciate you!
You write the best comments Lauren, I need to take commenting lessons from you! I’m so glad that you like my writers voice, I’m always worried my blog posts will come across like my academic writing (way too proper for this type of blog!).
I’m actually going to have to go back and get more buttons. I had only planned on 24 bowls, but we got more out of the fabric, and I only had 1 un-salvageable cut from the mat sliding – so it’s back to button hunting I go!
I do have to say that Earl is an integral part to all of my crafting. It would probably be more accurate to say they are our projects. 🙂 Sometimes he gets annoyed at me when we are at a stage where he can’t help! Usually, he’ll wait patiently and play a game or work on his cross stitch when that happens. Or do housework. I’m so lucky to have him around.
What a great job! It would make a great way to dress up presents! Cheers!
Thanks Randy! You can get all sorts of looks by switching around the vinyl color/pattern and the buttons as well. I was having a really hard time choosing the fabric I wanted until I found this particular one, the grain and the color are really just my style. Plus, I really like simple metal buttons. 🙂
Really like those bowls and the flower. Nice job.
Thanks Lynne! The flower is one of the inspirations, so it’s not mine, but I’m planning on doing that with some of my left over vinyl. We ended up having enough for 30 bowls (+1 that was un-salvageable), so I’ve got quite a few extras to play and experiment with!
These are simply amazing. I like how you showed us how to work out the sizing – it’s a great tute. The bowls are divine – can’t wait to see what goes in those bottles!
Thanks Pam! I hate to be coy, but you really will have to wait till after Christmas. I promise to get the posts together ahead of time though! That way I can post it sooner rather than later after the gifts are given. 🙂
On the note of sizing, I realized that I should put something in there on figuring out what size you actually need. I’ll edit it and add pictures later, but basically I put my three bottles on my cutting mat and realized I needed a ~3×3 square. The inner hex of the size I used was ~4×4.5, which allowed for the walls to come in just enough to overlap. Of course, as you saw above, figuring that out was a bit of trail and error. 🙂
Me and this article, sitting in a tree, L—G-R-N-I-NEA!
Wow, great idea!
Thanks Glenna! I’m so glad you like it. 🙂
WOW, I never would have thought to use my Portrait to create bowls like these! You are so clever! Thanks for inspiring me!
I love to inspire and be inspired, so your comment is especially heartwarming to me. Thank you!
Very impressive work on your bowls! I’m totally obsessed with the metallic teal color you chose!!
Thank Trisha! I am too. In fact, I was having a really hard time picking out the vinyl. There were some nice dark brown ones, and a few that looked like really pretty engraved leather pieces. But then I saw this teal, and it just screamed at me to choose it (in a nice way). I’m so glad I ran across it!
Kristy, these bowls are amazing. They are really beautiful. The people getting these as gifts are a lucky bunch.
Aww, thanks Valerie! I really hope they enjoy them and can use them for years to come. 🙂
I love seeing all these new ideas. I had a terrible experience cutting flannel that scared me away from fabrics, but this is an awesome idea!
Thanks! I can see how the machine wouldn’t like flannel. Even with cotton it occasionally catches on me. The nice thing about the vinyl fabric is that there aren’t really any threads for the blade to catch on! You should give it a try if you are so inclined, you might be pleasantly surprised!
Kristy – These bowls turned out great! They are perfect for the upcoming holidays. 🙂
Thanks Tori! They were so easy to make in the end too! I sort of want an excuse to make more. 🙂
[…] Geometric Fabric Bowls from Please Excuse My […]