

It’s been a bit quiet around here this week, and I’m really happy about that! It means you all are spending some quality time with friends and family. I have been too. In fact, last night I had some friends over and we had a wonderful Thanksgiving dinner together. Fun times were had by all. Today Earl and I did a bit of shopping, took a break, and then worked on our Christmas cards. Don’t worry, you’ll get to see them in time. Today I wanted to share a new tradition with you though! In the end, I was able to convince Earl that we should start making our own ornaments, one each year. We don’t put up a tree right now for space reasons, but eventually we will. My mother has been giving us one really nice ornament a year, and now we can supplement those with our own handmade ornaments! When we looked at ornaments Earl’s favorites were the ones that looked like little terrariums. We used those as a jumping point, and this is what we ended up with!

Materials

Box of glass ornaments (there were 6 in our box)
Mini pine cones
Fake branch of berries
White paper flowers
Fake Moss
Etching cream
Gloves
Q-tips
Silhouette spatula
Silhouette hook
Scissors
Stencil vinyl and transfer paper
Paper towels
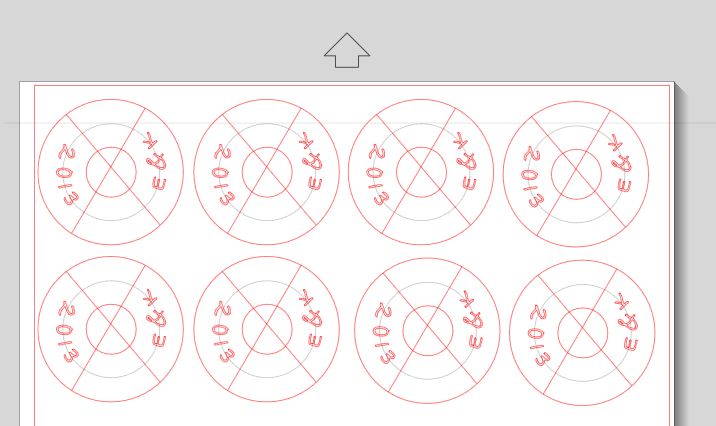
Step 1: Make your stencil
To make the stencil, I created a cut file in Studio that had the smallest diameter up top and then created a second, wider circle with a width that seemed about right. Next, I created a circle between those two which I could use as a path for my text. Once I had one of my text boxes written and then selected, I dragged the box to the center circle to use as a path. You can see a You tube video of the process here. Below is an image of what my cut files looks like, which you can download here if you want. Then, I cut the file out in stencil vinyl using my Cameo.
Step 2: Apply the stencil
I wasn’t able to get the shape just right, so there was some puckering when it was applied. Just make sure that there isn’t any puckering around the parts that you will be etching (the numbers and letters for my project). I found that it was easiest to weed (or remove the unwanted bits) everything but the part of the stencil I was transferring before moving it to the glass. With some of my other projects (particularly with cloth or very detailed cuts), I sometimes weed after I’ve transferred or do a little bit of weeding before hand and then some weeding afterwards.

Step 3: Apply the etching cream
First, make sure you are wearing gloves when you do this. I like nitrile gloves and happened to have a bunch around the house. Second, the stuff stinks (and isn’t particularly good to inhale too much of), so do this in a well ventilated area. To apply the cream to the ornament, I used a Q-tip. Make sure that you don’t go over your stencil onto the outer part of the ornament. You can give yourself wider borders in your silhouette file if you want.

Step 4: Remove the etching cream
Let your etching cream sit for at least 30-60 seconds. I let mine sit a bit longer. Then, use a spatula type tool to scoop up the etching cream and return it to the bottle. Remember to be careful and not go over those stencil edges! Then wipe whatever cream is remaining off with a paper towel.

Step 5: Rinse the ornament and remove the stencil
Rinse the ornament in water and dry it with a paper towel. Then use the hook tool to remove the stencil from the ornament. You want to make sure that your ornament is completely dry before moving on to the next step, especially the inside of the ornament!


Step 6: Adhere the moss
The moss is the only thing inside the ornament that is glued down. I used a bit of mod podge on the bottom and used a Q-tip to apply it to the bottom (I did have to hold onto it with tweezers to reach the bottom though). Be careful not to get any on the sides of your ornament, as it will dry white! This is also why you don’t want any water in your ornament at this time. Then, push some moss in through the opening and press it firmly into the mod podge in several places with the back of a pen so that it sticks.

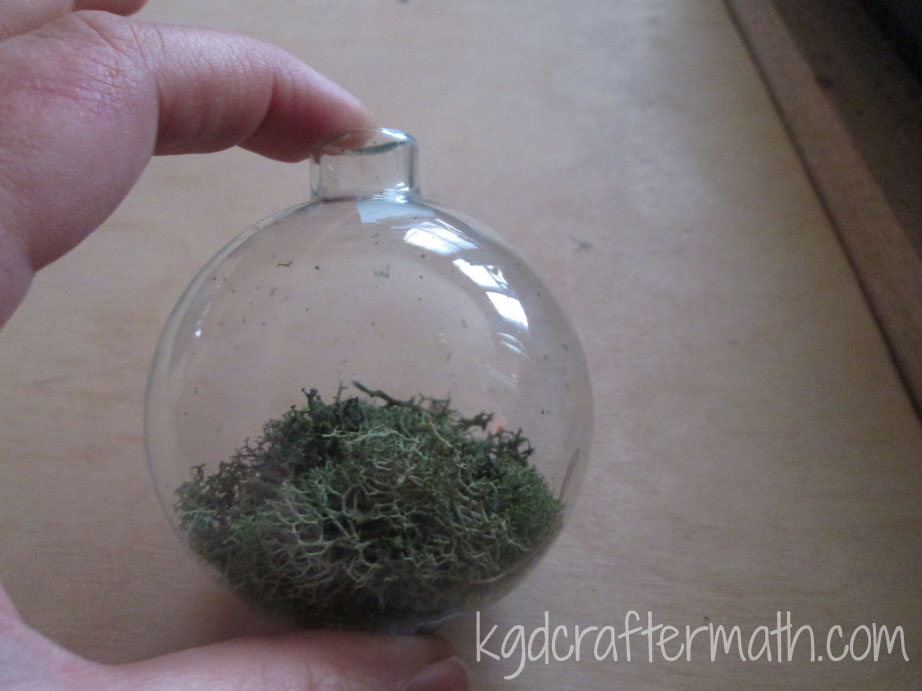
Step 7: Fill your ornament
The next step is to add the filling bits! We put in 2 white flowers, 5 pine cones, 1 bunch of berries, and 2 thin pieces of stem (in that order). The stem came from the more flexible ends of the white flower stems. We cut the stems into thirds and used the top two pieces. I just put one end in, and then slowly pushed it in so that it wrapped around the bulb until the entire piece fit in. Then the tension held those pieces in place. Be careful when stuffing the flowers and berries in, as they need to compress to fit through the hole. Then cap it back up, add a hanger, and you’re all set to go!


That’s all there is to it! New tradition added to the list! We have a few, but it’s always nice to add one or two more. I hope you enjoyed this tutorial! Do you make any ornaments yourself?
Edited to add: I forgot to show you the craftermath! Don’t mind the food and drink near the chemicals, those came after I finished the project. I promise!


I like to link up here.
Affiliate links help me keep this blog running. Thanks for using them!
All opinions expressed on this blog are always my own.
Whoa, Kristy! What an amazing concept – – terrariums + etching = fantasmagorical Christmas decor! (And I love that this may be a tradition for you guys.) Well done!
And to answer your question, yes! I’ve been busy with some ornament projects myself – – next on the list is going to be glamming up some pinecones! We shall see how it goes tomorrow….
Hope y’all had a very happy Thanksgiving! Enjoy the rest of your holiday weekend.
Fantasmagorical – I love it! I’m so glad that you enjoyed the project!
Glamming up some pine cones, eh? I can’t wait to see it! Have you seen the bleached pine cones Craftberry Bush made yet? I had wanted to do that with my mini pine cones, but it didn’t seem worth the effort because they were so small!
I have thoroughly been enjoying my Thanksgiving weekend (and yes, it lasts the whole weekend)! I hope you have been too!
These are adorable!!!
Deanna recently posted…Big Sister Gift Guide