For my challenge I wanted to work with vinyl since every one says how wonderful it is. While I’ve read that the silhouette vinyl is much nicer than other vinyls, I used Oracle indoor vinyl as they have a better color choice. And that mattered for my project! I was inspired by a pin I pinned on pinterest (too many pins?) of a vinyl back splash. It’s a really pretty quarter foil print. The original post at Landeelu seems to be gone, but you can see the pin image below.
Landeelou vinyl backsplash
Step 1: Inspiration
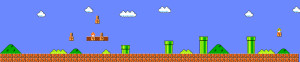
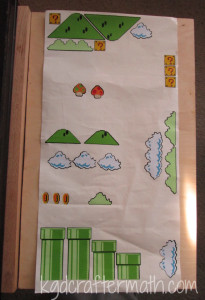
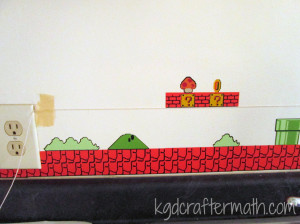
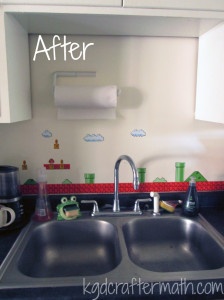
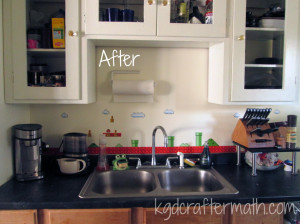
But, I couldn’t just stop with a simple repeating back splash, could I? Nope. I had to go for something a bit more… me? nerdy? fun? All of the above. Since back splashes are long and thin, I immediately thought of side scrolling video games. And what’s more iconic than Mario Bros.!? So, off to work I went, hi ho, hi ho, and all that. I decided to work with just the first level of Mario Bros., so I went and found myself a screen shot of the level. You can see the image below, but I didn’t need nearly that much for my back splash. So I sized it to the right height and cropped out everything I didn’t need. It worked wonderfully, since I only needed up to the first drop off in the game!
Step 2: Photoshop Wizardry
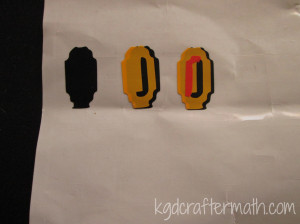
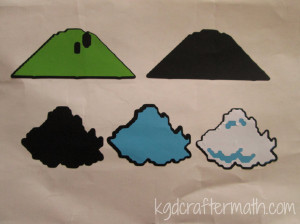
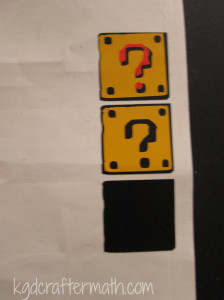
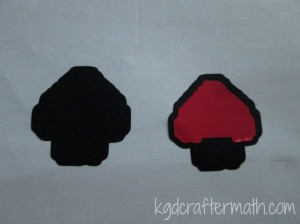
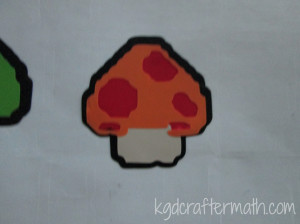
Once I had a screen shot, it was off to Photoshop I went. (See what I did there?) I won’t bore you with the details, but suffice it to say that the original Mario is an early 8-bit game, so it uses pixel blocks and relatively few colors. I just separated out shapes by color and spent some time thinking about negative space. Why negative space? Well, it turns out it’s easier to use negative space and layer than to make all those little bits separately. You’ll see what I mean in a bit. Here are all the shapes that I needed for my Mario back splash:
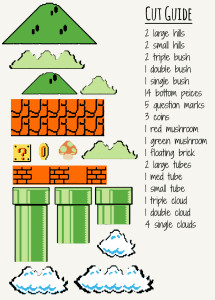
You can see how I simplified some of the shapes a bit, such as removing the light orange on the bricks. I was just worried that that I was doomed to failure with that particular layering trick.
The colors there are also based on the vinyl colors I chose, which were pretty close to the originals, but not quite exact. I used either Oracle 631 or Mactac 12×24# vinyl sheets, all of which I purchased from Just For Crafters. By using those colors in my shapes, it was easier for me to lay out my shapes by color in Silhouette Studio. The yellow below is the only Mactac sheet I used.

Step 3: Silhouette Layout
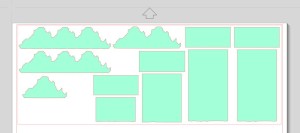
I had 10 Colors, which means 10 sheets of vinyl! I purchased 20 though, just in case I messed up. Thankfully, I didn’t need any. To lay out the images in silhouette, I first made a master file of all my shapes. This consisted of saving each layer in my Photoshop document as a different .jpg, importing it into Studio, and using the trace feature to create the shape. Once I had all my shapes in studio, I set it up just like my Photoshop file. Then, I created a separate studio file for each color and made sure to put as many of each shape into the file as I needed. I also cut a box around each group of shapes to make weeding easier. The only one that came close to needing two sheets was the black. Here’s what my light green file layout looked like to give you an idea:
Side note: I keep waffling back and forth about whether or not I want to share my silhouette files with you. Mario Bros. is copyright of Nintendo (with which I have no affiliation), but they are one of the companies that are generally more accepting of fan art, which this is. They state on their copyright page that while they have a blanket policy to deny permission to use their work, they don’t have a problem if you do so long as it fits within relevant laws. And since the US is still in this weird denial that fandoms exists, the laws pertaining to screenshots and copyright are pretty much non-existent. From what I’ve seen, it really comes down to how the company feels. For the moment, I have decided that I need more time to think about sharing this particular file since I can’t change my mind once I put it out there. That might change in the future, but for now please accept this explanation of why.
Step 4: Cutting the vinyl
For the most part, cutting the vinyl went as smooth as pie. The only hiccup I had was with the black detail for the bricks. I was able to pause the machine and slow down the speed to 4, and that worked beautifully. I only had to re-cut the one piece. Well, that and I forgot to tell it that the yellow vinyl wasn’t on the cutting mat, and so it cut all the way through the vinyl! Another easy fix, as I just cut off the bad part and started again. At least I caught it right away! Please excuse the lack of picture here, I lost the SD card with the pictures of the cut vinyl on it. :(
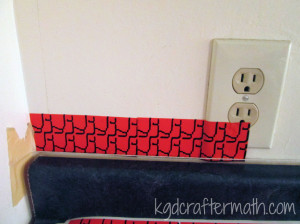
Step 5: Layering the vinyl.
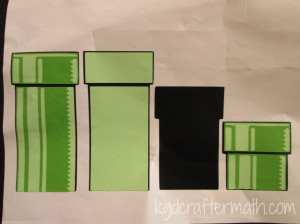
Next up came layering. I’ll show you how I layered each piece so you can get an idea of what I meant by negative space before. This is better done with pictures, so I’ll keep my chattering to a minimum here. The only ones I don’t have are the black and red, where the black detail was layered on top of the red block. I used my transfer tape a lot for this part.
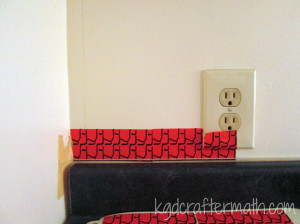
Once you have all of the vinyl layered, you will have 2 sheets of vinyl that look something like this:

Step 6: Prepping the wall
Once all the vinyl is done, it’s time to clear the counter tops and clean the wall. So bonus, this project means you clean your counter tops!
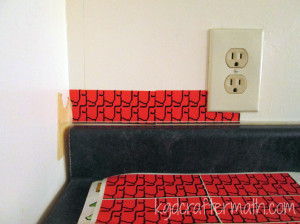
Step 7: Placing the bricks
I started by using the transfer paper, but realized that I didn’t need to since the shapes were pretty solid. After placing the first piece, we realized that we needed to use a string level since our counter tops themselves weren’t quite level. So, my engineer husband got to have fun with measuring. Goody!
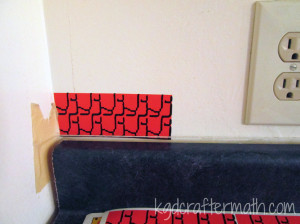
For the outlets, we simply cut around them carefully with an X-acto knife while it was on the wall. With some careful measuring, I could have had the cameo do this for me. I like this way better though, so you have some wiggle room in alignment.
Step 8: Ground cover
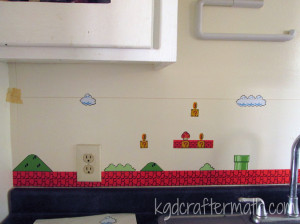
This next step got a bit tedious, but thankfully I had Earl to help. He counted the number of bricks on the image and told me where to place each ground piece. The first one was easy, since it was right at the start! We only had 1 piece that started on an outlet, and we were able to count back from the end since it was so close.
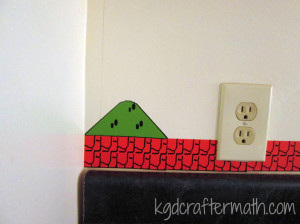
Step 8: Stuff in the air
The best thing to do here was to align things in relation to pieces that were already down. The first set of bricks was in line with the height of the second tube. Then, some of the extra blocks were aligned with the largest tube. I’m not sure how Earl figured out where the lower clouds were, but hey, it worked! And the final cloud cover aligns with the middle of the first cloud cover. You can see some of the alignment process below, note the continuous use of that string from before!
Step 9: Enjoy! (And put everything back!)
And then we were done! I was surprised that it only took about an hour to put it all up. That’s not counting the time I spent designing, printing, and layering the vinyl, but I still expected it to take longer!
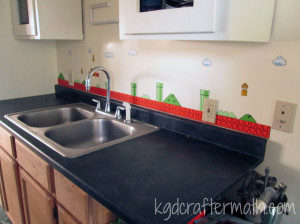
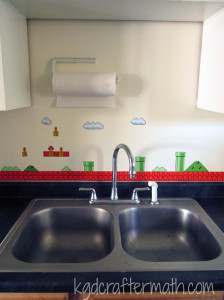
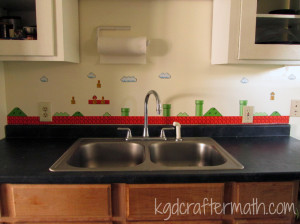
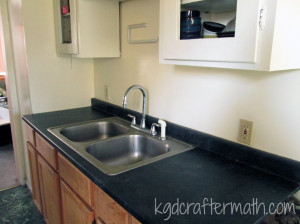
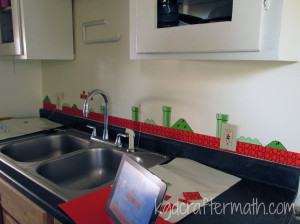
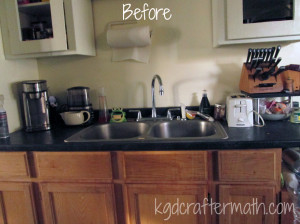
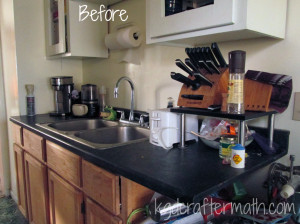
Here are some before and after shots of my kitchen to give you an idea of the difference:
It was a ton of fun and adds a bit of personality to my apartment. Plus, the vinyl comes off clean (I already tested this), so it’s really landlord friendly!

Ready for more fun? Head over to these other Silhouette Challenge posts!
Crafting with Glitter Just Got Easier by Create & Babble
Birthday Invitations Homer Simpson Style by Black & White Obsession
DIY Planner Dividers by The House on Hillbrook
3D Haunted Forest by Chicken Scratch NY
Pumpkins and Peacocks Fall Mantel by joy & gladness of heart
DIY Cheers Garland by Rain on a Tin Roof
Wedding Gift Wrapping by It Happens in a Blink
Glitter Monogrammed Pumpkin by unOriginal Mom
Halloween Family Rules by Tried & True
Faux Stitched Speech Bubbles by Get Silvered Craft
Halloween Spooky Eye Luminaries by A Tossed Salad Life
Addressing Invitations with a Silhouette Cameo by My Favorite Finds
Halloween Party Treat Bags by The Thinking Closet
“Create” Wooden Pallet by Lil’ Mrs. Tori
Spooky Halloween Bats Garland by TitiCrafty
Decorated Pumpkins by Tanya’s Creative Space
Cute Wedding Card by Zanaree
Learn to Tie Your Shoes by From Wine to Whine
Fussy Cutting Making You Fussy? by My Paper Craze
Cut Fabric With Your Silhouette by Cutesy Crafts
Cookie Lee Jewelry’ Gift Bags with a Purpose: Sharing Thankfulness by An Elegant Touch
Halloween Banner by Sowdering About
Interested in joining us for our group posting event next month? We’d love to have you. Simply fill out the new member request form, and Lauren from The Thinking Closet will get you squared away.
]]>If you play Dominion, you are familiar with the storage issue. Currently there is the base game plus 8 expansions, and a secondary set of base cards. This translates to 8 large boxes (12x12x3). So, you can imagine how much space that takes up! Thankfully, many people more organized than I have come up with storage solutions that cut that space down. My favorite diy solution is Drew’s Dominion Storage Solution. I started doing this once before with Earl, but we ended up abandoning it because it was just too much hand cutting. All the artwork here is Drew’s, but he’s expressed permission for people to create cut files in the past. Here’s where the silhouette comes in! I created a cut file for each of the boxes so that I could have my Silhouette do all the cutting! It still takes a long time, but much less than before.
This tutorial is uses the print and cut feature of the silhouette (which I LOVE), but you can also download the original .pdf version of the files by Drew here. I am working on creating print and cut files for all the templates along with sticker templates. For now, You can find .studio files for all the folders and the small box here. The sticker templates are annoying and forthcoming. I will defeat them!
This project was done over 4 evenings that ranged from 2-6 hours (not counting the time to create the silhouette file). So, it’s hard for me to estimate how much time it took, but it was totally worth it! I don’t have all the expansions, so I can’t confirm that all the expansions will fit in the original box this way. I think that at some point, we may switch to a different box, but for now I’m happy with the original box. Note that these are not sized for sleeved cards, though I might modify the templates if I have time for that in the future.

Materials
Cardstock. The amount you need will depend on which expansions you need (see step 1)
Double stick tape roller / glue stick / double sided tape (any adhesive really)
Printable sticker paper (I highly recommend the silhouette sticker paper, more on that below)
Step 1: Print everything you need
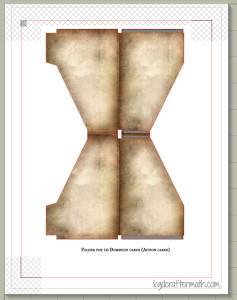
How much do you need? Well, that’s a really good question that depends on which expansions you have. Here is a list of what I needed. If you are using the .pdf versions, go ahead and print out that number through your .pdf reader (at 100% size) now. Make sure to print the labels on sticker paper. If you are using a silhouette, we’ll cut in the next step with the print and cut feature. I am working on a guide that will include all the expansions
Dominion (20 sheets total + boxes): 2-60 folder (copper, starter decks), 1-40 folder (silver., randomizer + trash), 1-30 folder (gold, curse), 2-12 folder (2 x estate, duchy, province), 12-10 folders (24 action cards)
Alchemy(9 sheets total + boxes): 2-12 folder (vineyard, randomizer), 6-10 folder (11 action cards), 1 20 card (potion)
Hinterlands(17 sheets total + boxes): 1-30 folder (randomizer), 4-12 cards (farmland, silk road, tunnel), 12-10 cards (20 action cards, 3 treasure cards, blanks)
Do yourself a favor and buy extra paper. I wouldn’t print extras unless you mess up and need to, but I needed to that and it’s better if you don’t have to go out and purchase more paper when you are in the middle of your project.
Step 2: Print and Cut.
Now can I gush about the silhouette studio print and cut? It’s awesome! I’ll be doing a tutorial later on how to turn a paper cut project into a print and cut , but for now you can just have the tiniest taste. In your studio file, you should see some weird hash marks, a box in the upper left, and then some corners. These are your registration marks. If you don’t see them, make sure to hit the registration button ![]() and check “Show Reg Marks”.
and check “Show Reg Marks”.
Once your registration marks are showing (oh my!), go to File – Print and send your file to your printer from within the studio program. If your cardstock is not coming from the regular paper tray, make sure to fix that by choosing printer preferences and selecting the appropriate choice. Mine feeds from the back tray. Since every printer’s options are different, I can’t really guide you too much here.
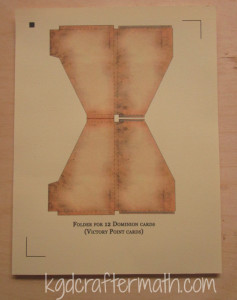
Now adhere the paper to the cutting mat, load it into your silhouette, and send the file to your machine. I highly recommend watching it register. I had a few mis-registrations that cut the paper in the wrong places. If you catch it early enough, you can pause and cancel the job. If this happens: check to make sure the lines printed correctly, turn the machine off and on again, and restart the program. It’s usually only one of the above problems, but by doing all three at once you don’t have to stop it again if you chose the wrong fix. After you remove the excess paper, you will be left with your piece! Note that all but the 60 folder template will create 2 boxes per page.
Rinse and repeat until you have all of the folders that you need. You may need to re-stick your cameo mat during this process. For the 40 card folders, the cut lines bleed outside of the registration marks. This means that you will need to finish the cut yourself either by hand with an x-acto blade, scissors, or your favorite cutting tool. I also suggest using coverstock or a heavier cardstock for the boxes that will hold all your folders.
Step 3: Assemble the Folders
Now for the mostly easy part! The print and cut file has already perforated your fold lines, so fold everything up and inwards, slap some adhesive on those grey bits, and stick it together!
Step 4: Label the Folders with the Stickers
Here’s the thing with the labels, if you are are a stickler like I am, you want everything to be alphabetized and alternating just so. This means that the templates need to be arranged depending on what expansions you have. I’ve been working on making the sticker templates for each individual expansion and for all the expansions, but I can’t customize for each and every possible combination. So, when I do finish the sticker templates, be aware of that. You’ll notice in my final image, I still need to fix my sticker templates to fit the expansions I have!
Actually adhering the stickers though is really is. It’s just a sticker, after all. I really liked the silhouette sticker paper because the clear sticker has some weight to it, so that even when the backing is pulled off the sticker is still nice and strong. Here’s a labeled folder to go with all that chatter!
Step 5: Organize and Oggle!
Or, if you are like me, organize it and figure out that you need to re-do all the stickers so that everything looks better! Never fear, when I get those downloads down you won’t need to do the perfectionist re-thinking things. Dominion storage = conquered!
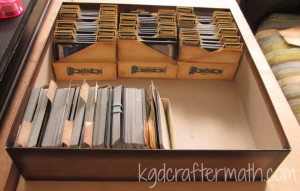
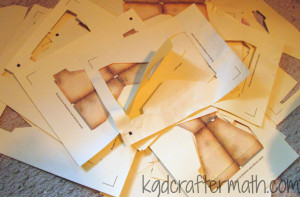
And what about the craftermath? Well, this project mostly makes a bunch of excess paper. What you see here is a pile of all the excess bits plus the bad cuts/prints. I had quite a few ![]() . I like to shred mine and keep it as bits. I’m hoping that one day I’ll have enough bits to try my hand at making my own paper!
. I like to shred mine and keep it as bits. I’m hoping that one day I’ll have enough bits to try my hand at making my own paper!
I’ll be back next Friday with downloadable templates and an even prettier picture of my own Dominion organization. See you all soon!
]]>
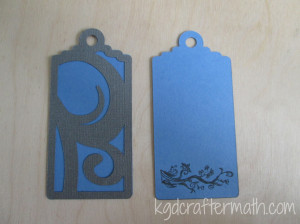
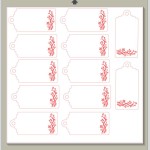
1. Go to File – My Library and open up the flourish shape.
When I opened the flourish tag shape, all 7 shapes were in the same block. Since I am cutting on two different colored peices, I wanted to make it so that only the swirls were in the first file. I also thought I could fit a few more than what is there to maximize my paper usage.
2. To separate the shapes use Object – Ungroup
This separated the 7 shapes into individual objects.
3. Select the blank tag and copy it into a new document.
To copy it, you must first go to File-New to open up a new cutting board.
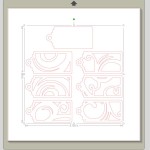
4. Arrange the boxes so that you can maximize the space.
I select all of the remaining tags (all of them will have grey boxes) and moved them to the right top of the page.
Hit Ctrl+C and Ctrl+V to paste a new set of 6 tags. You can also use Object – Replicate to do this.
Reposition the tags so that all 6 are within the white paper range. Use the green dot to rotate the images. As you can see, I comfortably fit 12 tags on one 12×12 page.
5. Go To File-Save As to save your file under a new name. You can also save directly to your library in the File menu.
6. Set up your blank pattern.
Copy and paste the blank pattern as many times as you had the swirl patterns in your previous file (I had 12). Got to File-Save As to save your file.
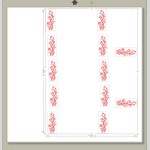
7. Open my flourish pattern from the library and clean it up a bit.
Move the flourish outside of the working area to see it better. It had an outline that I didn’t want, so I went to Object – Ungroup. Then I clicked the outside border. It looks like the whole thing is selected, but don’t worry, it’s not. Hit delete to remove that line.
To group everything back together, click and drag your cursor to select all the component pieces again. Then go to Object-Group. to group them together again.
8. Fit the flourish to the tag.
Drag the flourish back onto the page, resize it, and position it to fit one of the tags. I set mine up so that the grey border delimiting the space of the flourish sat along the tag’s border.
Duplicate as many flourished as you need to fit your cards.
9. Put the flourish in it’s own file.
Now, we need to put the flourishes in a third file since we don’t want to cut them out with the machine. So select all of your flourishes only.
Hit Ctrl+x to cut the images. Go to File – New and open another file. Hit Ctrl-V to paste the flourish. This will keep it in the same place as it was on the tags.
Go to File-Save As and save this new file. (You can also change which lines are cut through the cutting menu, but I was using an SD car originally, so I couldn’t do that here.)
10. Save to SD or send to print.
Since I don’t have room near my desktop to do this in the office, I had to use an sd card for the first time. So, I plugged in my SD card, emptied it out, and went to File-Save to SD for each file. I always empty my SD or flash cards if I am using new technology just in case there is something that doesn’t get along. Also, I really liked this feature. It detects the SD card for you so you don’t need to know the drive letter.
Overall, I would say that’s a pretty decent first contact with a software. As you can see, I was able to figure things out without too much trouble. Un-grouping was the big thing that took me a while to figure out. I tried a couple of different options first that also worked until I found that command. If I had the machine hooked up to my computer I could have put all this into a single file and just change the “cut” and “no-cut” option for each shape, but at the time there was just no room on my desk, necessitating the SD card. Up next I’ll send a “First Cuts” post your way.
This post is part of my First Cuts Series! Want to read the rest? Here’s the whole group of them!
Silhouette Cameo: The Unboxing
Silhouette Cameo: Installing the Software and Shapes
Silhouette: First Contact with the Software
Silhouette: First Cuts
Silhouette: Trouble Shooting
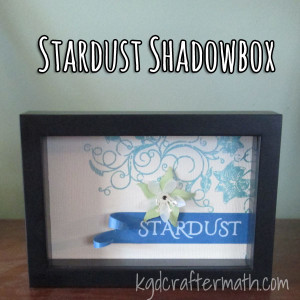
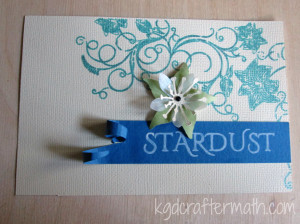
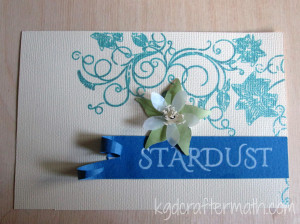
So how did I get to a Stardust shadow box? It’s a bit of a story. When Earl and I got married (3 years ago), my youngest brother Nate gave us a set of 5 shadow box frames. I really liked them, but have been trying to think of something to do with them, so they have just been sitting around. In the past few weeks several things happened that all came together nicely for this project. A few weeks ago I got my new Cameo, which has had me constantly thinking of new paper projects to do. Among those projects is a tutorial based on the paper flowers I made for my wedding. Each flower was made from the pages of fantasy books that Earl and I chose, including Neil Gaiman’s Stardust. Around the same time, The Thinking Closet did a post about making her own sketch art with her Cameo. Shortly thereafter, it all came together. I could use my Cameo to make some 3D paper art based on one of the Stardust cover art versions and put it all in one of the shadow boxes we have. I’m not sure what I’ll do with the other four boxes. Earl and I talked about doing artwork based on the other books we used or possible just using Gaiman, but we haven’t really decided yet. Rest assured, you will here about it here when we do decide.
Image source: Audible
Here’s how I made my shadow box! It’s just the directions, but I’ll add another post on how I designed the box later.
Materials:
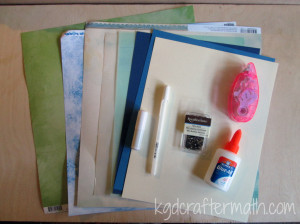
Assorted Paper:
Cream color for background
Blue for banner
White/blue/or vellum for flower
Green for leaves
1 Mini Brad
Double Sided Tape Roller
Elmer’s Glue
White Pen
Blue Pen (Not Shown)
If you don’t have a silhouette, you will also need:
A Self Healing Mat
Paper Scissors
An exact-o type knife with a new blade
Skills Needed: Cutting, gluing, and shaping paper.
Step 1: Download the patterns
If you have a silhouette, you can use these directions to work with the silhouette file I made and follow the steps in order. Otherwise, you can download a .pdf with the images and text. If you are using the .pdf, print the file out on each of your colored papers and hand cut the shapes out. With the .pdf, print at actual size, cut your shapes using your scissors and exact-o blade, and skip down to step 5. Both patterns are designed for a 4×6 image.
Step 2: Cut and Draw the background
I’m assuming that you are using 4 different colors: the leaf, the flower, the banner, and the background which also doubles as the center of the flower.
For the background, you first need to ungroup the main design. Click on the main design and go to Object – Ungroup. Now click on the cut style button in the upper right ![]() . Make everything no-cut except for your box and the center of the flower. It should like like this:
. Make everything no-cut except for your box and the center of the flower. It should like like this:
Without removing your paper, go back to the silhouette program and change your cuts so that only the floral design is being cut. Switch your blade for your blue pen, change your cut settings, and send the design to the silhouette. Here is the second cut:
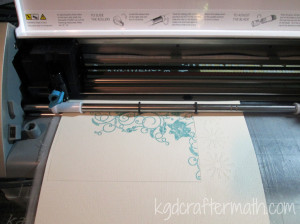
Now you can unload your paper.
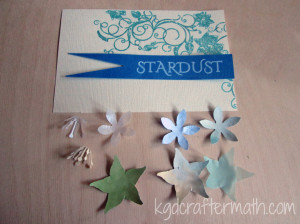
Step 3: Cut and Draw the banner
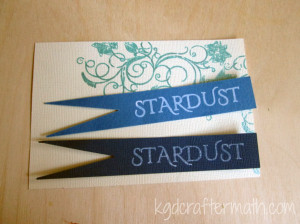
Move the main background out of the way and put your banner up top. Now click on the banner and ungroup that by going to Object-Ungroup. You will make two cuts here as well. First, set everything but the banner to no-cut. Cut your banner out of your blue paper. Keeping the paper in place, change the banner to no-cut and the text to cut. Switch out your blade for your white pen and send the design to the silhouette. Unload your blue paper.
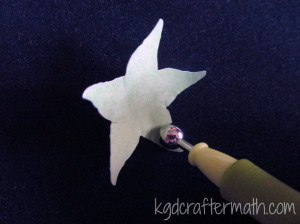
Step 4: Cut your flower and leaves
For the flower and the leaves, make sure that only the flower or leaves is set to cut depending on your paper. There is only one cut on each of these papers, so once you have cut out the shape you can remove the paper.
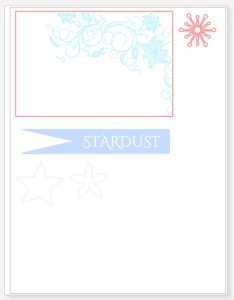
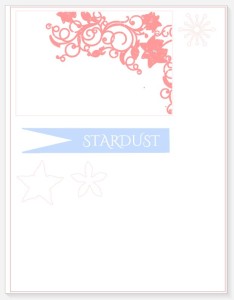
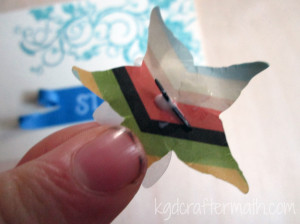
I wanted to experiment with several different colors for the leaves, flowers, and stamen. Below are all the bits I cut out with my silhouette. In the end Earl and I chose to go with the lighter blue banner, the silver velum flower, the bright green leaf, and the cream stamen.
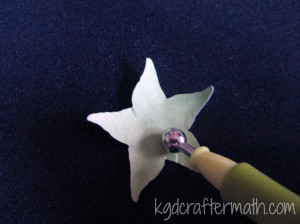
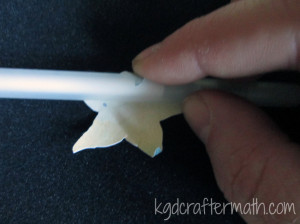
Step 5: Curl your leaves
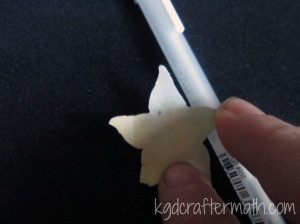
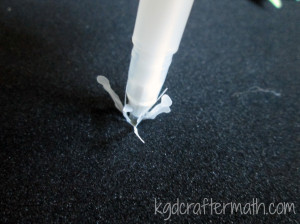
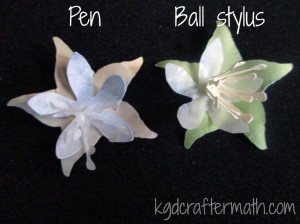
You can use one of two tools to curl your leaves and petals: a ball stylus or a pen. I used my ball stylus and foam molding mat because I like the way it looks better, but either works. I’ll show you both here.
First, you want to roll your leaves up towards the center. With the ball roller, simply place the roller near the center of the leaf and press out to the edge. Do this for each leaf. After you have rolled each leaf up, put the ball in the center of the leaves and depress the center a bit by using a circular motion. Then, turn the leaf over and roll just the tips back down. I like the rolling look this gives the leaves.
If you are using a pen, wrap the leaves around the pen going towards the center. Repeat for each leaf. Flip the leaf over and wrap just the tip in the opposite direction.
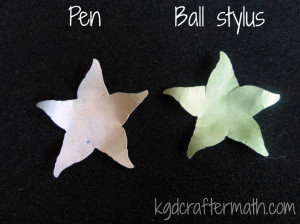
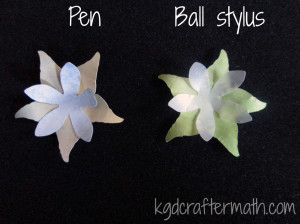
Here is a comparison photo of both methods:
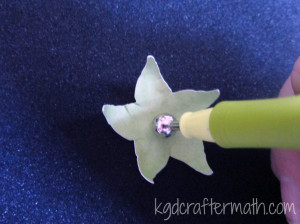
Step 6: Curl your petals
Follow the same steps as with the leaf, except don’t roll the edges backwards. Instead, press the flower down very gently with your hand to flatten it a bit.
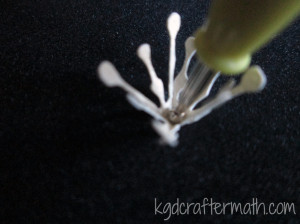
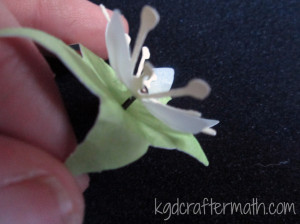
Step 7: Curl your stamen
To curl your stamen, press down the center with either the tip of your pen or a smaller ball stylus. Then pull each stamen bit up.
Step 8: Assemble your flower
Use the brad to assemble the three parts of your flower. If you cut your flower with the silhouette, there will be a hole there for you. If you printed via .pdf you will need to punch one through with the brad. If you flatten your flower as you assemble it, just re-work the shape with your hands a bit. It will be more pliable now that you’ve already shaped it above. Either way, you will probably have to pull your stamen up to the center again.
Step 9: Color in your banner and background
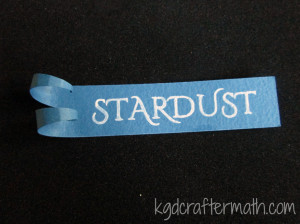
The silhouette file only colors the outline of the text. Just color inside the lines with the same pen to fill out the text. I went over the text 4 times to achieve the look I wanted. Also consider filling in some of the lines on your background scroll with the blue pen. I filled in the swoopy bits that connected the flowers, but kept the flowers as is.
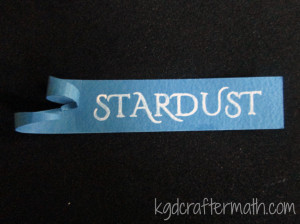
Step 10: Curl your banner
I curled my banner with my pen. After I curled both ends up, I pressed the bottom one backwards a bit and curled the top one even more with a smaller tool. Then I pulled the curl of the top one down so you could see the spiral.

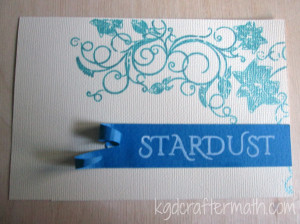
Step 11: Adhere the banner to the background
To adhere the banner to the background, I used my tape roller. I also added a bit of tape to the end of the bottom curl to keep it down a little more
Step 12: Add your flower
I used elmer’s glue to adhere my flower. It’s a bit heavier duty than the tape. Just a dot will do. Hold it down for a minute or two to make sure it takes. After a few minutes, pull your stamen back up and re-shape the flower if need be.
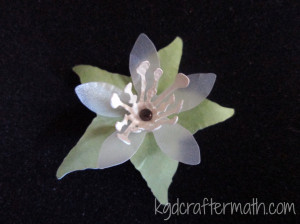
That’s it, you’re done! Put your new artwork into your shadow box, hang it on the wall, and enjoy!

And here’s your craftermath. This one isn’t too bad, but if you’re not careful you’ll have paper bits hanging around your house for a while!

What do you think of today’s project? What book would you turn into wall art if you could?
This post has been added to a link party! What does that mean? Well, it means that a bunch of crafty people all got together to share the fun projects they have been working on. To see more fun stuff, head over to That’s Pinteresting! hosted by the House on Hillbrooklane.
]]>Knitting Short Rows: Adding Wraps
1. Knit to the end of the row, leaving one stitch on the left hand needle. (Of all things, this confused me more than anything else. I didn’t realize I needed to leave a stitch there!)
2. Pull the working yarn from the back to the front.
3. Slip the loop on the left needle to the right needle.
4. Move the working yarn to the back.
5. Slip the loop back onto the left hand needle.
6. Turn the work so that the right hand needle is now the left hand needle. Purl until there is one loop left on the left needle. Bring the yarn to the back, slip the loop from the left to the right, bring the yarn to the front, slip the loop back onto the left needle, and turn the work. (This is almost exactly the same as before but for the direction the yarn is being pulled).
7. Continue this pattern, knitting or purling until you reach the last unwrapped stitch and wrap and turn using the method above. To keep track of how many wrapped stitches you have, I use a marker that I move to separate all the wrapped from unwrapped stitches.
Knitting Short Rows: Working Wraps Back In
Eventually, you will want to expand the number of loops you are using and add the wrapped stitches back in. For socks, it appears that you continue wrapping until your row is in thirds (1/3 wrapped, 1/3 center unwrapped, 1/3 wrapped). To work the wraps back in so that you are once again using the entire row, use the following steps.
1. Knit until you reach the first wrapped stitch.
2. Pick up the back of the wrap stitch with your right hand needle.
3. Slip that stitch onto the left hand needle.
4. Knit the stitch you just place and the stitch just behind it together (the one that the wrap was around).
5. Turn the work. Notice that your working thread is on the left hand needle. This will not do, we need it on the right, so slip the first stitch onto the right hand needle.
6. Purl till you reach the first wrapped stitch, pick up the wrap and slip it onto the left needle, purl together, flip the work, and slip the first stitch to the right. Continue in this manner until all your stitches are being worked again or unless otherwise directed by your pattern.
Are there any knitting techniques that have stumped you? Or any tricks you could offer? Let me know in the comments!
]]>1. With your needles in your left hand and the points facing to the right, loop your yarn over one of your needles with a long tail.
2. Twist the yarn so that your tail goes to the top and your working end goes to the bottom.
3. Place your second needle below the first and pull the tail down, over the bottom, and under the top. Your tail is still up and your working yarn down.
4. Pull the working yarn up, over the top, and under the bottom needle. The working yarn is pulled downwards.
5. Repeat steps 3 and 4 until you have cast all your stitches on.
6. Knit the top row through the back of the loop using either double pointed needles, two small circular needles, or one large circular needle with the magic loop technique.
7. When you get to the bottom row, knit through the front of the loop for this row only. Since the magic cast on technique creates a twist in the lower row of stitches, this will correct that twist.
8. Continue knitting through the back stitch or following whatever pattern you are while knitting and purling through the back stitch. Check out your lovely hidden cast on seam!
]]>Kitting the back loop
1. Make sure your working thread is to the back of the needle.
2.Push the right needle through the back part of the loop.
3. Loop the thread over the front of the right hand needle and then back to the right.
4. Pull the right needle through the loop on the left needle and to the front without dropping the loop on the right.
5. Drop the loop off of the left needle.
Purling through the back loop
1. With the working yarn in the front of the work, use the right needle to pull the back part of the left loop forward.
2. Loop the working yarn over the top of the right needle and then pull it back to the right.
3. Pull the right needle back through the loop on the left needle.
4. Drop the loop off of the left hand needle.
There you go, knitting and purling through the back loop. I’m also adding Judy’s Magic Cast on and short rows for knitting through the back loop. I may end up adding more of these, but I’ll try not to take up a Monday tutorial unless I have several.
P.S. Sorry for the lack of Craftermath this week. Knitting needles and yarn don’t leave much behind, especially when I was only doing such short tutorials. This is the closest I could come, though to be honest I didn’t try too hard. No need to make a mess just for a picture!
]]>Today’s tutorial is born out of that event, and thus is why I didn’t post it yesterday. I made Earl a leather luggage tag for our anniversary. We like to give each other little gifts, and I have made it a personal challenge to stick to the traditional anniversary gift materials. It is not a necessity that I make something, but I’ve done so two out of three years so far. Year three is leather and I spent forever trying to figure out what to get him. I couldn’t afford to get him the leather satchel he wants (it’s around $600), he already has a leather wallet, a basic leather belt is a bit blah, he doesn’t write in a journal so that’s out, so on and so forth. I finally got the idea to do a luggage tag after I remembered these gorgeous tags I found when we were getting married. So, I set forth to make him a tag and here are the results! I should note that I have removed his personal details with the magic of Photoshop for privacy reasons as well as the artwork I burned and painted. I’ve added a note about that at the very end. Without further adieu… here is your tutorial! It’s super easy, so don’t hesitate to give it a try!
Time needed: About 3-4 hours
Skills: Cutting, stitching, and burning leather
Materials
1. Leather. I used a rather thick piece of scrap leather I had that originally came from a belly piece. It needs to fit about the size of an 8.5×11 if you are using my pattern, but there are 2 pieces so you can cut your pieces diagonally if need be.
2. Your pattern with markings for your text, cut marks, and punch marks. You can download a .pdf of the pattern I made here if you want. It includes both leather pieces and the text to slip inside. It’s also a form, so you can add your own text (but not graphics).
3. Heavy cardstock for your contact information.
4. Some sort of hole puncher. I used my cropodile. The snaps I bought also had a tool to punch holes through cloth that probably would have worked for leather.
5. A ball point pen.
6. Something to cut your leather with. These are my leather cutting scissors.
7. Paper cutting scissors.
8. A paint brush.
9. A sharp exacto knife with a new blade (a utility knife would work as well.
10. Leather paint. You could probably get away with acrylic.
11. Leather dye. This is optional, if you like the color of your leather as is, you don’t have to dye it.
12. Snaps or some other sort of closure. These are snaps I got from the fabric store.
13. A hot tool to burn your leather. This was a cheapo $15 wood burning tool.
14. A hammer
15. An awl and thread. As long as you have a needle and something to punch small holes in the leather, it need not be an awl. I would also suggest a heaver string that has been waxed, as it is stronger.
Directions
Step 1. Print the pattern and cut it out using your paper scissors.
Step 2. Place the pattern on the side of the leather that you don’t want to use. Using your ball point pen (or a pencil if you prefer), trace the outline of the pattern.
Step 3. Cut out your leather. I used leather scissors for this, but a new utility blade would do just as well.
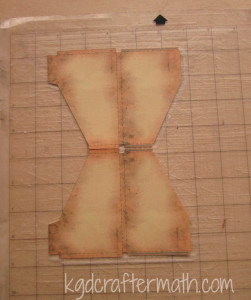
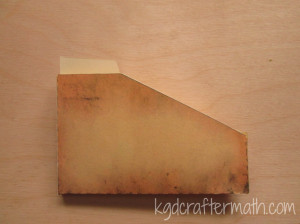
Step 4. Place your pattern on your leather so that the back side of the paper is on the front side of the leather. Carefully trace over the pattern with your ballpoint pen. Make sure to get everything that you want to burn as well as all the holes that you will be stitching. When you trace the holes, only trace the sides and the bottom. You will leave the top open to put your contact information in later. Do this for both pieces. When you are done, there will be an indent where you traced your pattern. These are your guidelines for almost everything else going forward. I have left a small portion of the removed image so you can better see what I mean.
Step 5. Cut out the inner part of the smaller piece. Start by cutting a hole in the center, then following out towards the traced lines. Use those lines as your guide and cut the entire center piece out.
Step 6. Burn the outlines of your image and the fill of your text. I suggest doing a few test swipes on a scrap piece of leather to better understand how the tool works.
Step 7. Punch lightly in each of the dots to start your holes. (I did steps 6 and 7 in opposite order, hence the odd picture lineup, but this makes more sense).
Step 8. Punch all of your holes. I found it easier to punch when the leather was wet. This does stretch the leather, however, if the leather is dry it cracks when you punch. So, choose your poison. If you are really careful and practice a lot beforehand, you can probably punch the holes without stretching or cracking.
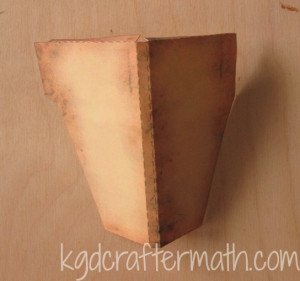
Step 9. Dye your leather. I did not wait for my leather to dry. This did not cause any adverse effects, but I would suggest you let your leather dry first. My dye did say that it could be used while the leather was still wet with cleaner, which I didn’t use, but I figured that water would have a similar effect. Once it was all dry, the leather did seem to take the dye just fine. To dye it, use the enclosed swab, saturate it with the dye, and run it over the leather. I did this a few times, waiting for the shinyness of the leather to dull before adding additional coats. Even if your leather is not wet, it will still be darker at this stage. Only when the leather is fully dry will you see the final color. You may want to do a test dye on a scrap piece to make sure you like the color. I choose Nubuck because I wanted a light brown (but darker than the naked leather) to complement the burn and paint colors.
Step 10. Paint the insides of your design. I waited for the dye to seep in (there was no more shinyness to to leather), but not for the leather to dry. As above, your mileage may vary. Here is a small snippet of the painted image (which sits just below his name) so that you can get an idea. Try not to go over the burn marks, if you do you’ll have to touch them up later.
Step 11. Sew the piece together. If you are just using a needle and thread, use a saddle stitch to stitch it through. The directions here can be modified to use a simple needle, but I am using an awl.
Stick your needle through the first hole.
Pull enough thread through the hole to cover twice the distance you are stitching.
Pull the needle back out of the first hole, leaving the extra thread behind. Place it into the second hole, leaving a little bit of extra thread between the first and second holes on the top.
On the bottom side, make a loop using the extra thread that is from the stitch above. Pull your bottom thread through that loop.
Pull your needle up and the thread tight; repeat until you have gone through all the stitches you punched. If you need to, you can add a punch now as well. My leather pieces stretched to different sizes. I just used the same pieces, which caused one side to bunch up. I was ok with this result.
Step 12. Cut your threads and knot them securely on each side. Trim your corners if they don’t match up.
Step 13. Now we will prep our end for the snap. If you are using a fabric snap, you will need to skive your leather. This is simply thinning it with a razor blade. There is a skiving tool, but I just used a blade. Choose the spot that you will put each of the snaps and thin it to about half it’s existing width. You can place your snap ends in to make sure it is thin enough.
Step 14. Now we will add the snaps. I decided I wanted the sticky outy part near the base of the tag and the other part near the top. Since my snaps had slightly different hole sizes, I made sure that the right size was punched for each hole.
Here are the four snap parts. Each one needs to be used with a particular “head” for the plastic tool that you hammer down on, so make sure that you put them together properly. I’ll go through each side here, but your snaps should come with instructions as well.
Below is the configuration for the sticky outy part, or the smaller of the two snap pieces. Make sure you have the sticky outy part on the inside of your leather. Once you have the whole assembly together, hammer it a few times with a hammer. Hammer it a bit more if you need to.
For the other piece, make sure that the flat end is on the bottom (or the smooth side) of the leather so that it will let the sticky outy bit snap into it. Align, and hammer.
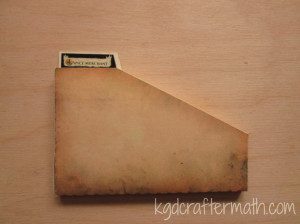
Step 15. After you’ve added your contact information, print it out on the cardstock and cut the square out. Insert this into the back of your tag and trim if needed.
And that’s it! Here are some photos of the finished product (the lighting and the color are more true on the right):
And as always, the craftermath. This one isn’t too bad. It spilled a bit onto the couch, but the pets always love to sleep on the mess. Much more than a clean couch it seems, especially the cat.
*Wait, you removed the artwork from the tag, explain please?!?! Well, as I (somewhat) often do, I found an image I liked through Google search and used that. Only when I was writing this post and looking to source the image did I realize that the creator of the image would have been very upset at my use of it. I have seen various reactions to re-use of images, and I try to avoid using images that artists explicitly request not be used (as was this case) or have watermarked. I partake in many fan bases that re-mix media often. While I have crafting ability, I’m not very good at drawing. Had I done due diligence and clicked through before using the image, I wouldn’t have used it at all. But, I can’t go back and undo what I have done. The craft has been made and the gift given. I seriously considered making an entirely new luggage tag for this tutorial, because it is a craft that I truly believe doesn’t require much knowledge of leather working. I could have even just removed all references of the image all together and used the magic of Photoshop to make it look like it had never been there (as you see above). But, I felt that would be disingenuous. So instead, I will own up to my misstep while still providing you with the above tutorial. I did choose to remove the image though, as it is the best way I can honor the originators wishes given the circumstances.
]]>Ok, let’s get onto the tutorial! I chose to do dog beds this week because I had a problem to solve. I have a queen sized “feather” bed that I have no use for. I was unable to find anyone that wanted it, and I wasn’t sure if I could donate it, so we decided to salvage the stuffing for other projects. The first thing that came to mind was dog beds for our Jack-Russel: Bug. Without further adieu, I present to you my very first tutorial.
Time: 30 min
Familiarity Needed: How to sew a basic straight stitch.
Materials
1. Cutting Mat and Straight Edge (optional)
2. Pins
3. Coordinating Thread
4. Rotary Blade (optional)
5. Scissors
6. Felt (I used 2 yds and made 4 beds)
7. Stuffing (you really don’t need much)
Directions
Step 1. Cut the Fabric to your desired size. Our crate is 24×18. I wanted the bed to be a bit small in the crate and we’ll be giving the beds some loft, so I cut my original pieces to 24×18 with my rotary blade.
Step 2. Place your two matching rectangles together and cut out a 2×2″ square in each corner of your fabric.
Step 3. With the wrong sides together, sew all four straight edges of your two pieces together. Leave an opening in the middle of one of the straight sides. (Alternatively, you can sew all the sides together here and leave one corner open in the next step)
Step 4. Grab the inside corners of the cut out squares and pull out so that they make a single seam. Sew each corner flat like these. (Make sure to leave one open if you did not leave a gap in one of the sides).
Step 5. Turn your fabric inside-out so that the seams are on the inside.
Step 6. Now it’s time to stuff your bed. You don’t want the bed to be too full. I stuffed mine so that there was a thin layer of stuffing about equally distributed. I would say it was maybe 1/4 as full as I would stuff a pillow.
Step 7. Now that your bed is full, it’s time to close up the bed. You could hand stitch it closed so that the seam doesn’t show so much. I machine stitched mine because it’s a dog bed, and it doesn’t bother me if the dog bed has an open seam.
And here it is, all finished and in the crate with Bug modeling how much he likes it!
Well, there it is, my first tutorial. It’s really simple, but I figured it was a good place to start. I hope you enjoyed it. Let me know in the comments if there is anything that you want me to make!
Oh yeah, and I almost forgot….. Here is the craftermath!
]]>