*Deep breaths*
It’s ok. I”ll just skip crafting hour today and give everyone a look at what my current crafts are shaping up to look like. I know, I know. It’s barely November! Now, I don’t break out the Christmas decorations until after Thanksgiving, but I just have to start earlier when it comes to crafting and gift buying. Otherwise, it would never get done! Also, I happen to know that some of the people who read my blog will be getting crafted gifts from me. So, I’ll be keeping all those crafts a secret.
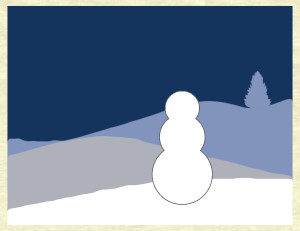
First up is Christmas Card planning. Earl and I have a tradition we started when we got married. Every year, the day after Thanksgiving, the two of us make Christmas cards. They have to be planned out ahead of time so that we have all the materials, because we certainly don’t want to have to do any last minute shopping on black Friday! This year we’re doing snowman cards, and I figured I’d give you a sneak peak. I’ll probably do a few posts related to these cards, but not until after we make them and send them out in the mail. Keep in mind that the image below is a preview only, the card itself is much cooler!
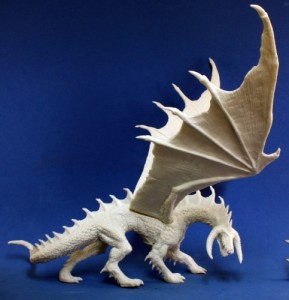
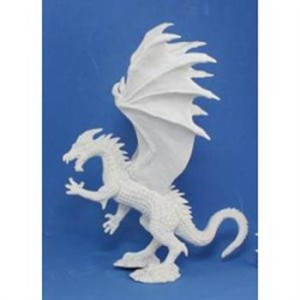
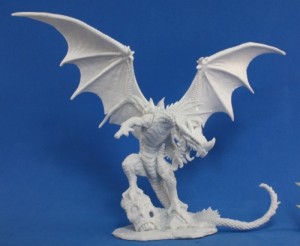
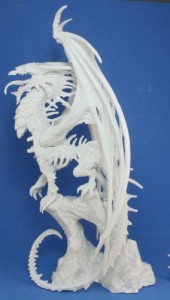
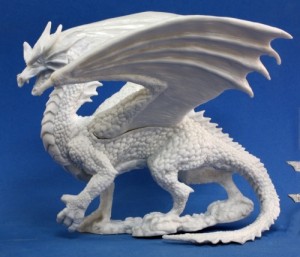
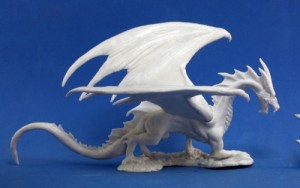
I’m also doing some painting work for a friend of mine. I’ll be painting up as many of the dragons below as I can before Christmas. I’m not sure how many I can get through, but at least one of them is a *must*.
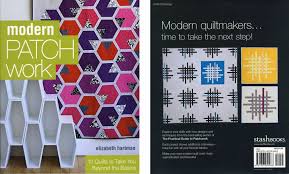
Christmas has another impending deadline for me: I really need to finish my brother’s quilt by then! He got married this summer and I started on a quilt, but haven’t yet finished. I’ve been working slowly away at it, but I’m not really close enough to done yet. I’m hoping to rectify that soon though. The quilt I’m making for them is the one pictured on the front of Elizabeth Hartman’s Modern Patch Work book. The colors I’m using are a variety of blues and greens.
And then of course there’s the *spoiler* that I’m making for my mom, and the *spoilers* I’m making as bulk gifts, oh yeah, and the *spoiler* for my brothers. Yeah… can’t really talk too much about those yet. I’m also trying to convince Earl that we should do yearly ornaments as well, like we do with our cards. Not sure he’s sold yet.
That’s all I got for now! Its a lot of crafting to do, and not much time to do it in, so off to craft I go! Look forward to an ornament inspired post on Wednesday, and maybe I”ll even get a finished Friday out if I can ever find my SD card *grumble grumble*.
]]>Program gets stuck in Initializing
From what I can tell, it’s probably a graphics drive error. If you are using win 8 on a surface, you will need to roll back your driver and set your computer to not allow updates. This wasn’t acceptable for me, so I just use the program on my win 7 desktop.
Silhouette can’t read SD card
Make sure you are saving through the Studio software. Try saving both to the root folder as well as to a secondary folder named studio.
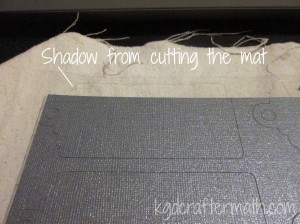
Silhouette cuts the top of your mat
You probably hit “load media’ instead of ’load cutting mat’. It’s annoying, but you can pause and cancel the cut using the buttons on the front panel of the machine.
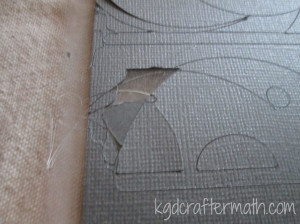
Silhouette cuts off center, tearing up the side of your mat
Eek! Pause and cancel the job as soon as you see this happening. Then, turn off the machine, have a hot cup of tea, and try again. I have no idea why this happened, but giving the machine a time out seemed to help.
The machine doesn’t register print and cut marks properly
As before, pause and cancel your cut to try and salvage the paper. Check your paper, do the registration marks look slanted? If so, it was a bad print and you’ll need to re-print. Otherwise, turn off the machine, shut down the program, open the program back up, and turn the machine back on in that order. You might want to give it another time out as well.
The mat isn’t sticky
There are a few things you can do: you can rinse it with water to remove paper debris and let it dry, you can get some re positional adhesive spray, or you can use a third party re-stick adhesive that goes over the whole mat. I use the third method and will have to find the brand I use. Also, try really hard to keep the protective cover on your mat to keep it sticky. This is the number one reason my mats aren’t sticky any more. I’m in the process of making a brief case like thing to help have a protective home for them.
The mat is too sticky
Keep using it. It will tame down pretty quickly. If it’s a problem, do a few cuts of something you don’t care about just to tone down the sticky.
The Silhouette Pen didn’t draw consistently
Try using the double cut option from the machine. If that doesn’t work, you might just have a bum pen. Sorry.
Still stumped?
Contact silhouette support. Their FAQ page is a bit odd to try and poke around, but their customer service is excellent. I did have to send them an email about the Surface, and they knew right away what the issue was and how to help me. The turn around response was also pretty quick. Customer service is never my first choice (I like to fiddle, and I never want to wait for a reply), but I was pleased with the service they provided.
This is not a comprehensive list of silhouette problems, just the ones I had during my first cuts. I”ll do another one of these again if the need arises. Feel free to post questions below about troubleshooting and I’ll help if I can!
This post is part of my First Cuts Series! Want to read the rest? Here’s the whole group of them!
Silhouette Cameo: The Unboxing
Silhouette Cameo: Installing the Software and Shapes
Silhouette: First Contact with the Software
Silhouette: First Cuts
Silhouette: Trouble Shooting
Once you’ve got your file ready, you are all set to start cutting! I admit that these are not quite the first cuts. There are a few reasons for this, mostly being that I ran into some issues my first few times. And since I was working at night, the light was terrible for picture taking. So, these are really the nearly first cuts. Don’t worry, the last post in this short mini series will talk about some of the trouble-shooting I did with my machine.
One issue I had to deal with was working from an SD card. I didn’t have room in my office for the silhouette yet, and my mobile computer was having problems with the software. For ‘ease’ I just decided to use the sd card. It isn’t hard to use, but I ended up saving the files both to the card itself as well as in a folder named ‘studio’. Only one of each design showed up, so I’m not exactly sure which one it was, even after troubleshooting. I’ve since been able to hook it up to my computer, and that is much easier!
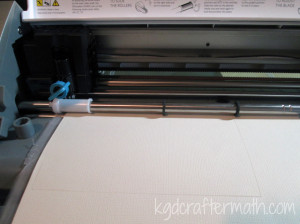
Loading the machine was pretty simple, but I made what seems to be a pretty typical mistake. First, remove the blue paper and press your cardstock gently onto the sticky side of the mat.
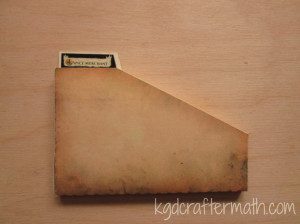
Next, place your mat up next to the rollers and choose “Load Cutting Mat”. This is important, unless you are not using the cutting mat don’t choose “Load Media”! I”ll show you why in the next photo. I didn’t need to move the rollers at this point, which made lining it up a no brainer. Not that changing the rollers is hard.
I chose the “Load Media” option, and it cut up my mat a bit. Not enough to destroy it, but enough to make me mildly annoyed.
Inserting the blade and changing it’s settings is super simple. There is a turn key right on the machine. Drop the blade into the turn key and then turn the top until it’s at the number you’ve set. Then drop it into the holder and click that baby shut.
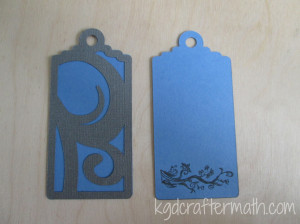
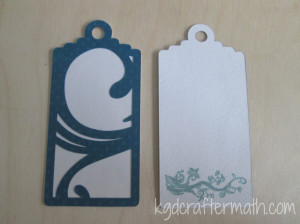
With the mat properly loaded and the blade in place, I was able to cut out my first sheets! For the tags, I needed to cut 2 pieces: the plane colored background and the fancy scroll work. Each of those was done in a different color. This is important now – for the blue sheet I needed to leave it in place for the next step.
When set this project up, I also added a sketch to the plain side of the tag. This required an extra step when cutting. First I cut the plain tags. Once the tags were cut, I left the cutting mat in place. So, no unloading. Next, I switched out the blade for my pen (I chose glitter green) and set it to draw. It needs to stay in place so that it aligns correctly.
Sadly, I wasn’t happy with the results. The pen didn’t draw consistently. I’ve asked around and some people have this problem, but others don’t. Of the 8 pens I have, this is the only one that it’s an issue for. So, I switched it up and used the black glitter pen.
Once the cut was done, weeding began. Weeding is the process of removing all the extra paper that you don’t need. I’m glad that I did this as my first project, because the weeding was really easy. Once or twice the paper didn’t cut right, but that ended up meaning I just needed to re-cut a new piece.
These were so easy to make, and I had extra paper left over from the wall boxes I did. I used that left over paper to make more cards of different colors! Here’s all three of the variants I’ve made so far.
Well, that was my first cut! For the most part, pretty easy. One more part to talk about in another post, and that’s trouble shooting. Then I’ll go through and link them all up together for easy reference. Thanks for reading, and I hope this is helpful if this is you’re first time with the silhouette!
This post is part of my First Cuts Series! Want to read the rest? Here’s the whole group of them!
Silhouette Cameo: The Unboxing
Silhouette Cameo: Installing the Software and Shapes
Silhouette: First Contact with the Software
Silhouette: First Cuts
Silhouette: Trouble Shooting
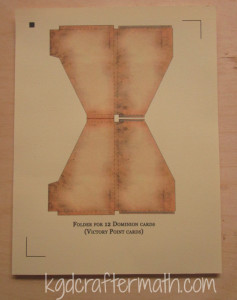
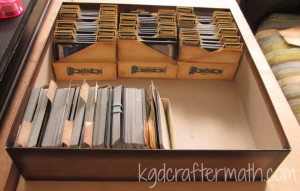
If you play Dominion, you are familiar with the storage issue. Currently there is the base game plus 8 expansions, and a secondary set of base cards. This translates to 8 large boxes (12x12x3). So, you can imagine how much space that takes up! Thankfully, many people more organized than I have come up with storage solutions that cut that space down. My favorite diy solution is Drew’s Dominion Storage Solution. I started doing this once before with Earl, but we ended up abandoning it because it was just too much hand cutting. All the artwork here is Drew’s, but he’s expressed permission for people to create cut files in the past. Here’s where the silhouette comes in! I created a cut file for each of the boxes so that I could have my Silhouette do all the cutting! It still takes a long time, but much less than before.
This tutorial is uses the print and cut feature of the silhouette (which I LOVE), but you can also download the original .pdf version of the files by Drew here. I am working on creating print and cut files for all the templates along with sticker templates. For now, You can find .studio files for all the folders and the small box here. The sticker templates are annoying and forthcoming. I will defeat them!
This project was done over 4 evenings that ranged from 2-6 hours (not counting the time to create the silhouette file). So, it’s hard for me to estimate how much time it took, but it was totally worth it! I don’t have all the expansions, so I can’t confirm that all the expansions will fit in the original box this way. I think that at some point, we may switch to a different box, but for now I’m happy with the original box. Note that these are not sized for sleeved cards, though I might modify the templates if I have time for that in the future.

Materials
Cardstock. The amount you need will depend on which expansions you need (see step 1)
Double stick tape roller / glue stick / double sided tape (any adhesive really)
Printable sticker paper (I highly recommend the silhouette sticker paper, more on that below)
Step 1: Print everything you need
How much do you need? Well, that’s a really good question that depends on which expansions you have. Here is a list of what I needed. If you are using the .pdf versions, go ahead and print out that number through your .pdf reader (at 100% size) now. Make sure to print the labels on sticker paper. If you are using a silhouette, we’ll cut in the next step with the print and cut feature. I am working on a guide that will include all the expansions
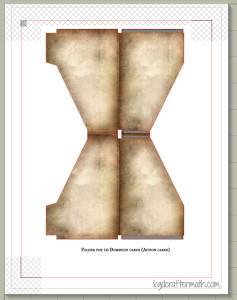
Dominion (20 sheets total + boxes): 2-60 folder (copper, starter decks), 1-40 folder (silver., randomizer + trash), 1-30 folder (gold, curse), 2-12 folder (2 x estate, duchy, province), 12-10 folders (24 action cards)
Alchemy(9 sheets total + boxes): 2-12 folder (vineyard, randomizer), 6-10 folder (11 action cards), 1 20 card (potion)
Hinterlands(17 sheets total + boxes): 1-30 folder (randomizer), 4-12 cards (farmland, silk road, tunnel), 12-10 cards (20 action cards, 3 treasure cards, blanks)
Do yourself a favor and buy extra paper. I wouldn’t print extras unless you mess up and need to, but I needed to that and it’s better if you don’t have to go out and purchase more paper when you are in the middle of your project.
Step 2: Print and Cut.
Now can I gush about the silhouette studio print and cut? It’s awesome! I’ll be doing a tutorial later on how to turn a paper cut project into a print and cut , but for now you can just have the tiniest taste. In your studio file, you should see some weird hash marks, a box in the upper left, and then some corners. These are your registration marks. If you don’t see them, make sure to hit the registration button ![]() and check “Show Reg Marks”.
and check “Show Reg Marks”.
Once your registration marks are showing (oh my!), go to File – Print and send your file to your printer from within the studio program. If your cardstock is not coming from the regular paper tray, make sure to fix that by choosing printer preferences and selecting the appropriate choice. Mine feeds from the back tray. Since every printer’s options are different, I can’t really guide you too much here.
Now adhere the paper to the cutting mat, load it into your silhouette, and send the file to your machine. I highly recommend watching it register. I had a few mis-registrations that cut the paper in the wrong places. If you catch it early enough, you can pause and cancel the job. If this happens: check to make sure the lines printed correctly, turn the machine off and on again, and restart the program. It’s usually only one of the above problems, but by doing all three at once you don’t have to stop it again if you chose the wrong fix. After you remove the excess paper, you will be left with your piece! Note that all but the 60 folder template will create 2 boxes per page.
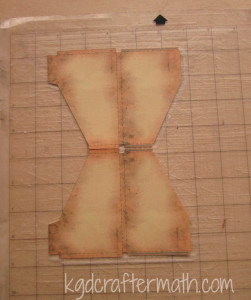
Rinse and repeat until you have all of the folders that you need. You may need to re-stick your cameo mat during this process. For the 40 card folders, the cut lines bleed outside of the registration marks. This means that you will need to finish the cut yourself either by hand with an x-acto blade, scissors, or your favorite cutting tool. I also suggest using coverstock or a heavier cardstock for the boxes that will hold all your folders.
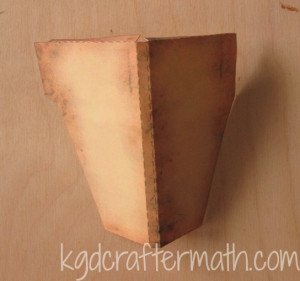
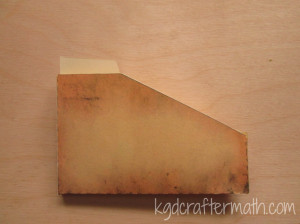
Step 3: Assemble the Folders
Now for the mostly easy part! The print and cut file has already perforated your fold lines, so fold everything up and inwards, slap some adhesive on those grey bits, and stick it together!
Step 4: Label the Folders with the Stickers
Here’s the thing with the labels, if you are are a stickler like I am, you want everything to be alphabetized and alternating just so. This means that the templates need to be arranged depending on what expansions you have. I’ve been working on making the sticker templates for each individual expansion and for all the expansions, but I can’t customize for each and every possible combination. So, when I do finish the sticker templates, be aware of that. You’ll notice in my final image, I still need to fix my sticker templates to fit the expansions I have!
Actually adhering the stickers though is really is. It’s just a sticker, after all. I really liked the silhouette sticker paper because the clear sticker has some weight to it, so that even when the backing is pulled off the sticker is still nice and strong. Here’s a labeled folder to go with all that chatter!
Step 5: Organize and Oggle!
Or, if you are like me, organize it and figure out that you need to re-do all the stickers so that everything looks better! Never fear, when I get those downloads down you won’t need to do the perfectionist re-thinking things. Dominion storage = conquered!
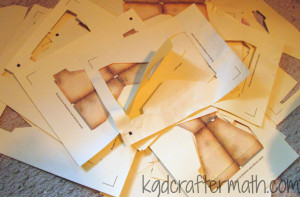
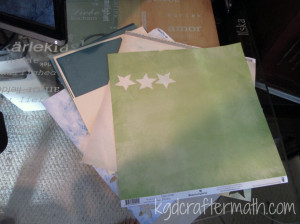
And what about the craftermath? Well, this project mostly makes a bunch of excess paper. What you see here is a pile of all the excess bits plus the bad cuts/prints. I had quite a few ![]() . I like to shred mine and keep it as bits. I’m hoping that one day I’ll have enough bits to try my hand at making my own paper!
. I like to shred mine and keep it as bits. I’m hoping that one day I’ll have enough bits to try my hand at making my own paper!
I’ll be back next Friday with downloadable templates and an even prettier picture of my own Dominion organization. See you all soon!
]]>
This Saturday something special happened. Two dear friends of mine, Kassie and Adam, were married. I love everything about weddings except that there are too many people there and I’m often expected to dance. Kassie is such a social butterfly though, and she’s always so happy; it was really an honor to be able to celebrate with them.
Earl and I had spent some time thinking about what to get them, and we ended up getting them a copy of 7 wonders. It’s a really fun board game with many different ways to win, and we’ve recently gotten Adam hooked. We also found some gorgeous skull paper to wrap it in. If you know Kassie, you know that it is right up her ally. Kassie focused on physical anthropology, in particular zooarchaeology (the study of bones) for her undergraduate. Currently she has a collection of bobcat skulls on her parents porch weathering. The one thing I hadn’t had the chance to think about was the card! I like to make cards in general, and especially for weddings, so I wasn’t about to run to a card shop.
When I woke up on Saturday and realized I didn’t have a card for them, I was really glad I had my silhouette. I went to my pinterest silhouette board for inspiration and found a style that I liked. I also found a really cute vinyl photo frame project that I made for them that morning. The negative die cut of the card below with the watercolor behind was really pretty. I needed a wedding appropriate image though. For some reason, scherenschnitte came to mind. Scherenschnitte is the art of cutting delicate paper figures by hand. A few years ago I did a scherenschnitte cut from Cindy Bean’s scherenschnitte blog. Her designs are really pretty, and it seemed like the perfect pattern source for the cameo! She offers a number of really nice free patterns, and her Spring Love template fit the bill perfectly.
Watercolor Birthday by Loll Thompson
Spring Love by Cindy Bean
Inspiration in hand, I converted the pattern to a silhouette cut file. Since I knew I wanted to do a negative cut, I needed to find a pattern for the back paper. I didn’t have anything I liked on hand, so I went to the silhouette store and found two patterns I liked. Both were water color, one a white/grey water color and the other a green/brown gradient. I also found a really nice vinyl cut that I thought would work great as a greeting. The text is: “Live Simply, Dream Big, Be Grateful, Give Love, Laugh Lots.” I thought it was great advice for a wedding card. Simple and to the point.
Once the cut file was done, I used the print and cut feature to print the patterns on some calligraphy paper. I’ve decided that I really like calligraphy paper for paper projects. It has a delicacy to it that cardstock doesn’t, but still feels a bit sturdier than printer paper. I ended up with 3 4×6 pieces: the cut out, the watercolor background, and the saying. Originally I had been planning on making 4×6 cardstock card to adhere these to, but ended up deciding I liked them as a single piece, like a little print. Or you could call it a post card, but I like print better.
First I cut out the image for the negative die cut.
Next, I used some transfer tape to remove the paper from the mat while keeping the separate bits in the same place.
With the other two pieces cut, I sprayed on just a little 3M spray on the cut. With some careful positioning, I was able to adhere the cut to the gradient paper.
The same process was used to adhere the saying to the back of the gradient sheet.
I made an envelope with some Tim Holtz craft resist paper, placed the card in, and signed the flap of the envelope. I think the project took about 2 hours including setting up the silhouette, finding the files I wanted, and the actual paperwork. I made a second one during that time as well. I think that took about 20 min. for printing, cutting, and adhering.
Thanks for reading! Are there any cards that you like to make?
]]>Monday: The Crafting Hour
I’m switching this series of posts to Mondays for one major reason: they are the easiest for me to write, and therefore to edit. Since Monday is my busiest day, and I tend to leave teaching stuff till way too late, it seems best to do these posts on Monday. So keep your eyes peeled for some Monday hourly updates!
Wednesday: Mid-Week Inspiration
These posts will still probably be from the web, but this allows me to add other media inspiration as well. And who doesn’t need a bit of a pick-me-up come Wednesday?
Friday: Finished Object Friday.
I like the alliteration here. Also, by switching from tutorials to finished objects it allows me to showcase items that I can’t do tutorials for. Some of these will be projects that were completed before I entered blog land. Others will be projects that rely on patterns or directions from other sources to an extant that I am uncomfortable doing them as hourly progress updates. Additionally, I can show of some of the finished hourly projects (like my socks) where you would probably get bored from a second iteration of the first. I’ll still do tutorials when I can, this just expands the possibilities. Finally, since I do my tutorial stuff on the weekends, this gives me a week to be able to write and edit the posts, hopefully making for a better reading experience overall.
Ok, business aside, let’s go on to see some crafting hour goodness!
Today’s crafting hour is all about a paper craft I made. There aren’t too many pictures, but that’s because it’s a really easy project. I recently sold some wedding jewelry I received with my dress, and I wanted to add a little something special to the package for the recipient, but I didn’t really want to spend any money. During our wedding, Earl managed to rip my dress (still not sure how he managed that one…). It was only through the amazing preparedness of Melissa, one of my brides maids, that it was an easy fix. She may not have been the only one with a sewing kit, but I am sure glad she had it!
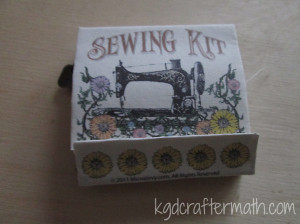
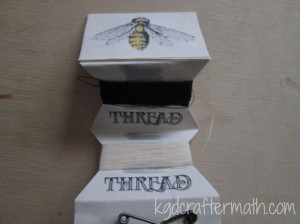
I thought that making a small sewing kit would be appropriate for all occasions, and I happen to have all sorts of thread, needles, and the like around my house. When thinking about the shape, I lit upon the idea of a small folding matchbox with some thread and a needle inside. I have some old matchboxes from our wedding around, so I thought I could use that for a template if I needed. I couldn’t be the first to think of this idea, so checked around online first to see if there was anything out there. Lo and behold, Jivvy from microjivvy.com not only created an amazing matchbook sewing kit that was way cooler than what I could have done, she provided us with the .pdf file to make our own for free!
Matchbox sewing kit. Source: microjivvy
If you are so inclined, you should really check out more photos of her final product over by clicking on the link above.
This project only took me 2 hours, so here is the breakdown.
Hour 1: Editing frenzy
I was insistent that I wanted to use my silhouette to cut my paper. I don’t know why, I just was. New toy syndrome maybe? So, I created a cut and print file in Silhouette Studio. I cannot tell you how much in love I am with cut and print files right now. It places markers on the page so you can print something (like microjivvy’s awesome layout) and then the silhouette will know where to cut. I have also made a paper Tardis for Earl. There are so many paper cut files that this could work amazingly with….. Gushing aside, once I had the layout down, I decided that I didn’t need the black cut lines (or dotted fold lines) from the original file, so I spent some time cleaning those out. Because some of the fold lines are not associated with the outline of the box, I also added in a few cross cuts to help locate those folds later. I used some of my calligraphy paper for the project, since cardstock would have been too heavy. Here is what it all looked like printed out:

Hour 2: Assembly
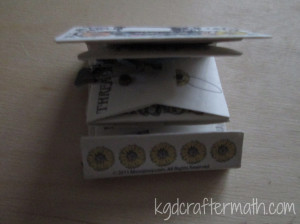
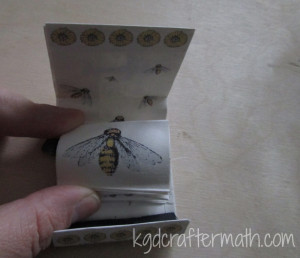
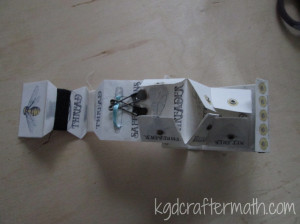
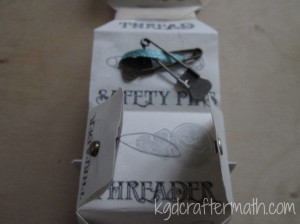
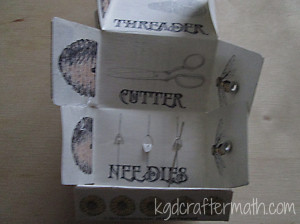
Assembling the paper was really easy. First, I assembled all the parts: two colors of thread, a needle threader (preferably one of those cheap ones that are easy to disassemble), three needles, a small bit of ribbon, and safety pins (I added 2).There are a few parts that need to be glued to the paper: the cutting apparatus, the threader, the inserts for the thread sections (I used card stock here), and I also did the brads ahead of time to hide the back side of those. Jivvy had the most amazing idea for a thread cutter: part of the ripper from an aluminum foil box! Brilliant! Then you adhere the back and front together, for which I used double sided tape, and fold the matchbook into shape (also adhering along the way). I used my scoreboard to help with the folds, but I don’t see why you couldn’t do it by hand. Now, add your sewing materials and the rivets for the parts that close, glue the inside to the outside so it pulls out like an accordion, and viola! A really cute matchbox sewing kit. (Sorry about some of the poor quality photos, they were taken with the puffy bandage on).
Had I done the cutting by hand, I probably would have finished this in around an hour, including gathering the supplies. So it makes the perfect crafting hour post!
]]>
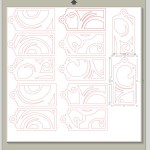
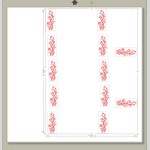
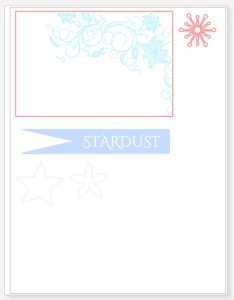
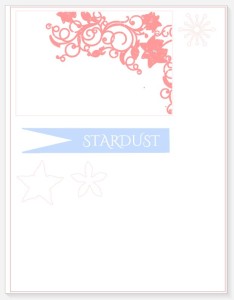
1. Go to File – My Library and open up the flourish shape.
When I opened the flourish tag shape, all 7 shapes were in the same block. Since I am cutting on two different colored peices, I wanted to make it so that only the swirls were in the first file. I also thought I could fit a few more than what is there to maximize my paper usage.
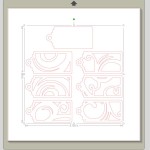
2. To separate the shapes use Object – Ungroup
This separated the 7 shapes into individual objects.
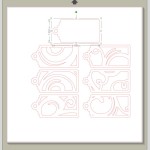
3. Select the blank tag and copy it into a new document.
To copy it, you must first go to File-New to open up a new cutting board.
4. Arrange the boxes so that you can maximize the space.
I select all of the remaining tags (all of them will have grey boxes) and moved them to the right top of the page.
Hit Ctrl+C and Ctrl+V to paste a new set of 6 tags. You can also use Object – Replicate to do this.
Reposition the tags so that all 6 are within the white paper range. Use the green dot to rotate the images. As you can see, I comfortably fit 12 tags on one 12×12 page.
5. Go To File-Save As to save your file under a new name. You can also save directly to your library in the File menu.
6. Set up your blank pattern.
Copy and paste the blank pattern as many times as you had the swirl patterns in your previous file (I had 12). Got to File-Save As to save your file.
7. Open my flourish pattern from the library and clean it up a bit.
Move the flourish outside of the working area to see it better. It had an outline that I didn’t want, so I went to Object – Ungroup. Then I clicked the outside border. It looks like the whole thing is selected, but don’t worry, it’s not. Hit delete to remove that line.
To group everything back together, click and drag your cursor to select all the component pieces again. Then go to Object-Group. to group them together again.
8. Fit the flourish to the tag.
Drag the flourish back onto the page, resize it, and position it to fit one of the tags. I set mine up so that the grey border delimiting the space of the flourish sat along the tag’s border.
Duplicate as many flourished as you need to fit your cards.
9. Put the flourish in it’s own file.
Now, we need to put the flourishes in a third file since we don’t want to cut them out with the machine. So select all of your flourishes only.
Hit Ctrl+x to cut the images. Go to File – New and open another file. Hit Ctrl-V to paste the flourish. This will keep it in the same place as it was on the tags.
Go to File-Save As and save this new file. (You can also change which lines are cut through the cutting menu, but I was using an SD car originally, so I couldn’t do that here.)
10. Save to SD or send to print.
Since I don’t have room near my desktop to do this in the office, I had to use an sd card for the first time. So, I plugged in my SD card, emptied it out, and went to File-Save to SD for each file. I always empty my SD or flash cards if I am using new technology just in case there is something that doesn’t get along. Also, I really liked this feature. It detects the SD card for you so you don’t need to know the drive letter.
Overall, I would say that’s a pretty decent first contact with a software. As you can see, I was able to figure things out without too much trouble. Un-grouping was the big thing that took me a while to figure out. I tried a couple of different options first that also worked until I found that command. If I had the machine hooked up to my computer I could have put all this into a single file and just change the “cut” and “no-cut” option for each shape, but at the time there was just no room on my desk, necessitating the SD card. Up next I’ll send a “First Cuts” post your way.
This post is part of my First Cuts Series! Want to read the rest? Here’s the whole group of them!
Silhouette Cameo: The Unboxing
Silhouette Cameo: Installing the Software and Shapes
Silhouette: First Contact with the Software
Silhouette: First Cuts
Silhouette: Trouble Shooting
Installing the Software
The software was really easy to install, even though it didn’t work on my Surface (Win 8). I’m hoping that their customer support is as awesome as everyone says (spoiler – it is), but for now at least I still have the desktop (Win 7). There is a cd that comes with the software or you can download the software from their website. The silhouette comes with 50 free designs, which is pretty cool. Note that to get those designs you need to hook your cameo up to the software and then download them, so don’t worry if they don’t show up right away. I downloaded the software from the website, so this may not be true if you use the cd. There is a premium version of the software, but I don’t know if I need it just yet. I am sure that I will want to do more than just what you can do in studio, but for now I’ll work with what I have.
Connecting your Online account with your software
First you need to create an account at their shape store. Once you’ve done that, go to File – Download Pending Orders. Your library will pop up on the left and a screen will pop up on the right prompting you for your email and password. You also have the option to remember your password and to automatically check for pending orders when the program opens. I have both clicked, this way if I purchase something online it will automatically download and I won’t have to wonder if I’ve downloaded the files or not.
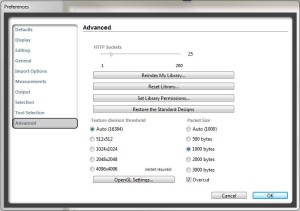
Downloading the free shapes
This was really easy. Just go to File-Preferences and choose advanced in the pop-up window. Then hit “Restore the Standard Designs”. I had already registered my Silhouette before I did this, so you may need to do that first.
Here is a sample of the free shapes you receive. Everything but the flourish was included in my free downloads.

Purchasing Shapes
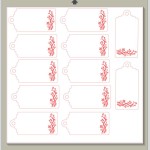
Even though the cameo comes with a number of shapes, they are all pretty basic and I wanted to do a project that would be a complete project to start with. Plus, it came with a $10 gift card to buy files, so it was only reasonable that I take advantage of all the wonderful projects already there! I don’t expect to be doing to much purchasing of projects, but I figured why not. The Silhoutte Online Store was really easy to browse, and you can even browse within the studio software which I thought was pretty cool. I purchased 3 projects and 1 sketch for a total of $6:
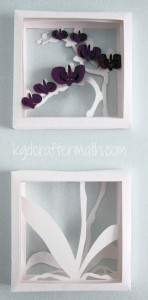
3D orchid shadow box
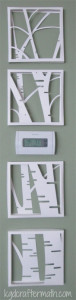
3D birch shadow box
6 flourished small tags and a Flourish Sketch
As you can see, I made all three of the paper cuts, but I’ll only be going through how I made the tags. You can visit the Ashbee Design blog for detailed instructions on how to make the other two. Most of the designs are $1 or less, but the 3D ones are a bit more complicated and so are fairly priced a bit higher. I also really like that you can purchase commercial licences for some of the designs right through studio, which were also reasonably priced.
Once I purchased the shapes and connected my software to my online account, they downloaded right into my Studio software package.
Ok, I think that’s a good stopping point. For the next post I’ll walk you through working with the tags in the software.
This post is part of my First Cuts Series! Want to read the rest? Here’s the whole group of them!
Silhouette Cameo: The Unboxing
Silhouette Cameo: Installing the Software and Shapes
Silhouette: First Contact with the Software
Silhouette: First Cuts
Silhouette: Trouble Shooting
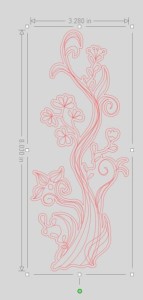
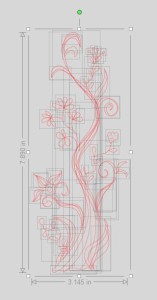
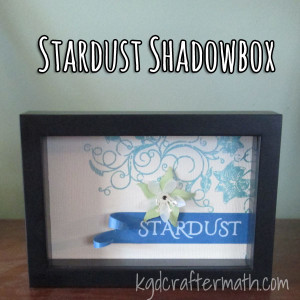
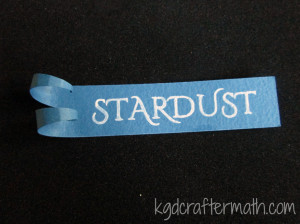
So how did I get to a Stardust shadow box? It’s a bit of a story. When Earl and I got married (3 years ago), my youngest brother Nate gave us a set of 5 shadow box frames. I really liked them, but have been trying to think of something to do with them, so they have just been sitting around. In the past few weeks several things happened that all came together nicely for this project. A few weeks ago I got my new Cameo, which has had me constantly thinking of new paper projects to do. Among those projects is a tutorial based on the paper flowers I made for my wedding. Each flower was made from the pages of fantasy books that Earl and I chose, including Neil Gaiman’s Stardust. Around the same time, The Thinking Closet did a post about making her own sketch art with her Cameo. Shortly thereafter, it all came together. I could use my Cameo to make some 3D paper art based on one of the Stardust cover art versions and put it all in one of the shadow boxes we have. I’m not sure what I’ll do with the other four boxes. Earl and I talked about doing artwork based on the other books we used or possible just using Gaiman, but we haven’t really decided yet. Rest assured, you will here about it here when we do decide.
Image source: Audible
Here’s how I made my shadow box! It’s just the directions, but I’ll add another post on how I designed the box later.
Materials:
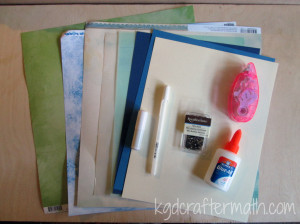
Assorted Paper:
Cream color for background
Blue for banner
White/blue/or vellum for flower
Green for leaves
1 Mini Brad
Double Sided Tape Roller
Elmer’s Glue
White Pen
Blue Pen (Not Shown)
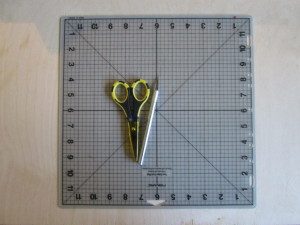
If you don’t have a silhouette, you will also need:
A Self Healing Mat
Paper Scissors
An exact-o type knife with a new blade
Skills Needed: Cutting, gluing, and shaping paper.
Step 1: Download the patterns
If you have a silhouette, you can use these directions to work with the silhouette file I made and follow the steps in order. Otherwise, you can download a .pdf with the images and text. If you are using the .pdf, print the file out on each of your colored papers and hand cut the shapes out. With the .pdf, print at actual size, cut your shapes using your scissors and exact-o blade, and skip down to step 5. Both patterns are designed for a 4×6 image.
Step 2: Cut and Draw the background
I’m assuming that you are using 4 different colors: the leaf, the flower, the banner, and the background which also doubles as the center of the flower.
For the background, you first need to ungroup the main design. Click on the main design and go to Object – Ungroup. Now click on the cut style button in the upper right ![]() . Make everything no-cut except for your box and the center of the flower. It should like like this:
. Make everything no-cut except for your box and the center of the flower. It should like like this:
Without removing your paper, go back to the silhouette program and change your cuts so that only the floral design is being cut. Switch your blade for your blue pen, change your cut settings, and send the design to the silhouette. Here is the second cut:
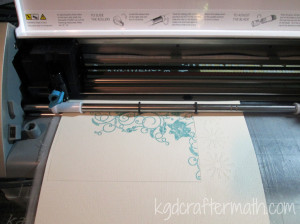
Now you can unload your paper.
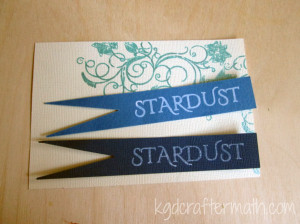
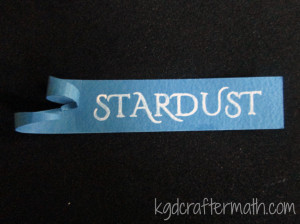
Step 3: Cut and Draw the banner
Move the main background out of the way and put your banner up top. Now click on the banner and ungroup that by going to Object-Ungroup. You will make two cuts here as well. First, set everything but the banner to no-cut. Cut your banner out of your blue paper. Keeping the paper in place, change the banner to no-cut and the text to cut. Switch out your blade for your white pen and send the design to the silhouette. Unload your blue paper.
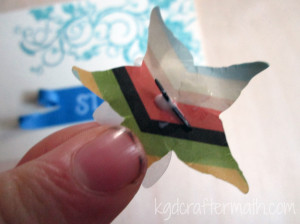
Step 4: Cut your flower and leaves
For the flower and the leaves, make sure that only the flower or leaves is set to cut depending on your paper. There is only one cut on each of these papers, so once you have cut out the shape you can remove the paper.
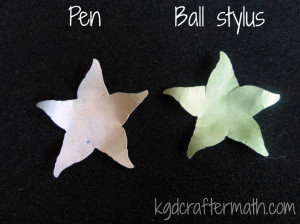
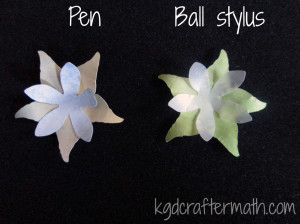
I wanted to experiment with several different colors for the leaves, flowers, and stamen. Below are all the bits I cut out with my silhouette. In the end Earl and I chose to go with the lighter blue banner, the silver velum flower, the bright green leaf, and the cream stamen.
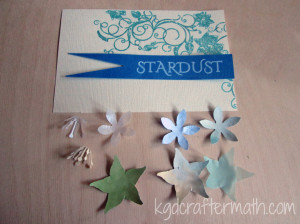
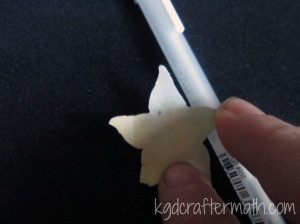
Step 5: Curl your leaves
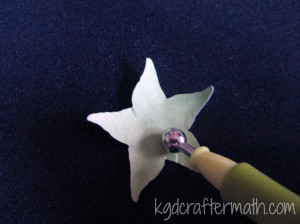
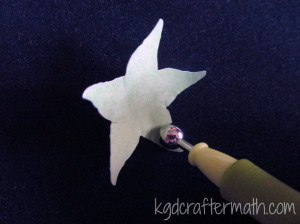
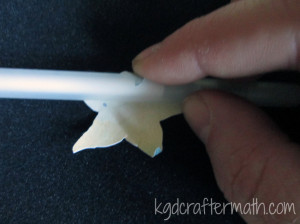
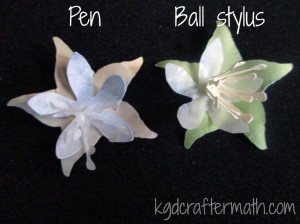
You can use one of two tools to curl your leaves and petals: a ball stylus or a pen. I used my ball stylus and foam molding mat because I like the way it looks better, but either works. I’ll show you both here.
First, you want to roll your leaves up towards the center. With the ball roller, simply place the roller near the center of the leaf and press out to the edge. Do this for each leaf. After you have rolled each leaf up, put the ball in the center of the leaves and depress the center a bit by using a circular motion. Then, turn the leaf over and roll just the tips back down. I like the rolling look this gives the leaves.
If you are using a pen, wrap the leaves around the pen going towards the center. Repeat for each leaf. Flip the leaf over and wrap just the tip in the opposite direction.
Here is a comparison photo of both methods:
Step 6: Curl your petals
Follow the same steps as with the leaf, except don’t roll the edges backwards. Instead, press the flower down very gently with your hand to flatten it a bit.
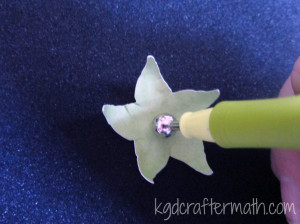
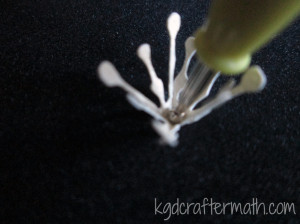
Step 7: Curl your stamen
To curl your stamen, press down the center with either the tip of your pen or a smaller ball stylus. Then pull each stamen bit up.
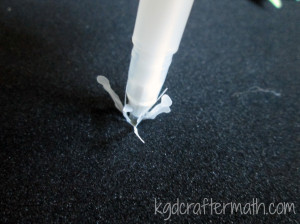
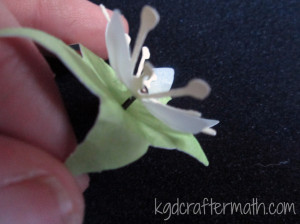
Step 8: Assemble your flower
Use the brad to assemble the three parts of your flower. If you cut your flower with the silhouette, there will be a hole there for you. If you printed via .pdf you will need to punch one through with the brad. If you flatten your flower as you assemble it, just re-work the shape with your hands a bit. It will be more pliable now that you’ve already shaped it above. Either way, you will probably have to pull your stamen up to the center again.
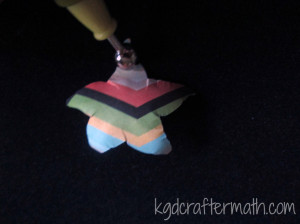
Step 9: Color in your banner and background
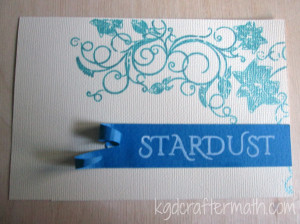
The silhouette file only colors the outline of the text. Just color inside the lines with the same pen to fill out the text. I went over the text 4 times to achieve the look I wanted. Also consider filling in some of the lines on your background scroll with the blue pen. I filled in the swoopy bits that connected the flowers, but kept the flowers as is.
Step 10: Curl your banner
I curled my banner with my pen. After I curled both ends up, I pressed the bottom one backwards a bit and curled the top one even more with a smaller tool. Then I pulled the curl of the top one down so you could see the spiral.

Step 11: Adhere the banner to the background
To adhere the banner to the background, I used my tape roller. I also added a bit of tape to the end of the bottom curl to keep it down a little more
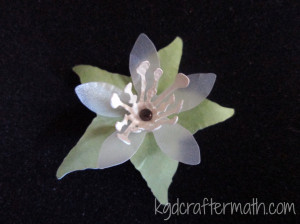
Step 12: Add your flower
I used elmer’s glue to adhere my flower. It’s a bit heavier duty than the tape. Just a dot will do. Hold it down for a minute or two to make sure it takes. After a few minutes, pull your stamen back up and re-shape the flower if need be.
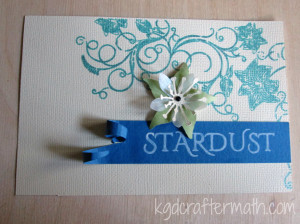
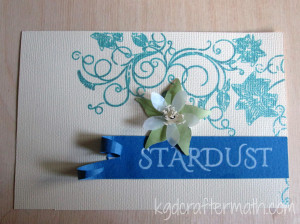
That’s it, you’re done! Put your new artwork into your shadow box, hang it on the wall, and enjoy!

And here’s your craftermath. This one isn’t too bad, but if you’re not careful you’ll have paper bits hanging around your house for a while!

What do you think of today’s project? What book would you turn into wall art if you could?
This post has been added to a link party! What does that mean? Well, it means that a bunch of crafty people all got together to share the fun projects they have been working on. To see more fun stuff, head over to That’s Pinteresting! hosted by the House on Hillbrooklane.
]]>This weekend I splurged a little when I probably shouldn’t have. The Silhouette Cameo was on sale at a local Dick Blick’s for a really good deal, and I bought one. I am so excited for this. I have been wanting one ever since I knew about their existence. Essentially, it is a printer that cuts paper and works with computer files to create whatever shape you want. You need to be able to purchase or design the shape yourself, but you aren’t limited to cartridges like you are with a die cutting machine. It can also cut fabric, light chipboard, and vinyl. Plus, there are pens that you can use to have it draw line art on paper as well. And they have all sorts of add ons that you can use, like glass etching, sticker paper, tattoos, oh my!
What is really exciting for me is that I want to do some tutorials for the paper crafts I made for my wedding, but use the cameo to cut the paper instead of cutting it by hand. My plan is to offer cameo templates as well as .pdf files so you can either use the cameo or print the .pdf file on whatever paper you are using and hand cut the paper. For an event, trust me, you will want to avoid hand cutting if you can.
What’s in the Box
The unboxing is pretty simple and had what I expected in the box. The machine isn’t really all that big. It’s as long as my regular printer, but only half as deep. And even though it’s as tall, the triangular profile means it takes up a lot less space. The usual paperwork was there: a booklet on how to use the cameo and a safety warning sheet. One of those cd’s is the program (you can also download the newest version through their website) and the other says that it contains video tutorials. I didn’t bother to open then second and ended up using the download to install the software. The cameo also came with a blade and a cutting mat. I thought it was a really nice touch that they added a $10 gift certificate to their online shape store.
I also purchased a few accessories. The pens were on sale for $2.50 (normally $7), so I picked up one of each set. I also picked up a second blade for fabric cutting. Word on the internet has it that the blue fabric blade is the same as the black blade just in a different color housing so that you don’t use the same blade on different materials. As someone who does lots of crafting and has special scissors for every type of material you can imagine, I figure this is probably true. Finally, I bought some vinyl because, well, vinyl. I’m not sure what cool thing I will do with the vinyl, but I’ll come up with something.
Next up I’ll talk about installing the software and purchasing shapes from their online store. Plus, I’ll show you pictures of the projects I’ve already finished! Eventually, I’ll take you through the entire first project I made (gift tags). Have you ever worked with a silhouette? What’s your favorite use?
This post is part of my First Cuts Series! Want to read the rest? Here’s the whole group of them!
Silhouette Cameo: The Unboxing
Silhouette Cameo: Installing the Software and Shapes
Silhouette: First Contact with the Software
Silhouette: First Cuts
Silhouette: Trouble Shooting