Since the weather is turning cold, I thought I’d round up some cardigan and sweater patterns. Please note that several of these are Ravelry patterns. In order to see those patterns, you will need to make a free account there.
Ophelia’s Willow: Owlish’s notebook, adapted from Verdaia by Jodie St. Clair.
I know that not everyone lives up in the cold north. So, I figured I’d start with a nice light weight shawl. I really like the simple pattern on this shawl. The pointed ends also make it almost reminiscent of a spider web to me.
Ahni: Julia Trice
Ooohhh! Pretty spiral patterns. That was the thought that first went through my head when I saw this one. If/when I make this sweater, I probably won’t do so much on the cuff, especially at the bottom of the sweater itself. Maybe for the sleeves though. I really love the overall look of this one though.
Freija: Mari Muinonen / tikru (image from Dayana’s notebook)
Ok, I admit it, I like things that are just a bit out of the ordinary. Like this gorgeous cable knit sweater. Who knew that cable knitting could have such personality to it? I love the color it is in here as well. One day, my precious, one day…
Wild Thing!: Splendor
When I saw this pattern, how could I not add it here! It’s just so awfully fun! What a better way to refuse to grow up than to dress up as one of the wild things.
Magnum Reversible Vest/Wrap: Karenclements
Ok, now we’re talking cold weather gear. Well, almost. There aren’t any sleeves on this! It shouldn’t bee too hard to add them though. She also has a downright stunning pattern for a honeycomb sweater as well. I have a feeling that once my socks and mittens are done, these two projects will be up next. Oh, how I like to wrap myself up in blankets and call them clothes. :)
There you are! Five knitting projects to keep yourself warm as the weather cools down. To see more, don’t forget to stop by my pinterest knitting board where you will find more warm wraps, a few summertime ones, and plenty of other knitting projects! I hope to see you all again on Friday, but if not then I’ll certainly be back to regular posting schedule by Monday. Thanks for reading!
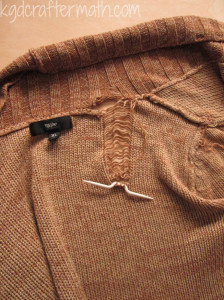
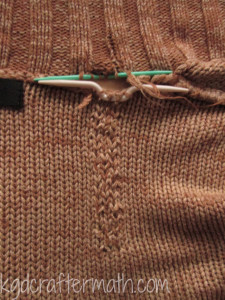
]]>Hour 1: Fixing the bottom run
Here’s the cardigan as it was given to me. I have already picked up the bottom most dropped stitches in this picture and placed them on a cable needle.
For each stitch I did the following; Remove a loop from the holder. Push your crochet hook through. Grab the loose yarn closest to the loop. Pull the yarn through with your hook to create a new loop.
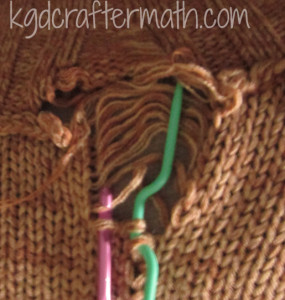
I went left to right across each row and up the run. This took about an hour and was the longest part of the fix.
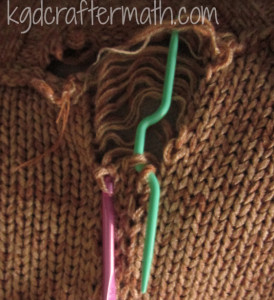
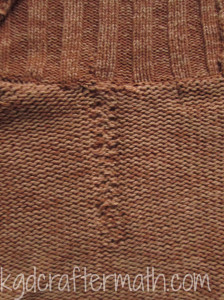
Hour 1.25: Fixing the upper run. There was also a bit of a run on the upper pattern. I fixed it the same way as above, but it took less time since there was significantly less run. I did have to use a smaller hook though, and it would have come out better if I had had an even smaller hook.
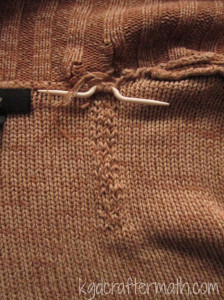
Hour 1.5: Binding it all up I purchased a skein of yarn that was almost the same color as the original cardigan. I stitched it through all the stitches that were on the holders. I also ran it through some of the other stitches, made sure to bind up the loose ends of the cardigan, and tied it off at the end.
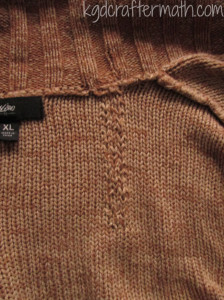
Hopefully this will hold for her longer! You can still see where the run was. I’m not sure if there is anything to be done about that. You might be able to block it back into place, but I didn’t think to try that until afterwards. Thanks to Sam for convincing me to fix it properly! So there you go : 1.5 hours to fix a run in a cardigan. Definitely worth it if the cardigan is like a best friend!
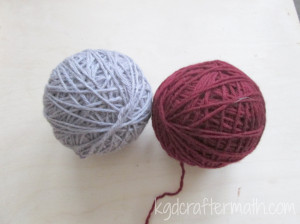
]]>After I wound all of my yarn skeins, I finally caved and cast on not 1, but 2 new knitting projects. One of them I’ll share when I’m done, probably next week, since it’s a relatively small one. The other is the pair of O.W.L. mittens that I am making for a friend for Christmas. She picked out the yarn and I’m doing the knitting. Yay! The pattern comes from the Unofficial Harry Potter Knits magazine that also has the Dumbledore socks in it.
O.W.L. Mitts by Celeste Young
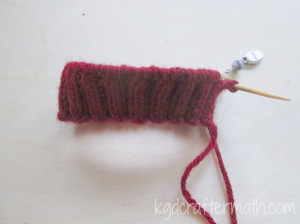
Hour 1: Casting on and rib knitting
Sarah, my friend whom these are for, choose a beutiful burgundy and grey from the Cascade 220 line for her mittens. They happen to be the colors of my high school, so every once and a while I get flash backs and think I’m knitting a bobcat or something. The cast on and the ribbing knit up pretty quickly. I just used a long-tail cast on.
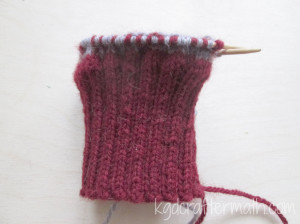
Hour 2: Finishing the ribbing.
These really do seem to be knitting up faster than the socks. I think part of it is that I’m in the knitting groove again, and part of it was that the ribbing pattern is easier for me to follow than the seeded rib from the socks. Anyways, by the end of hour 2 I had finished the ribbing and started on the pattern. I also added an additional row of contrast and color before starting the pattern since I really didn’t care for how close the text is to the bottom in the original pattern.
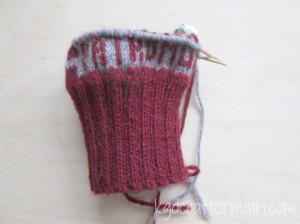
Hour 3.5 – Patronus
Ok, so here is where it gets a bit tricky to document. I took my picture after the first row of text. Since I only did a row at a time here or there, it’s hard for me to get an idea of exactly how long it took to knit up the section. I checked this morning, and it took me about 10 min. or so to knit up a single row. So I think it’s taking me about 1.5 hours. For now, that’s how I will label them. It will help with my OCD to take the picture at the end of each text block, especially since I’m only knitting a row or two at a time.
Hour 5: Incendio
Here is the next text block. I’ll try to take a picture from both sides from here on out.
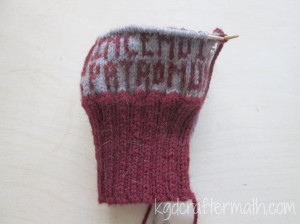
There you have it, a few hours of knitting. At five hours, that’s 1 hour for each week night. Not bad. As you may have noticed, I’ve started to take my pictures on a piece of unfinished wood, and I think I like the results a lot better than the black or the cream canvas. What do you think?
]]>Anyways… I present to you some pretty awesome knitting patterns. Some of them were introduced to me by my friend Sam, so thanks to her for that!
Amigurumi Airship
by Needle Noodles
Squee! This is so cute. Needle Noodles has a whole bunch of cute patterns like this. Some of her patterns are knitting patterns and some are crochet patterns. Most of her patterns are right around $4, but you can also buy some of them in groups. She also offers a number of them for free, including a really cute yeti. I may have to try to learn to crochet again so I can make an airship and a balloon and even some vikings in a ship!
Baby’s First DNA
by Kimberly Chapman
Ok, so this is really really cute. I know some people who have young children, so maybe if I ever have the time to make something just because I’ll make them one. Plus, most all of the people I know would really get excited about the whole science toy for kids thing. I wonder if I could modify it slightly and make the whole A-T C-G more integral to the pattern. Hmmm….
DNA Scarf
by June Oshiro
Maybe your science nerd friend is like me and doesn’t have any kids, but you still want to knit up some DNA for them. If so, try this pretty awesome DNA scarf. Sam, my friend, has knitted two! They are so popular that several of our friends have requested she make them one. Go Sam! Go DNA! Go Knitting! And since September is upon us, it might not be much longer until a scarf is needed here in MN. At least it’s still nice and warm right now!
Dr. Who Afghan
by Carrie Fritsche
Absolutely Gorgeous. Words cannot express how awed I am by this afghan. I haven’t made an afghan yet, but I can’t even imagine how much hard work went into both making the pattern and knitting the afghan. Maybe on day I’ll be good enough to even attempt this, but I’m not there yet. That’s ok, it’s something to aspire to!
Composition Book E-reader cover
by Janet Brani
This felted I-pad cover is just perfect for back to school. And it has so many nostalgic memories for many of us. Do they still use composition books in school? I hope so. A friend of mine has school aged children who are loaned I-pads from the school. I hope they still do things like take hand written notes. Using multiple senses is always good for solidifying what you learn! (So says the college TA).
I hope you’ve enjoyed these projects! If you’re interested in seeing more, head over to my pinterest knitting board! As always, I’ll continue to add to that board as I find more things that inspire me.
P.S. I’ve decided that I like the format of having 5 projects featured here and then linking back to my pinterest board at the end of the post. This way the post isn’t too long, but you can still go see more. 5 seems like a good number. Plus, it leaves me room to go back and feature new things another week. What, you thought this would be the last knitting inspiration? Plenty more to come, but don’t worry, there will be other stuff in between. I don’t want this blog to only be about knitting!
I’ll see you Monday with a sewing tutorial!
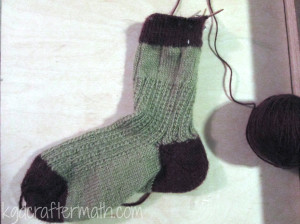
]]>Hour 15: Letter Boxes
I decided pretty quickly that I was happy with the length and switched to working on the letter boxes. It took me a bit to get the centered the way I wanted, but once I did I was off and knitting.
Hour 16: Finishing the Letter Boxes
Not much interesting here to say. The letter boxes went faster though, since most of it was knitting. The knit-purl switch off is something that my fingers still haven’t gotten used to. I’m not sure they ever really will.
Hour 17: The Cuff
Interestingly, the rib pattern didn’t bother me too much. The title here is a bit of a misnomer. I did start my rib and then have to completely pull it out. I forgot that when working in the round, you don’t need to switch from knit-purl to purl-knit. Oops. That mistake cost me an hour.
Hour 18: Binding Off
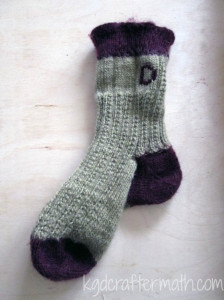
A little more cuff, the bind off, and the first of the letters. I embroidered them in from right to left. I’m not sure why, but it made more sense for me to do it that way.
Hour 19: Stitching the letters in
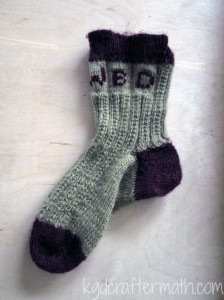
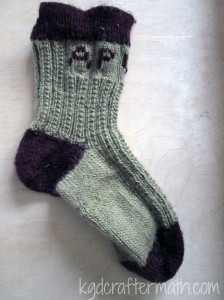
Look, it’s a finished sock! I only have one sock, so this project is really only half way done. Not counting lost hours, it took 19 hours. The final length ended up being maybe about crew length? My sizes last time were off since I was just measuring against my leg without putting it on. Overall, I’m happy with the length though. I know that I need to cast the other sock on soon, but I won’t be posting too much about it here. My plan is to cast the sock on and then start interspersing another craft. Anyone interested in quilts? I have one that I really need to finish by Christmas, so that will be my next set of posts. I’ll try to switch around weekly as well. I have some other knitting projects and a few smaller projects that may or may not merit a tutorial.
All that said, here’s what to expect for my Wednesday crafting hour. The posts will be interspersed with different projects which include a pair of knit gloves, a quilt, and some miniature painting. Since the semester is started up, you might get some metal working in there too. That’s all for today, I’ll see you again on Friday if not sooner!
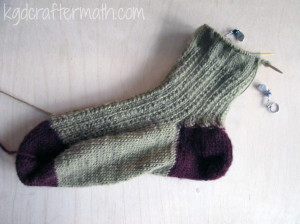
]]>Hour 12: It’s a sock!
So this is the point where I can officially say I have a sock. It’s a no-show invisible sock, but I could ostensibly finish it off here and call it a day. I didn’t though, nor was I tempted too, but it was still an exciting point. For the next sock, I think I will join the heel back with the green with a simple knit stitch. You can kind of see a little bit that using the rib stitch made it a little messier than I would like. I also messed up a bit on the first few rows, but you can’t tell unless you really look for it. You should be proud of me, I didn’t rip out my stitches to fix a little error!
Hour 13: An ankle sock
At this point I’ve pretty much decided to title by the sock length. I’m mostly guessing at the right size based on pictures and how it fits on me. At this point I took the sock off and tried it on to figure out how long I wanted it to be. It fit like a glove. Remember earlier when I said I was worried that I was headed for disaster by putting the heel on at 4″ instead of 6″? Well, I need not have been worried. This is also about how long I usually wear my socks.
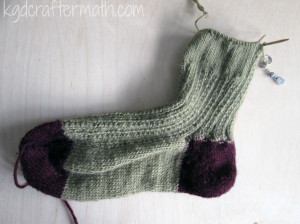
Hour 14: Quarter Crew
This is about the right length for an ankle sock. While it isn’t even half of what the pattern suggests before switching to the letter boxes, I will probably switch soon. I’m trying to go for a 3/4 crew I think. The pattern calls for an additional 3.5″ in stitching after switching, so I think it’s about time to switch. I want to count how many rows I’ve done and record that so that I can make the second sock the same height.
Well, that’s all for this week! Join me on Friday for some web inspiration on what to do with fabric scraps. Oh, and let me know in the comments what you think of my website (re)design!
]]>Hour 7: Getting to the heel.
I don’t know why I took this picture from this angle. Maybe it was to show that I went back to working with two needles again? I don’t know, but it’s weird. So, sorry about that. After another hour the sock was long enough that I felt it was time to go onto the heel. I was a little worried that the pattern was having me make the sock too long, so I moved onto shaping the heel a bit early. I am hoping that this was the right decision, but since I’ve never knit a pair of socks before, I could be in for a disaster going forward. I am hoping for the best. When I hit the edge of my heel, I switched back to two needles so I could work the heel and leave the top in tact. I plan to switch back to a single circular needle when I’ve finished the heel.
Hour 8: Starting the heel.
First of all, look at how the sock is now forcing me to photograph it length wise. It makes me happy. Figuring out how to knit a short row heel was somewhat difficult for me having never done it before, as you might have guessed from this week’s tutorials. It took a little while for me to do so, which is why you don’t see too much progress during this hour. But, I eventually figured it out and here you can see the first few rows of the heel.
Hour 9: More Heel
Nothing too special here, just a few more short rows.
Hour 10: Going back towards green
Truth be told, this photo is from between hour 9 and 10. However, it shows a pivotal point for me. This is where I hit the half way point of my heel and started heading back towards working the non-heel part of the sock. Yay!
Hour 11: Finishing the Heel
Woot, the heel is done! I’m ready to switch back to my green and work on the upper part of the sock. Yay! I’ll probably pull it off the needles again after a bit to try it on. I also need to decide just how long I want to wear it. I usually wear low cut socks, but this one won’t work so well that way. And I do wear longer socks in the winter. It’s Minnesota, it gets cold here. I am hoping that at this pace I can finish the first sock in the next two weeks.
I think I addressed this in my Crafting Hour post, but I wanted to take a moment to say that I hope these hourly posts inspire you to try something new. Part of the reason I want to do them is to show people that even if they can only craft in small chunks of time, you can still be productive and create things that make you happy.
Speaking of happy, what types of crafts do you do to wind down or get away from the world? I like to try everything, so I’m always up for something new!
]]>Knitting Short Rows: Adding Wraps
1. Knit to the end of the row, leaving one stitch on the left hand needle. (Of all things, this confused me more than anything else. I didn’t realize I needed to leave a stitch there!)
2. Pull the working yarn from the back to the front.
3. Slip the loop on the left needle to the right needle.
4. Move the working yarn to the back.
5. Slip the loop back onto the left hand needle.
6. Turn the work so that the right hand needle is now the left hand needle. Purl until there is one loop left on the left needle. Bring the yarn to the back, slip the loop from the left to the right, bring the yarn to the front, slip the loop back onto the left needle, and turn the work. (This is almost exactly the same as before but for the direction the yarn is being pulled).
7. Continue this pattern, knitting or purling until you reach the last unwrapped stitch and wrap and turn using the method above. To keep track of how many wrapped stitches you have, I use a marker that I move to separate all the wrapped from unwrapped stitches.
Knitting Short Rows: Working Wraps Back In
Eventually, you will want to expand the number of loops you are using and add the wrapped stitches back in. For socks, it appears that you continue wrapping until your row is in thirds (1/3 wrapped, 1/3 center unwrapped, 1/3 wrapped). To work the wraps back in so that you are once again using the entire row, use the following steps.
1. Knit until you reach the first wrapped stitch.
2. Pick up the back of the wrap stitch with your right hand needle.
3. Slip that stitch onto the left hand needle.
4. Knit the stitch you just place and the stitch just behind it together (the one that the wrap was around).
5. Turn the work. Notice that your working thread is on the left hand needle. This will not do, we need it on the right, so slip the first stitch onto the right hand needle.
6. Purl till you reach the first wrapped stitch, pick up the wrap and slip it onto the left needle, purl together, flip the work, and slip the first stitch to the right. Continue in this manner until all your stitches are being worked again or unless otherwise directed by your pattern.
Are there any knitting techniques that have stumped you? Or any tricks you could offer? Let me know in the comments!
]]>1. With your needles in your left hand and the points facing to the right, loop your yarn over one of your needles with a long tail.
2. Twist the yarn so that your tail goes to the top and your working end goes to the bottom.
3. Place your second needle below the first and pull the tail down, over the bottom, and under the top. Your tail is still up and your working yarn down.
4. Pull the working yarn up, over the top, and under the bottom needle. The working yarn is pulled downwards.
5. Repeat steps 3 and 4 until you have cast all your stitches on.
6. Knit the top row through the back of the loop using either double pointed needles, two small circular needles, or one large circular needle with the magic loop technique.
7. When you get to the bottom row, knit through the front of the loop for this row only. Since the magic cast on technique creates a twist in the lower row of stitches, this will correct that twist.
8. Continue knitting through the back stitch or following whatever pattern you are while knitting and purling through the back stitch. Check out your lovely hidden cast on seam!
]]>Kitting the back loop
1. Make sure your working thread is to the back of the needle.
2.Push the right needle through the back part of the loop.
3. Loop the thread over the front of the right hand needle and then back to the right.
4. Pull the right needle through the loop on the left needle and to the front without dropping the loop on the right.
5. Drop the loop off of the left needle.
Purling through the back loop
1. With the working yarn in the front of the work, use the right needle to pull the back part of the left loop forward.
2. Loop the working yarn over the top of the right needle and then pull it back to the right.
3. Pull the right needle back through the loop on the left needle.
4. Drop the loop off of the left hand needle.
There you go, knitting and purling through the back loop. I’m also adding Judy’s Magic Cast on and short rows for knitting through the back loop. I may end up adding more of these, but I’ll try not to take up a Monday tutorial unless I have several.
P.S. Sorry for the lack of Craftermath this week. Knitting needles and yarn don’t leave much behind, especially when I was only doing such short tutorials. This is the closest I could come, though to be honest I didn’t try too hard. No need to make a mess just for a picture!
]]>