*Deep breaths*
It’s ok. I”ll just skip crafting hour today and give everyone a look at what my current crafts are shaping up to look like. I know, I know. It’s barely November! Now, I don’t break out the Christmas decorations until after Thanksgiving, but I just have to start earlier when it comes to crafting and gift buying. Otherwise, it would never get done! Also, I happen to know that some of the people who read my blog will be getting crafted gifts from me. So, I’ll be keeping all those crafts a secret.
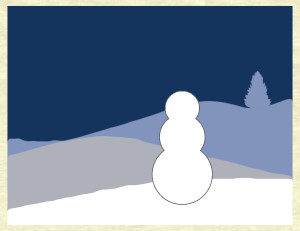
First up is Christmas Card planning. Earl and I have a tradition we started when we got married. Every year, the day after Thanksgiving, the two of us make Christmas cards. They have to be planned out ahead of time so that we have all the materials, because we certainly don’t want to have to do any last minute shopping on black Friday! This year we’re doing snowman cards, and I figured I’d give you a sneak peak. I’ll probably do a few posts related to these cards, but not until after we make them and send them out in the mail. Keep in mind that the image below is a preview only, the card itself is much cooler!
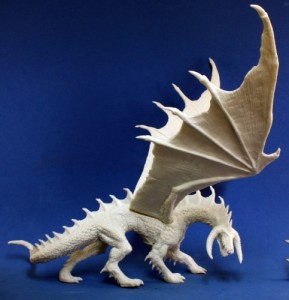
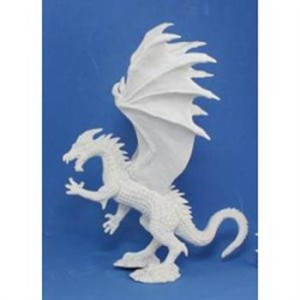
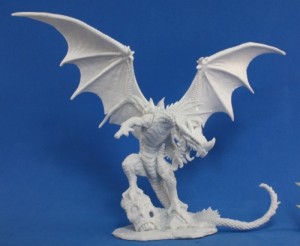
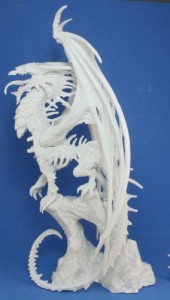
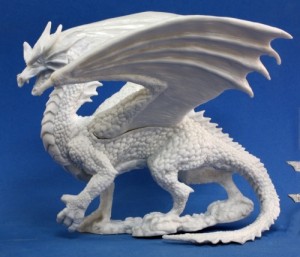
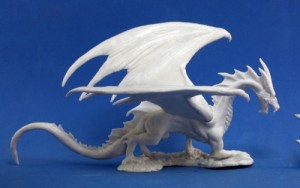
I’m also doing some painting work for a friend of mine. I’ll be painting up as many of the dragons below as I can before Christmas. I’m not sure how many I can get through, but at least one of them is a *must*.
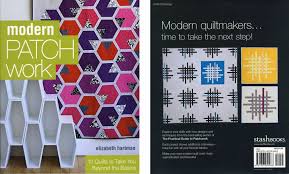
Christmas has another impending deadline for me: I really need to finish my brother’s quilt by then! He got married this summer and I started on a quilt, but haven’t yet finished. I’ve been working slowly away at it, but I’m not really close enough to done yet. I’m hoping to rectify that soon though. The quilt I’m making for them is the one pictured on the front of Elizabeth Hartman’s Modern Patch Work book. The colors I’m using are a variety of blues and greens.
And then of course there’s the *spoiler* that I’m making for my mom, and the *spoilers* I’m making as bulk gifts, oh yeah, and the *spoiler* for my brothers. Yeah… can’t really talk too much about those yet. I’m also trying to convince Earl that we should do yearly ornaments as well, like we do with our cards. Not sure he’s sold yet.
That’s all I got for now! Its a lot of crafting to do, and not much time to do it in, so off to craft I go! Look forward to an ornament inspired post on Wednesday, and maybe I”ll even get a finished Friday out if I can ever find my SD card *grumble grumble*.
]]>Since the weather is turning cold, I thought I’d round up some cardigan and sweater patterns. Please note that several of these are Ravelry patterns. In order to see those patterns, you will need to make a free account there.
Ophelia’s Willow: Owlish’s notebook, adapted from Verdaia by Jodie St. Clair.
I know that not everyone lives up in the cold north. So, I figured I’d start with a nice light weight shawl. I really like the simple pattern on this shawl. The pointed ends also make it almost reminiscent of a spider web to me.
Ahni: Julia Trice
Ooohhh! Pretty spiral patterns. That was the thought that first went through my head when I saw this one. If/when I make this sweater, I probably won’t do so much on the cuff, especially at the bottom of the sweater itself. Maybe for the sleeves though. I really love the overall look of this one though.
Freija: Mari Muinonen / tikru (image from Dayana’s notebook)
Ok, I admit it, I like things that are just a bit out of the ordinary. Like this gorgeous cable knit sweater. Who knew that cable knitting could have such personality to it? I love the color it is in here as well. One day, my precious, one day…
Wild Thing!: Splendor
When I saw this pattern, how could I not add it here! It’s just so awfully fun! What a better way to refuse to grow up than to dress up as one of the wild things.
Magnum Reversible Vest/Wrap: Karenclements
Ok, now we’re talking cold weather gear. Well, almost. There aren’t any sleeves on this! It shouldn’t bee too hard to add them though. She also has a downright stunning pattern for a honeycomb sweater as well. I have a feeling that once my socks and mittens are done, these two projects will be up next. Oh, how I like to wrap myself up in blankets and call them clothes. :)
There you are! Five knitting projects to keep yourself warm as the weather cools down. To see more, don’t forget to stop by my pinterest knitting board where you will find more warm wraps, a few summertime ones, and plenty of other knitting projects! I hope to see you all again on Friday, but if not then I’ll certainly be back to regular posting schedule by Monday. Thanks for reading!
]]>Those of you who’ve ready my ‘About’ page will recall that I am a grad student, which pretty much defines my life. One of the things that comes with that is grant applications. And we are currently in the midst of grant season. I am working on a grant that’s due Nov 1. This will be my second all-nighter this week (ugh).
With that in mind, I must suspend my activities here. I will try hard to get something up this weekend, but cannot promise much. At the very latest, I will return on Monday 11/4. Until then, stay inspired!
Also, I leave you with this awesome picture of molten bronze as penance.
]]>It’s not surprising, then, that I would find myself attracted to gifts in mason jars. I know Christmas isn’t really here yet, but I like to plan early so I have time to make any gifts that need making. So this week’s web inspiration is a collection of mason jar gifts. I hope you enjoy!
Flower Bulb Gifts by Homework
I know it’s fall, but here, have a bit of spring. This bulb jar is a really cute gift idea. Since I’ve (kind of) started gardening this year, it made me smile a bit. It’s super simple to do as well. I imagine that you would want to keep your lid off for this gift though.
Chalkboard Mason Jar Candles by heart. love. weddings.
The suggested use for these gorgeous candles is as a centerpiece, but I think they would be cute just about anywhere. You could even fill the jar all the way up with wax and make it a much larger candle that burns down. She uses a baby food jar for the little one, but a 5 oz mason jar would probably be just as cute. It’s amazing what you can do with a bit of chalkboard paint!
Housewarming Gift by Southern State of Mind
Once upon a time my mother told me that I was good at giving useful gifts. In particular, I gave good gifts for people who were changing something about their life (first apartment, college, etc.), and that my gifts often provided things they wouldn’t have thought of otherwise. I didn’t put that very well, but the point is that I remembered that. And now I feel the need to live up to that expectation. This jar of little home goodies would definitely fit the bill. The small gifts that Heather put in have just the right amount of thought and usefulness to them. Plus, it would probably make my mom laugh that I just wrote that. Moving on..
{Everything} In A Jar by The Gunny Sack
I think this blog post is my favorite of the bunch. In addition to the three pictured here, Tonia offers suggestions for other themed jars. She also has a few date’s in a jar, and I particularly like her ice skating date in a jar. The {Everything} in a Jar is my overall favorite though because of how she managed to keep all her jars color coded. It’s really quite stunning visually.
No-Knead Multigrain Bread (In A Jar!} by Our Best Bites
Of course, for in a jar, I must include some sort of food! I chose this bread recipe because it’s a bit of a deviation from the myriad of sweet recipes that you find. Of course, there isn’t anything wrong with brownies, cookies, hot chocolate, or other sweet goodies in a jar! I just liked the idea of a savory bread.
For more gifts in jars, feel free to check out my pinterest gift ideas board where you’ll find these along with several others, including sweets in a jar. There are also non jar gift ideas there as well to peruse!
What type of ‘in a jar’ gifts do you like receiving? Thanks for reading, and I’ll see you again on Friday!
]]>
]]>
Everywear Tails: Free
Pattern from Your Style Rocks
For today’s inspiration, I wanted to start with this pattern. It is one of my favorites. It comes from a British based site, Your Style Rocks, where they feature patterns made by their readers. I have made it before and lined it so it was reversible. That probably wasn’t the best decision as it made the vest super bulky. It didn’t help that I was using upholstery fabric and wool for the two sides! I’d like to make it again, but not quite as bulky this time. With the right fabric, it would be perfect for those few occasions where I dress up. While I really like the brown, I would make a slate blue for the imaginary outfit I’m currently considering.
Kimono Tabbard Shirt: £4.95
Pattern from Ralph Pink Patterns
I think this loose shirt from Ralph Pink Patterns would pair well with the waistcoat above. The straight neck -line doesn’t clash too much with the collar of the vest. Depending on the season, I might modify the sleeves so that they were long sleeve though. A collared shirt or non-button up could work as well, but I think I would keep it white as a light pop to the whole ensemble. That way it wouldn’t take too much attention.
Basic Pant: Free
Pattern from Modern Sewing Patterns
Since I don’t wear skirt or dresses, a pant is a must. Thankfully Modern Sewing Patterns has a nice basic pant that will pair with almost anything I wear! I have made pants before, and it’s really important that you pay careful attention to your measurements. It may take a few botched pairs if you aren’t super careful, but once you have a nice go to pattern, you’ll be set! Then you can make them in whatever color you want! For this outfit, a nice dark grey would work well.
Melford Messanger Bag: $8
Pattern From Charlie’s Aunt Etsy Store
I’m not much of a purse person, but I do travel quite a bit. I also have to drag things too and from the lab on campus as well, particularly my Surface Pro. And this bag fits the bill for that just great. I love the vintage look of this bag by Charlie’s Aunt, and the plaid and brown wool give it just the right tone. I have also made this pattern, though I altered it to have a central pocket divider in the main compartment. The front pocket also has a zippered section and several separated pencil spots. I plan to make it again, but just a tad deeper, with a larger flap for the top, and a second magnetic closure for a bit better security. For this particular pretend outfit, I would make the bag either in a similar blue plaid or a green much like the one in the picture here with a grey pocket.
Newsboy Cap: Free
Pattern from Clevergirl
To ‘top’ it all off, I’d add a wool newsboy cap. This pattern from Clevergirl.org is meant for a kid, but I could probably size it up just a bit. I think the colors here would go just great with the slate blue, dark grey, white, and pop of green.
Using the magic of Photoshop and my awesome box and oval drawing skills, here is a look at the color scheme I would use.

There you have it. A whole outfit put together from the patterns on my current pinterest board. If you are interested in seeing more clothing patterns, visit my pattern board. You can also check out my sewing projects board, which has projects other than clothes, or take another perusal through my scrap fabric board.
And now I know what my next clothing projects will be! I promise that I’ll share the results with you when I eventually get around to them, though I can’t promise that will be any time soon. Oh yeah, and I need to find a reason to wear this, though I guess it would make a great first day of class impression!
What clothing projects do you have on the horizon?
]]>
Installing the Software
The software was really easy to install, even though it didn’t work on my Surface (Win 8). I’m hoping that their customer support is as awesome as everyone says (spoiler – it is), but for now at least I still have the desktop (Win 7). There is a cd that comes with the software or you can download the software from their website. The silhouette comes with 50 free designs, which is pretty cool. Note that to get those designs you need to hook your cameo up to the software and then download them, so don’t worry if they don’t show up right away. I downloaded the software from the website, so this may not be true if you use the cd. There is a premium version of the software, but I don’t know if I need it just yet. I am sure that I will want to do more than just what you can do in studio, but for now I’ll work with what I have.
Connecting your Online account with your software
First you need to create an account at their shape store. Once you’ve done that, go to File – Download Pending Orders. Your library will pop up on the left and a screen will pop up on the right prompting you for your email and password. You also have the option to remember your password and to automatically check for pending orders when the program opens. I have both clicked, this way if I purchase something online it will automatically download and I won’t have to wonder if I’ve downloaded the files or not.
Downloading the free shapes
This was really easy. Just go to File-Preferences and choose advanced in the pop-up window. Then hit “Restore the Standard Designs”. I had already registered my Silhouette before I did this, so you may need to do that first.

Here is a sample of the free shapes you receive. Everything but the flourish was included in my free downloads.

Purchasing Shapes
Even though the cameo comes with a number of shapes, they are all pretty basic and I wanted to do a project that would be a complete project to start with. Plus, it came with a $10 gift card to buy files, so it was only reasonable that I take advantage of all the wonderful projects already there! I don’t expect to be doing to much purchasing of projects, but I figured why not. The Silhoutte Online Store was really easy to browse, and you can even browse within the studio software which I thought was pretty cool. I purchased 3 projects and 1 sketch for a total of $6:
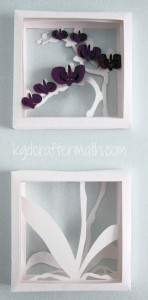
3D orchid shadow box
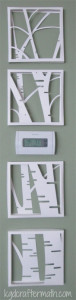
3D birch shadow box
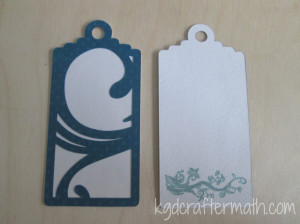
6 flourished small tags and a Flourish Sketch
As you can see, I made all three of the paper cuts, but I’ll only be going through how I made the tags. You can visit the Ashbee Design blog for detailed instructions on how to make the other two. Most of the designs are $1 or less, but the 3D ones are a bit more complicated and so are fairly priced a bit higher. I also really like that you can purchase commercial licences for some of the designs right through studio, which were also reasonably priced.
Once I purchased the shapes and connected my software to my online account, they downloaded right into my Studio software package.
Ok, I think that’s a good stopping point. For the next post I’ll walk you through working with the tags in the software.
This post is part of my First Cuts Series! Want to read the rest? Here’s the whole group of them!
Silhouette Cameo: The Unboxing
Silhouette Cameo: Installing the Software and Shapes
Silhouette: First Contact with the Software
Silhouette: First Cuts
Silhouette: Trouble Shooting
In the meantime, here are some inspiring projects to show the variety of creative things you can make!
Handmade by Paula: Mini Greeting Cards
Note Cards from Handmade by Paula
Aren’t these cards just adorable? Changing the color and the greeting is such a simple way to add variety to a note card pack. I also really like the matching envelopes. So pretty!
Mouse Pad Makeover
Mouse Pad Redo by Seasoned Home Maker
This mouse pad is so effective and easy to do. She just used the silhouette to cut the fabric to size and then adhered it to the old mouse pad. Awesome!
Silhouette Decorative Wall Border
Silhouette Blog decorative border
This wall border made from vinyl would look really cute in a child’s room. I would imaging you would want to keep the flower flat though, as kids tend to grab at things and I bet these flowers are just the right height for pulling!
Cupcake Project: Cupcake Wrappers
Cupcake project’s cupcake wrappers
There are so many really awesome paper wrappers for cupcakes, and all sorts of holiday ones as well. I can’t wait until I can find an excuse to make some cupcakes and pretty them up!
The Miller’s: labeled jars
Ok, so this is something I really want to do. The Silhouette can work with any installed font on your computer. Yes, you read that right, any. The idea of labeling jars like this is such a simple thing to do and really looks good. Plus, it would make it easier to tell the difference between bread flour and regular flour. Awesome!
The Silhouette also cuts fabric. There are kits to dye fabric, cut stencils, set rhinestones, land etch glass. If you want to see some more inspirational silhouette projects, check out my pinterest board here! I’ll keep adding things as I come across them, as you do with pinterest.
Look forward to my own silhouette projects soon!
]]>
So, what should you expect to see here? Well, for starters I am planning on doing one tutorial a week. I haven’t figured out when I’ll post them yet, but since I’ll be working on them on the weekends, it will probably be on Mondays at first. I’d like to get ahead of the game so that I can post them on Friday’s. This way, maybe you’ll get some inspiration for your weekend! Additionally, I’m a really big fan of “roundups”. These are things that I find on the internet and post links to here. These help me get my creative juices flowing and help showcase all of the other wonderful things out there. I’ll also be posting progress on some of my larger projects, like the quilt I am currently sewing for my brother and his new wife.
Going forward, I would like to do craft alongs where you participate as well. And for some of my projects, it is easy for me to make more than one thing. Those would be really fun to do as give-aways. As I develop this space more, I’ll create a pinterest board and a facebook page. But, first I need to get some posts here and develop this space as an actual space. Expect these things to come in the next few weeks. I am, after all, only one person!
With all of that, I’ll leave you with some teasers for tutorials to come.
Plus bags, dog beds, and cork drawer liners!
]]>