I know what you’re thinking: “That’s a sewing project, Kristy, it’s not a silhouette project.” Au contraire mon ami! The silhouette does so much more than just paper. But, you already knew that. What you might not have known is that you can use it to score the nice felt backed vinyl you can find at your fabric store. That’s what makes this a silhouette project!
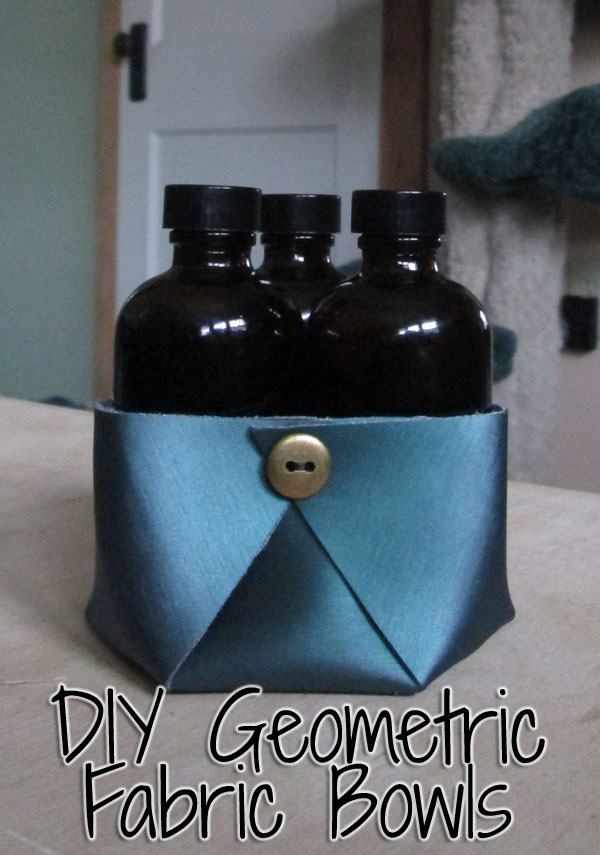
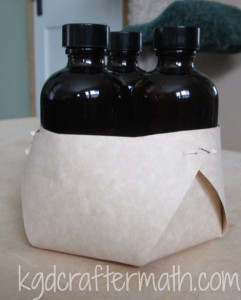
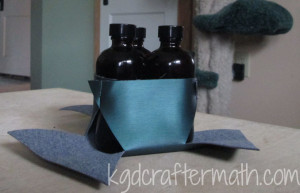
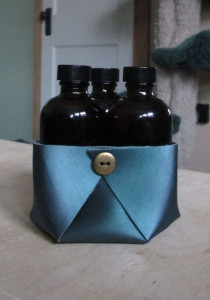
But first, the inspiration! As you all know, I never create in a vacuum, and I like to give credit where credit is due. This project started as a problem. You see, Earl and I are making something in those 8 oz bottles modeled above for Christmas. No, I won’t tell you what, they’re presents. But, each person we’re giving them to is getting 3, and I wanted a way to hold them together. I thought about all sorts of different ways to create baskets or bowls, and even knit up a bowl to felt. The bowl took me 3 hours to knit though, and I need to make 24 of them, so that was a no go. I went to pinterest for inspiration, and what did I find but these gorgeous leather bowls by Between the Lines! They even had a link to their inspiration, which was a heavy felt bowl!
I can’t find the original blog post for the felt ones, but the picture explains the concept relatively well.
I fell in love with them instantly. They are beautifully made, very simple to do, and fit what I need just right. There was one problem though: leather is expensive. I just can’t afford to get as much as I would need for 24 bowls. For that matter, industrial felt is also wicked expensive. I tried to stiffen some felt myself, but I wasn’t really happy with the result. My biggest concern was that since I used water soluble glue, it could easily wash out if the bowl got wet, which is not inconceivable considering the contents. My silhouette also failed to cut through the felt, and I knew I wanted to use it to cut out the bowls. (FYI – silhouette can cut felt in general, just not the stuff I was using. Check out Cutesy Craft’s post on the topic for more info!) See, I don’t know about you, but cutting geometric shapes is not my forte. We ended up doing the hexagon bowls, and even with a pattern, I would have screwed it up, and the bowls would have come out lop sided. Clothing patterns? No problem. Straight lines? With angles that aren’t right angles? You want me to do what now? Yeah… that’s not happening.
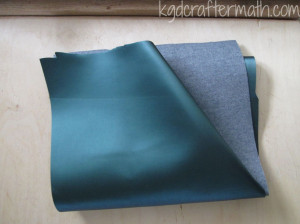
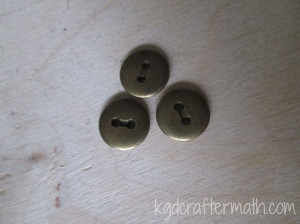
This prompted a visit to SR Harris, my local fabric outlet. I love SR Harris because they have a wide variety of good quality fabrics, and almost everything is 50% off. To be honest, I went in looking for heavy duty felt. I didn’t find it. I did find some really nice felt backed vinyls, and the price was perfect! All told, I purchased 1 2/3 yds for ~$15. I also went through their buttons and counted out 72 of the same button. O.o This was no small feat, as all their buttons are mixed in plastic containers. So… many… buttons… I went home, did some testing with the fabric, and verified that yes! The silhouette will (mostly) cut through it! With my material in hand, an some nifty graphics, I set forth to make my own bowls!
Ok, back story over, now it’s tutorial time! If you want to make your own geometric bowls, here is how you do it. I did hex bowls that end up to be about 4″x4.5″x2.5″. You can download the cut file and .pdf patterns here.
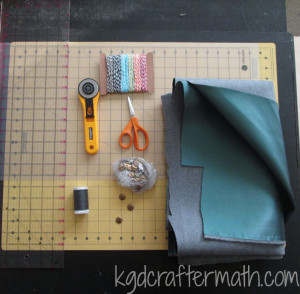
The Materials
Fabric. Each hex I cut measures ~ 8.5×9.75 I used a total of 1 2/3 yds for 28 bowls
Buttons (Optional – I used 3 for each hex)
Cutting mat and straight edge
Rotary blade
Fabric scissors
Silhouette mat (I used a 12×24)
Thread (I used a heavy duty upholstery thread)
Something to attach the buttons (I thought about using twine, but ended up using the upholstery thread.)
Step 1: Prep your fabric
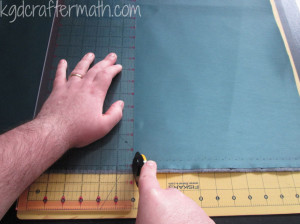
As much as I would love to just send the fabric through the silhouette as is, You just can’t send 1 yd of fabric through the silhouette. I cut all of my fabric into strips that were 12″x36″. Yes, the strips are longer than the cut mat, but that’s ok. Honestly, it’s just the 12″ width that matters. And yes, that’s Earl helping out with the project! He usually does. *warm fuzzies* :)
Step 2: Set up your cut file.
We tested everything in paper first, and found that we liked the ~8.5×9.75 hex size best. Any smaller and the three bottles wouldn’t fit. We also discovered that the pattern worked best when the inner base was .45% of the full shape. If the sides are smaller, the corners don’t meet. I imagine you could do larger sides if you wanted. With the above size hex, the walls hit right around the 2/3 mark of the bottles, which was pleasing to the eye. I did try the square bowl as well, but the bottles didn’t really fit well and end up warping the square. The larger the hex is, the more you can pull the sides in to make the flower like shape in the inspiration post (assuming you want a small opening). I liked the straight edge look of the hexes we made.
Square Bowl- Too small
Large Hex Bowl – too big
Small hex bowl – Just Right!
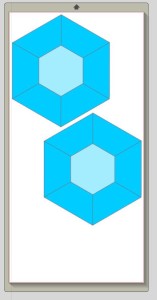
I also did some math to figure out the best way to fit 12″ strips on our vinyl and get as many hexes as possible. I can fit 4 hexes on a 12×36. You can download my cut file here. Both the square and hex shapes are there. You could theoretically do this with any even sided geometric shape. Anyone want to do an icosahedren (20 sides)? What matters for the sides is the ratio of center to wall, so it’s easy to re-size the cut file for your needed size. I staggered 2 hexes on the cutting area – you’ll see how to get 4 out of that in a moment. You can use 9″ strips as well, you just won’t be able to stagger them. (Note that the inner color does not cut, and is just there for sizing purposes.)
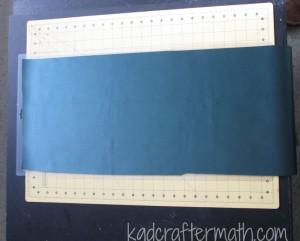
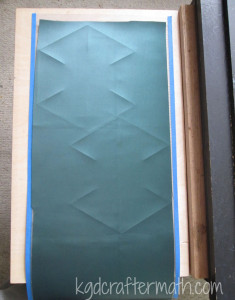
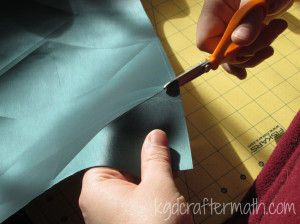
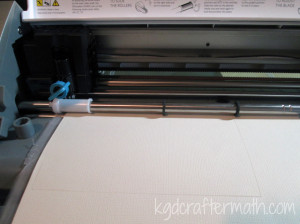
Step 3: Cut one side of your vinyl
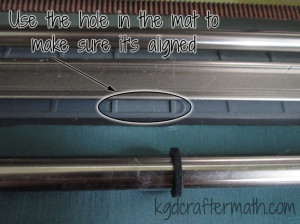
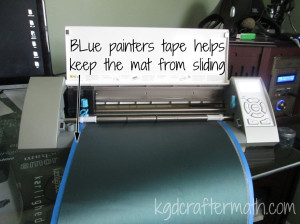
When laying the felt backed vinyl down, make sure the felt side goes onto the mat. If you do it the other way, the blade doesn’t cut through the vinyl. After aligning the fabric, send it through the silhouette. You will notice that the blade doesn’t cut all the way through, but it does score through most of the fabric. This was the key for me – it made the whole process *so* much easier. My mat ended up slipping a bit after 4 successful cuts (which told me it wasn’t the fabric), but my Silhouette friends set me straight and suggested I used painters tape on the sides of the mat. It worked like a charm. Thanks guys!
I forgot to tell you my cut settings! I used the fabric blade set to 10, Speed at 3, and Thickness at 33.
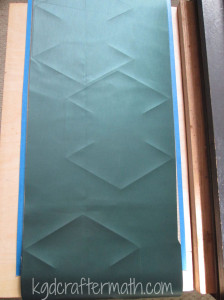
Step 4: Cut the second side of your vinyl
Remember I said you could get 4 out of the vinyl? This is how I did it. Once the first side was cut, I removed the fabric and flipped it so that the uncut side was now at the top of the sheet. Since the hexes are staggered, this places the already cut hexes in a staggered fashion to where the new hexes will be cut. Then I sent the fabric through the machine and cut out the second 2 hexes. Here are some pictures to help explain. Of course, none of this is necessary if you are just making one bowl. Also, make sure to double check all your measurements so you don’t have an overlapping cut!
If you can fit more than 4 shapes along the length of your fabric, you can re-position the fabric by pulling it upward instead of flipping it and then start a new cut. Stay tuned, as I’ll go over that this Friday.
Second Cut.
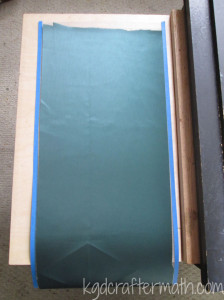
Flipped on the mat (notice the cut marks at the bottom?)
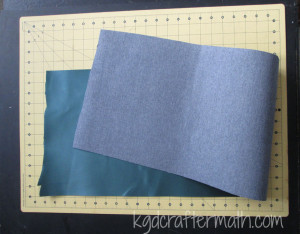
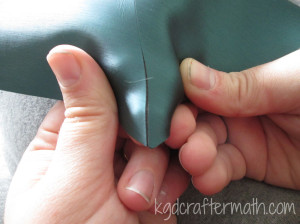
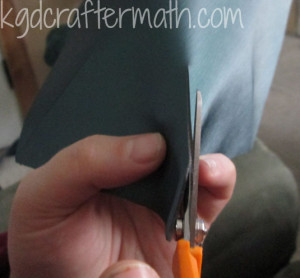
Step 5: Cut out your fabric with scissors
Now that everything is scored, it’s really easy to go through with a fabric scissor and cut along all the score lines. Just cut in from one of the sides to a score line, fold the fabric, and follow the score. Make sure to cut along the outside of your shape as well as along the radiating lines towards the middle.
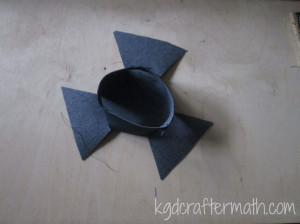
Step 6: Assemble the inner part of the bowl
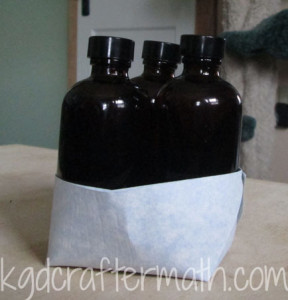
Ok, now we’ve hit the sewing part. But don’t worry, it’s really easy. If size matters, do the following steps with pins first to make sure you will have the right size opening. Here is my pinned version (look at the next few pictures to see how I got there).
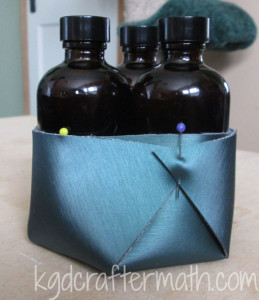
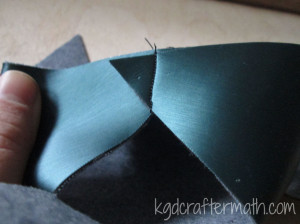
First, you need to sew together the ends of every other triangle to make the inner wall. Pull the corners together and overlap them. The more overlap you have,the more petal like it will appear, but the smaller opening you will have. You can see the amount of overlap I used below. Earl did a fit test on all of the boxes to make sure he wasn’t making them too small before sewing. On the inner triangles, Earl stitched across the overlap since it will be hidden later. You might have to finagle a bit to get it to go through the way you want. The overlaps don’t have to make a straight line either, so if they tilt in a bit that’s OK. Do this for all 3 of the inner wall triangles.
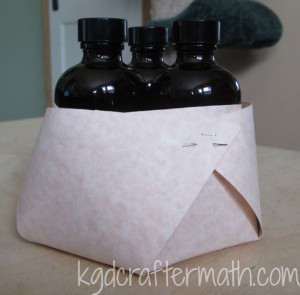
Step 7: Assemble the outer wall.
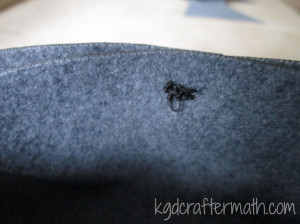
For the outer wall, you are going to pull. up the remaining triangles. The overlap here is going to be less than the previous step. I made sure all my edges were straight and hand stitched the buttons on with doubled up upholstery thread (5 passes) to secure the bowls together. I chose to stitch right through both the inner and the outer wall, since the size of the two walls is so close. You could just stitch through the overlap and not the inner wall if you had a larger difference between the walls. For me, it was more important that the basket was sturdy.

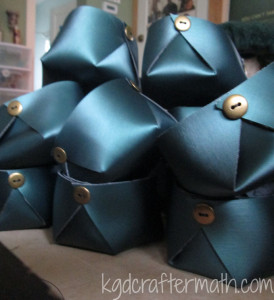
Fin!
That’s it! Your bowl is done! Aren’t they just so elegant in their simplicity?
Here’s some mid-project craftermath. I’ve still got some buttons to sew, so it doesn’t seem fair to call it completely over yet.
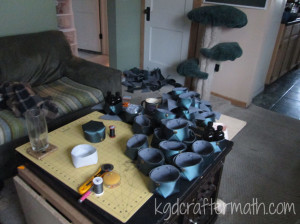
Of course, we’re making 24 total, so that was a lot of bowls. O.o Once we got into a rhythm, they went by pretty fast. Cutting the bowl took less than 5 min (silhouette + hand cutting), sewing it took maybe another 2-3, and the buttons took the longest at ~5 min. So, 20-30 minutes a bowl. A heck of a lot better than 3 hours+ a bowl! We’re not done yet, but here’s a bit of what we did do! They kind of look like lots of tiny hats. :)
I’m really happy with the outcome, and so excited to give these as gifts. Of course, the real gift is what’s inside those bottles! Sorry, you will have to wait till *after* Christmas to find out. I know, I’m such a tease. I’m also really glad that I was able to use my silhouette with these; the straight, accurate lines really make a difference for this project!
Thanks for checking out my geometric bowls. Be sure to look through some of the links below for more inspiring projects!

Want to Check Out More Silhouette Projects?
My Silhouette Challenge buddies are all sharing projects today on their blogs, so peruse the links below for a blog-hopping good time.
Silhouette Challenge: Time Zone Bathroom Art by Nearly Handmade
Santa’s Christmas Countdown by Tried & True
Nautical Anchor Pillow Tutorial by The Thinking Closet
Christmas Card Ornament with Free Cut File by unOriginalMom
Thanksgiving and Christmas Dual Sign by Architecture of a Mom
Itching to Etch by Get Silvered
Snowman Tag ~ Silhouette Challenge by Whats Next Ma
Thanksgiving Sign by Chicken Scratch NY
DIY Horse Silhouette Pillow by Rain on a Tin Roof
Sketching on Fabric by The Sensory Emporium
Paper Leaf Garland by Lil’ Mrs. Tori
DIY Blessing Board – Silhouette Challenge by One Tough Mother
Christmas Pillow by Create & Babble
Glass Painting with Reverse Stencils by Givemeapaintbrush
Chalkboard Thankful Tree by Cutesy Crafts
Bottoms Up! MYO Wine Tag by From Wine to Whine
‘Happy Holly-days’ Tags for the Swap by An Elegant Touch…
Thank You for Dinner (Card) by Everyday Paper
Advent Star Christmas Countdown by My Favorite Finds
Paper Carnival by Home At Eight
Silhouette Cameo Tutorial: Dual Sided Business Cards by Black and White Obsession
In Case of Emergency Baby Bag Tags by Tossed Salad Life
Christmas On My Mind by Creative Turn
Jingle all the Way! by My Paper Craze
Christmas Lights Garland by Making Home Base
We Are Thankful by 4 You With Love
Seattle Skyline Silhouette by Sowdering About in Seattle
DIY Stenciled Mugs by Coley’s Corner
Do you have a Silhouette machine?
Looking for Silhouette inspiration, support, trouble-shooting? Interested in joining us for our group posting event next month? Then, we’d love to have you join our Silhouette Challenge Facebook group. To join, simply fill out the new member request form, and Lauren from The Thinking Closet will get you squared away.
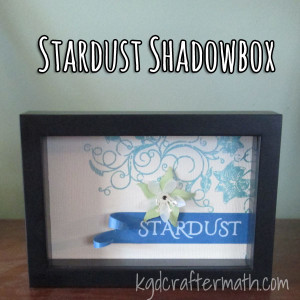
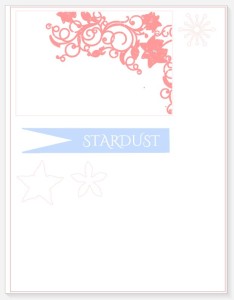
So how did I get to a Stardust shadow box? It’s a bit of a story. When Earl and I got married (3 years ago), my youngest brother Nate gave us a set of 5 shadow box frames. I really liked them, but have been trying to think of something to do with them, so they have just been sitting around. In the past few weeks several things happened that all came together nicely for this project. A few weeks ago I got my new Cameo, which has had me constantly thinking of new paper projects to do. Among those projects is a tutorial based on the paper flowers I made for my wedding. Each flower was made from the pages of fantasy books that Earl and I chose, including Neil Gaiman’s Stardust. Around the same time, The Thinking Closet did a post about making her own sketch art with her Cameo. Shortly thereafter, it all came together. I could use my Cameo to make some 3D paper art based on one of the Stardust cover art versions and put it all in one of the shadow boxes we have. I’m not sure what I’ll do with the other four boxes. Earl and I talked about doing artwork based on the other books we used or possible just using Gaiman, but we haven’t really decided yet. Rest assured, you will here about it here when we do decide.
Image source: Audible
Here’s how I made my shadow box! It’s just the directions, but I’ll add another post on how I designed the box later.
Materials:
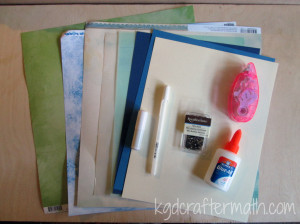
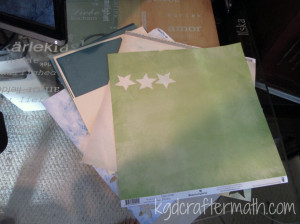
Assorted Paper:
Cream color for background
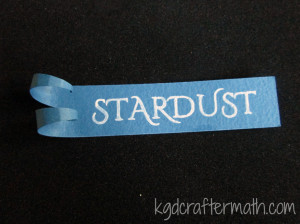
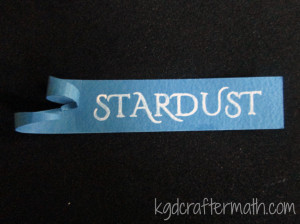
Blue for banner
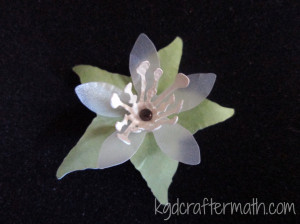
White/blue/or vellum for flower
Green for leaves
1 Mini Brad
Double Sided Tape Roller
Elmer’s Glue
White Pen
Blue Pen (Not Shown)
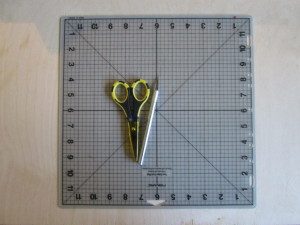
If you don’t have a silhouette, you will also need:
A Self Healing Mat
Paper Scissors
An exact-o type knife with a new blade
Skills Needed: Cutting, gluing, and shaping paper.
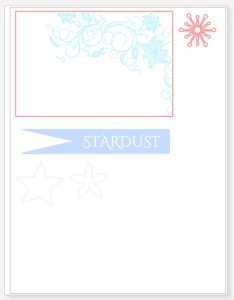
Step 1: Download the patterns
If you have a silhouette, you can use these directions to work with the silhouette file I made and follow the steps in order. Otherwise, you can download a .pdf with the images and text. If you are using the .pdf, print the file out on each of your colored papers and hand cut the shapes out. With the .pdf, print at actual size, cut your shapes using your scissors and exact-o blade, and skip down to step 5. Both patterns are designed for a 4×6 image.
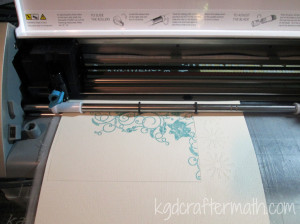
Step 2: Cut and Draw the background
I’m assuming that you are using 4 different colors: the leaf, the flower, the banner, and the background which also doubles as the center of the flower.
For the background, you first need to ungroup the main design. Click on the main design and go to Object – Ungroup. Now click on the cut style button in the upper right ![]() . Make everything no-cut except for your box and the center of the flower. It should like like this:
. Make everything no-cut except for your box and the center of the flower. It should like like this:
Without removing your paper, go back to the silhouette program and change your cuts so that only the floral design is being cut. Switch your blade for your blue pen, change your cut settings, and send the design to the silhouette. Here is the second cut:
Now you can unload your paper.
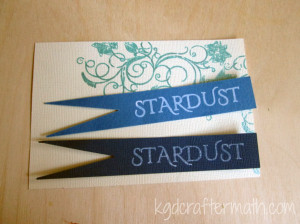
Step 3: Cut and Draw the banner
Move the main background out of the way and put your banner up top. Now click on the banner and ungroup that by going to Object-Ungroup. You will make two cuts here as well. First, set everything but the banner to no-cut. Cut your banner out of your blue paper. Keeping the paper in place, change the banner to no-cut and the text to cut. Switch out your blade for your white pen and send the design to the silhouette. Unload your blue paper.
Step 4: Cut your flower and leaves
For the flower and the leaves, make sure that only the flower or leaves is set to cut depending on your paper. There is only one cut on each of these papers, so once you have cut out the shape you can remove the paper.
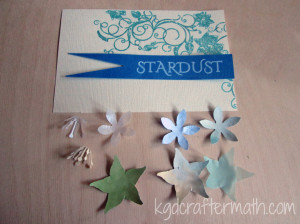
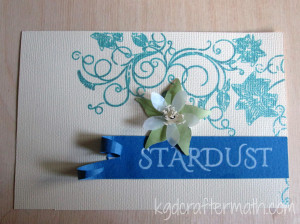
I wanted to experiment with several different colors for the leaves, flowers, and stamen. Below are all the bits I cut out with my silhouette. In the end Earl and I chose to go with the lighter blue banner, the silver velum flower, the bright green leaf, and the cream stamen.
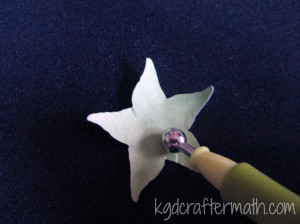
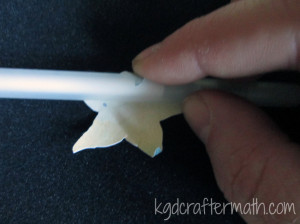
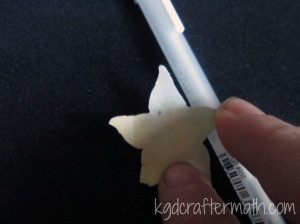
Step 5: Curl your leaves
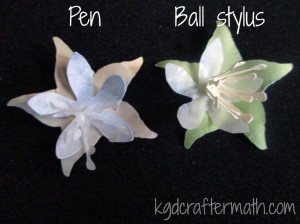
You can use one of two tools to curl your leaves and petals: a ball stylus or a pen. I used my ball stylus and foam molding mat because I like the way it looks better, but either works. I’ll show you both here.
First, you want to roll your leaves up towards the center. With the ball roller, simply place the roller near the center of the leaf and press out to the edge. Do this for each leaf. After you have rolled each leaf up, put the ball in the center of the leaves and depress the center a bit by using a circular motion. Then, turn the leaf over and roll just the tips back down. I like the rolling look this gives the leaves.
If you are using a pen, wrap the leaves around the pen going towards the center. Repeat for each leaf. Flip the leaf over and wrap just the tip in the opposite direction.
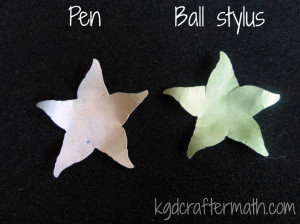
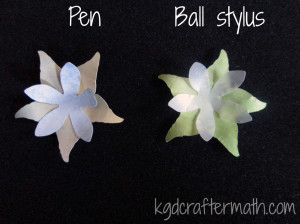
Here is a comparison photo of both methods:
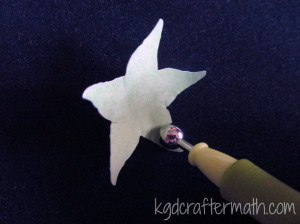
Step 6: Curl your petals
Follow the same steps as with the leaf, except don’t roll the edges backwards. Instead, press the flower down very gently with your hand to flatten it a bit.
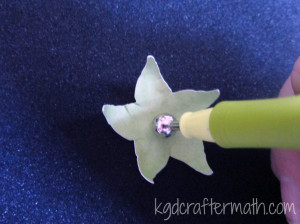
Step 7: Curl your stamen
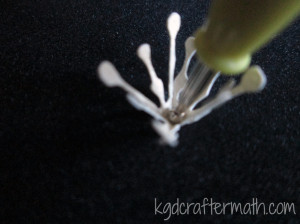
To curl your stamen, press down the center with either the tip of your pen or a smaller ball stylus. Then pull each stamen bit up.
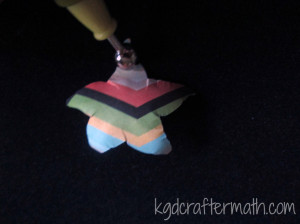
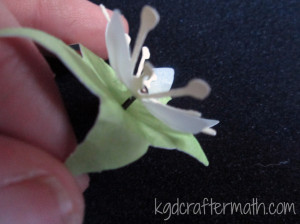
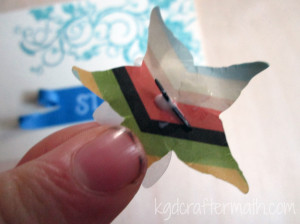
Step 8: Assemble your flower
Use the brad to assemble the three parts of your flower. If you cut your flower with the silhouette, there will be a hole there for you. If you printed via .pdf you will need to punch one through with the brad. If you flatten your flower as you assemble it, just re-work the shape with your hands a bit. It will be more pliable now that you’ve already shaped it above. Either way, you will probably have to pull your stamen up to the center again.
Step 9: Color in your banner and background
The silhouette file only colors the outline of the text. Just color inside the lines with the same pen to fill out the text. I went over the text 4 times to achieve the look I wanted. Also consider filling in some of the lines on your background scroll with the blue pen. I filled in the swoopy bits that connected the flowers, but kept the flowers as is.
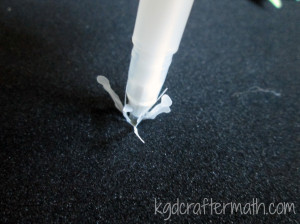
Step 10: Curl your banner
I curled my banner with my pen. After I curled both ends up, I pressed the bottom one backwards a bit and curled the top one even more with a smaller tool. Then I pulled the curl of the top one down so you could see the spiral.

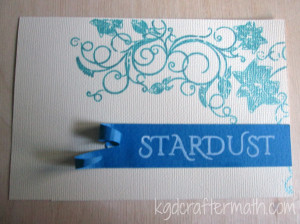
Step 11: Adhere the banner to the background
To adhere the banner to the background, I used my tape roller. I also added a bit of tape to the end of the bottom curl to keep it down a little more
Step 12: Add your flower
I used elmer’s glue to adhere my flower. It’s a bit heavier duty than the tape. Just a dot will do. Hold it down for a minute or two to make sure it takes. After a few minutes, pull your stamen back up and re-shape the flower if need be.
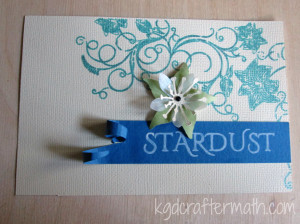
That’s it, you’re done! Put your new artwork into your shadow box, hang it on the wall, and enjoy!

And here’s your craftermath. This one isn’t too bad, but if you’re not careful you’ll have paper bits hanging around your house for a while!

What do you think of today’s project? What book would you turn into wall art if you could?
This post has been added to a link party! What does that mean? Well, it means that a bunch of crafty people all got together to share the fun projects they have been working on. To see more fun stuff, head over to That’s Pinteresting! hosted by the House on Hillbrooklane.
]]>Ikea Hacker’s nature inspired blind.
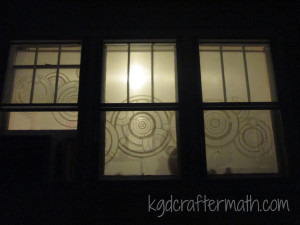
I really liked the idea of adding a distracting pattern, and what better geekier thing to do than the Dr.’s name! If you don’t know who Dr. Who is, go wikipedia it for a brief primer. Basically he is a traveler through space and time who encounters all sorts of issues and usually saves the day through some hair brained scheme. There is a lot more to it, but I’m just hoping you know what I’m talking about by now. If you haven’t seen it and want to watch some Dr. Who you can do so on netflix. The Oncoming Hope has a really good article on which episodes you should watch if you have never seen it before. Or you can just start at the beginning of the 2005 reboot. That being done, you should know that the doctor comes from a place called Gallifrey. Gallifreyan script is really pretty and composed of overlapping circles. In the episode “A good man goes to war” we have the pleasure of seeing the doctors name on the side of his old cot. And so, the idea was born to paint the doctor’s name in Gallifreyan script as a triptic across my brandy new ikea blinds. And now, with this nifty tutorial, you can to!
Update 8/30: If you find yourself trying this project yourself and want to ask questions, feel free to email me at [email protected] or catch up with me on facebook. I’d love to see how yours come out!
Materials
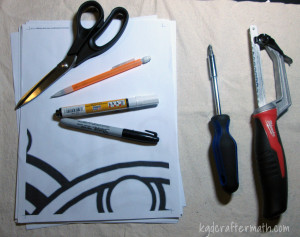
Handsaw
Fabric scissors
Screwdriver
Fabric pens
Pattern
Blind
Step 1: Cutting the blinds to fit
No pictures here, since I wasn’t blogging then and Earl surprised me by cutting them one day when I wasn’t home. It’s pretty easy though. Ikea sells the enje blinds in a variety of sizes. If they don’t happen to have your size, you can always buy one size up and cut it down. Here is how to do it.
1. Measured for length. Mark the amount you need to remove on both rods.
2. Remove one side on the top and the bottom. slide the bottom out.
3. Cut the fabric to the correct length with your scissors.
4. Use your hacksaw to cut the rods down to size.
5. Replace the bottom rod.
6. Screw your ikea mounts into the window frame and mount your blinds.
If you want pretty pictures of how to do this, I would suggest you go Door Sixteen, she has some nice pictures and goes though the process in detail.
Step 2: Create your pattern.

I used Photoshop to separate out the script into 3 equal parts, since I have 3 windows. Then, I re-sized each image to 29″ wide, which is slightly thinner than my blinds. You can do this in your choice of graphics program. If you want, you can use the file I created. It is hosted on Google Drive as a .pdf here. It is sized for 3 29″ windows, so if you are using a different sized shade you will need to re-size it appropriately in a graphics program first.
Step 3: Print your pattern.
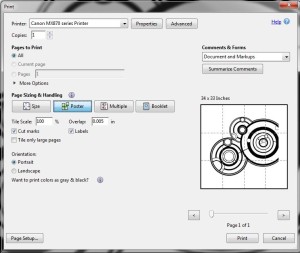
I saved my pattern as a .pdf so I could use the ‘poster’ print settings. Use the settings above when you print your pattern. This will print your pattern out at full size across multiple pages, I had 36 printed pages total. Don’t bother to try and tape them together, rather leave them separated for the next part.
Step 4: Trace your first blind.
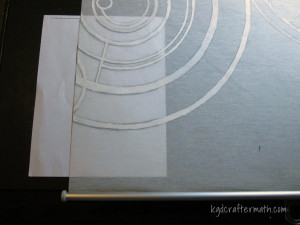
Note the distance from the bottom.
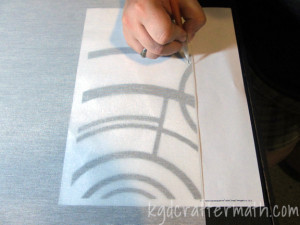
Start tracing with this piece (bottom right of the left panel).
Because the Enje blinds filter light through, you can see through them to trace your pattern directly onto the blind. Starting with the right blind and lower left page from your printout. Align your page to the side of the blind leaving some breathing space below the paper. Trace all the lines on that page in light pencil. Now, align your next page with the lines you traced on the blind. Continue this process until you have traced an entire blind.
Update 9/21: Reader Malin had a great idea, use tailor’s chalk on the blinds! It will erase easily if you are trying to center the image and need to re-position.
Step 5: Trace your second and third blinds.

Mark the edges from the other blind in pencil (exaggerated here so you can see it).
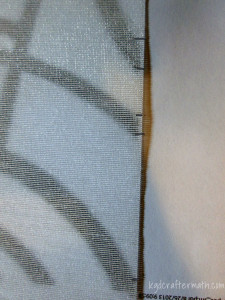
Then line up the paper with the marks.
To align your second blind to the first blind, arrange them so that the bottoms are even and overlap the side slightly. Make a mark for each mark on the traced blind. Use these lines to align the paper on your second blind. The middle blind might require you to extend your lines a little bit. Complete tracing this blind as you did the first. Then use these sames steps for your third blind.
Step 6: Paint your blinds
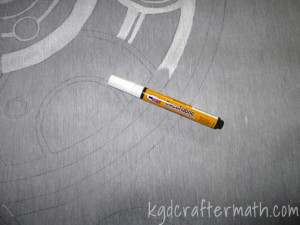
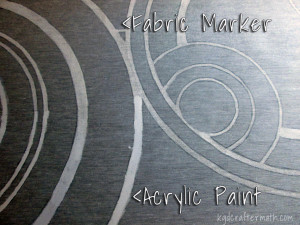
To paint the blinds, I used both regular acrylic paint and a fabric marker. The fabric marker wasn’t as thick and I had a bit more control, so I ended up using that. It took me 12 markers in total to complete the blinds. As soon as I realized that I would need a few, I bought them in bulk. I have since learned that you can re-fill the pens with fabric paint. If I ever do this again, I’ll make sure to do it that way.
Update 8/30: Tip: Try to keep your strokes going in the same curve as the circles. Do medium to long strokes and overlap your sections. Don’t create vertical or horizontal lines, as those stick out at the end. If you look at the middle curtain closely you can see where I made some vertical guide lines.
8/31 Tip: I found it easier to have the blind hang over the edge of the table, pull it tight, and then paint the part in the air. That way the paint didn’t seep through onto the table.
8/31 Tip: If you are using several markers, vigorously shake them before opening them. When you open a new one, blot it on a paper towel just in case the first bit of paint is runny. It should thicken up quickly. Some of my markers were very watery, and I ended up having a big blob on my right blind I had to clean off.
8/31 Tip: If you need to remove the paint, use a paper towel with isopropol alcohol and lots of elbow grease.
That’s it!
This project probably took me a month and a half to do, but only because did it sparingly in my free time. You could probably finish this in a weekend if you dedicated your weekend to it. Since I did the project over a long time and because there isn’t much mess, there is no craftermath. However, I hope you enjoy these photos of the finished project from different views!
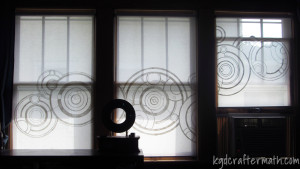
An Inside view during the day.
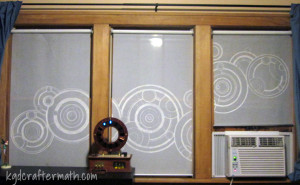
A view from inside at night
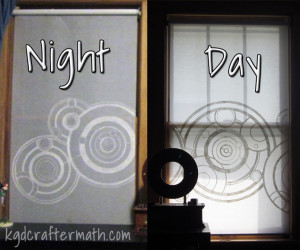
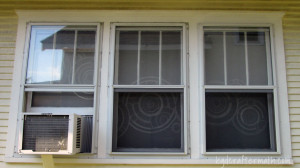
An Outside View
Update 8/30: Here’s another picture, this time from the outside at night. You can see how the shade allows you to see what’s inside, but the pattern obscures the view and draws your attention. You could still see inside if you really wanted, but it keeps the casual passer by from getting a birds eye view of your house. I wouldn’t walk around in my knickers though, just saying.
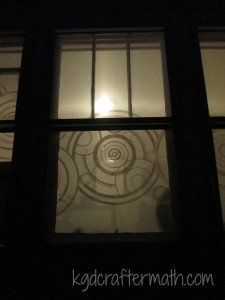
Outside view at night
Thanks to everyone who has featured this post!
![]()


![]()
![]()

Knitting Short Rows: Adding Wraps
1. Knit to the end of the row, leaving one stitch on the left hand needle. (Of all things, this confused me more than anything else. I didn’t realize I needed to leave a stitch there!)
2. Pull the working yarn from the back to the front.
3. Slip the loop on the left needle to the right needle.
4. Move the working yarn to the back.
5. Slip the loop back onto the left hand needle.
6. Turn the work so that the right hand needle is now the left hand needle. Purl until there is one loop left on the left needle. Bring the yarn to the back, slip the loop from the left to the right, bring the yarn to the front, slip the loop back onto the left needle, and turn the work. (This is almost exactly the same as before but for the direction the yarn is being pulled).
7. Continue this pattern, knitting or purling until you reach the last unwrapped stitch and wrap and turn using the method above. To keep track of how many wrapped stitches you have, I use a marker that I move to separate all the wrapped from unwrapped stitches.
Knitting Short Rows: Working Wraps Back In
Eventually, you will want to expand the number of loops you are using and add the wrapped stitches back in. For socks, it appears that you continue wrapping until your row is in thirds (1/3 wrapped, 1/3 center unwrapped, 1/3 wrapped). To work the wraps back in so that you are once again using the entire row, use the following steps.
1. Knit until you reach the first wrapped stitch.
2. Pick up the back of the wrap stitch with your right hand needle.
3. Slip that stitch onto the left hand needle.
4. Knit the stitch you just place and the stitch just behind it together (the one that the wrap was around).
5. Turn the work. Notice that your working thread is on the left hand needle. This will not do, we need it on the right, so slip the first stitch onto the right hand needle.
6. Purl till you reach the first wrapped stitch, pick up the wrap and slip it onto the left needle, purl together, flip the work, and slip the first stitch to the right. Continue in this manner until all your stitches are being worked again or unless otherwise directed by your pattern.
Are there any knitting techniques that have stumped you? Or any tricks you could offer? Let me know in the comments!
]]>1. With your needles in your left hand and the points facing to the right, loop your yarn over one of your needles with a long tail.
2. Twist the yarn so that your tail goes to the top and your working end goes to the bottom.
3. Place your second needle below the first and pull the tail down, over the bottom, and under the top. Your tail is still up and your working yarn down.
4. Pull the working yarn up, over the top, and under the bottom needle. The working yarn is pulled downwards.
5. Repeat steps 3 and 4 until you have cast all your stitches on.
6. Knit the top row through the back of the loop using either double pointed needles, two small circular needles, or one large circular needle with the magic loop technique.
7. When you get to the bottom row, knit through the front of the loop for this row only. Since the magic cast on technique creates a twist in the lower row of stitches, this will correct that twist.
8. Continue knitting through the back stitch or following whatever pattern you are while knitting and purling through the back stitch. Check out your lovely hidden cast on seam!
]]>Kitting the back loop
1. Make sure your working thread is to the back of the needle.
2.Push the right needle through the back part of the loop.
3. Loop the thread over the front of the right hand needle and then back to the right.
4. Pull the right needle through the loop on the left needle and to the front without dropping the loop on the right.
5. Drop the loop off of the left needle.
Purling through the back loop
1. With the working yarn in the front of the work, use the right needle to pull the back part of the left loop forward.
2. Loop the working yarn over the top of the right needle and then pull it back to the right.
3. Pull the right needle back through the loop on the left needle.
4. Drop the loop off of the left hand needle.
There you go, knitting and purling through the back loop. I’m also adding Judy’s Magic Cast on and short rows for knitting through the back loop. I may end up adding more of these, but I’ll try not to take up a Monday tutorial unless I have several.
P.S. Sorry for the lack of Craftermath this week. Knitting needles and yarn don’t leave much behind, especially when I was only doing such short tutorials. This is the closest I could come, though to be honest I didn’t try too hard. No need to make a mess just for a picture!
]]>Today’s tutorial is born out of that event, and thus is why I didn’t post it yesterday. I made Earl a leather luggage tag for our anniversary. We like to give each other little gifts, and I have made it a personal challenge to stick to the traditional anniversary gift materials. It is not a necessity that I make something, but I’ve done so two out of three years so far. Year three is leather and I spent forever trying to figure out what to get him. I couldn’t afford to get him the leather satchel he wants (it’s around $600), he already has a leather wallet, a basic leather belt is a bit blah, he doesn’t write in a journal so that’s out, so on and so forth. I finally got the idea to do a luggage tag after I remembered these gorgeous tags I found when we were getting married. So, I set forth to make him a tag and here are the results! I should note that I have removed his personal details with the magic of Photoshop for privacy reasons as well as the artwork I burned and painted. I’ve added a note about that at the very end. Without further adieu… here is your tutorial! It’s super easy, so don’t hesitate to give it a try!
Time needed: About 3-4 hours
Skills: Cutting, stitching, and burning leather
Materials
1. Leather. I used a rather thick piece of scrap leather I had that originally came from a belly piece. It needs to fit about the size of an 8.5×11 if you are using my pattern, but there are 2 pieces so you can cut your pieces diagonally if need be.
2. Your pattern with markings for your text, cut marks, and punch marks. You can download a .pdf of the pattern I made here if you want. It includes both leather pieces and the text to slip inside. It’s also a form, so you can add your own text (but not graphics).
3. Heavy cardstock for your contact information.
4. Some sort of hole puncher. I used my cropodile. The snaps I bought also had a tool to punch holes through cloth that probably would have worked for leather.
5. A ball point pen.
6. Something to cut your leather with. These are my leather cutting scissors.
7. Paper cutting scissors.
8. A paint brush.
9. A sharp exacto knife with a new blade (a utility knife would work as well.
10. Leather paint. You could probably get away with acrylic.
11. Leather dye. This is optional, if you like the color of your leather as is, you don’t have to dye it.
12. Snaps or some other sort of closure. These are snaps I got from the fabric store.
13. A hot tool to burn your leather. This was a cheapo $15 wood burning tool.
14. A hammer
15. An awl and thread. As long as you have a needle and something to punch small holes in the leather, it need not be an awl. I would also suggest a heaver string that has been waxed, as it is stronger.
Directions
Step 1. Print the pattern and cut it out using your paper scissors.
Step 2. Place the pattern on the side of the leather that you don’t want to use. Using your ball point pen (or a pencil if you prefer), trace the outline of the pattern.
Step 3. Cut out your leather. I used leather scissors for this, but a new utility blade would do just as well.
Step 4. Place your pattern on your leather so that the back side of the paper is on the front side of the leather. Carefully trace over the pattern with your ballpoint pen. Make sure to get everything that you want to burn as well as all the holes that you will be stitching. When you trace the holes, only trace the sides and the bottom. You will leave the top open to put your contact information in later. Do this for both pieces. When you are done, there will be an indent where you traced your pattern. These are your guidelines for almost everything else going forward. I have left a small portion of the removed image so you can better see what I mean.
Step 5. Cut out the inner part of the smaller piece. Start by cutting a hole in the center, then following out towards the traced lines. Use those lines as your guide and cut the entire center piece out.
Step 6. Burn the outlines of your image and the fill of your text. I suggest doing a few test swipes on a scrap piece of leather to better understand how the tool works.
Step 7. Punch lightly in each of the dots to start your holes. (I did steps 6 and 7 in opposite order, hence the odd picture lineup, but this makes more sense).
Step 8. Punch all of your holes. I found it easier to punch when the leather was wet. This does stretch the leather, however, if the leather is dry it cracks when you punch. So, choose your poison. If you are really careful and practice a lot beforehand, you can probably punch the holes without stretching or cracking.
Step 9. Dye your leather. I did not wait for my leather to dry. This did not cause any adverse effects, but I would suggest you let your leather dry first. My dye did say that it could be used while the leather was still wet with cleaner, which I didn’t use, but I figured that water would have a similar effect. Once it was all dry, the leather did seem to take the dye just fine. To dye it, use the enclosed swab, saturate it with the dye, and run it over the leather. I did this a few times, waiting for the shinyness of the leather to dull before adding additional coats. Even if your leather is not wet, it will still be darker at this stage. Only when the leather is fully dry will you see the final color. You may want to do a test dye on a scrap piece to make sure you like the color. I choose Nubuck because I wanted a light brown (but darker than the naked leather) to complement the burn and paint colors.
Step 10. Paint the insides of your design. I waited for the dye to seep in (there was no more shinyness to to leather), but not for the leather to dry. As above, your mileage may vary. Here is a small snippet of the painted image (which sits just below his name) so that you can get an idea. Try not to go over the burn marks, if you do you’ll have to touch them up later.
Step 11. Sew the piece together. If you are just using a needle and thread, use a saddle stitch to stitch it through. The directions here can be modified to use a simple needle, but I am using an awl.
Stick your needle through the first hole.
Pull enough thread through the hole to cover twice the distance you are stitching.
Pull the needle back out of the first hole, leaving the extra thread behind. Place it into the second hole, leaving a little bit of extra thread between the first and second holes on the top.
On the bottom side, make a loop using the extra thread that is from the stitch above. Pull your bottom thread through that loop.
Pull your needle up and the thread tight; repeat until you have gone through all the stitches you punched. If you need to, you can add a punch now as well. My leather pieces stretched to different sizes. I just used the same pieces, which caused one side to bunch up. I was ok with this result.
Step 12. Cut your threads and knot them securely on each side. Trim your corners if they don’t match up.
Step 13. Now we will prep our end for the snap. If you are using a fabric snap, you will need to skive your leather. This is simply thinning it with a razor blade. There is a skiving tool, but I just used a blade. Choose the spot that you will put each of the snaps and thin it to about half it’s existing width. You can place your snap ends in to make sure it is thin enough.
Step 14. Now we will add the snaps. I decided I wanted the sticky outy part near the base of the tag and the other part near the top. Since my snaps had slightly different hole sizes, I made sure that the right size was punched for each hole.
Here are the four snap parts. Each one needs to be used with a particular “head” for the plastic tool that you hammer down on, so make sure that you put them together properly. I’ll go through each side here, but your snaps should come with instructions as well.
Below is the configuration for the sticky outy part, or the smaller of the two snap pieces. Make sure you have the sticky outy part on the inside of your leather. Once you have the whole assembly together, hammer it a few times with a hammer. Hammer it a bit more if you need to.
For the other piece, make sure that the flat end is on the bottom (or the smooth side) of the leather so that it will let the sticky outy bit snap into it. Align, and hammer.
Step 15. After you’ve added your contact information, print it out on the cardstock and cut the square out. Insert this into the back of your tag and trim if needed.
And that’s it! Here are some photos of the finished product (the lighting and the color are more true on the right):
And as always, the craftermath. This one isn’t too bad. It spilled a bit onto the couch, but the pets always love to sleep on the mess. Much more than a clean couch it seems, especially the cat.
*Wait, you removed the artwork from the tag, explain please?!?! Well, as I (somewhat) often do, I found an image I liked through Google search and used that. Only when I was writing this post and looking to source the image did I realize that the creator of the image would have been very upset at my use of it. I have seen various reactions to re-use of images, and I try to avoid using images that artists explicitly request not be used (as was this case) or have watermarked. I partake in many fan bases that re-mix media often. While I have crafting ability, I’m not very good at drawing. Had I done due diligence and clicked through before using the image, I wouldn’t have used it at all. But, I can’t go back and undo what I have done. The craft has been made and the gift given. I seriously considered making an entirely new luggage tag for this tutorial, because it is a craft that I truly believe doesn’t require much knowledge of leather working. I could have even just removed all references of the image all together and used the magic of Photoshop to make it look like it had never been there (as you see above). But, I felt that would be disingenuous. So instead, I will own up to my misstep while still providing you with the above tutorial. I did choose to remove the image though, as it is the best way I can honor the originators wishes given the circumstances.
]]>Ok, let’s get onto the tutorial! I chose to do dog beds this week because I had a problem to solve. I have a queen sized “feather” bed that I have no use for. I was unable to find anyone that wanted it, and I wasn’t sure if I could donate it, so we decided to salvage the stuffing for other projects. The first thing that came to mind was dog beds for our Jack-Russel: Bug. Without further adieu, I present to you my very first tutorial.
Time: 30 min
Familiarity Needed: How to sew a basic straight stitch.
Materials
1. Cutting Mat and Straight Edge (optional)
2. Pins
3. Coordinating Thread
4. Rotary Blade (optional)
5. Scissors
6. Felt (I used 2 yds and made 4 beds)
7. Stuffing (you really don’t need much)
Directions
Step 1. Cut the Fabric to your desired size. Our crate is 24×18. I wanted the bed to be a bit small in the crate and we’ll be giving the beds some loft, so I cut my original pieces to 24×18 with my rotary blade.
Step 2. Place your two matching rectangles together and cut out a 2×2″ square in each corner of your fabric.
Step 3. With the wrong sides together, sew all four straight edges of your two pieces together. Leave an opening in the middle of one of the straight sides. (Alternatively, you can sew all the sides together here and leave one corner open in the next step)
Step 4. Grab the inside corners of the cut out squares and pull out so that they make a single seam. Sew each corner flat like these. (Make sure to leave one open if you did not leave a gap in one of the sides).
Step 5. Turn your fabric inside-out so that the seams are on the inside.
Step 6. Now it’s time to stuff your bed. You don’t want the bed to be too full. I stuffed mine so that there was a thin layer of stuffing about equally distributed. I would say it was maybe 1/4 as full as I would stuff a pillow.
Step 7. Now that your bed is full, it’s time to close up the bed. You could hand stitch it closed so that the seam doesn’t show so much. I machine stitched mine because it’s a dog bed, and it doesn’t bother me if the dog bed has an open seam.
And here it is, all finished and in the crate with Bug modeling how much he likes it!
Well, there it is, my first tutorial. It’s really simple, but I figured it was a good place to start. I hope you enjoyed it. Let me know in the comments if there is anything that you want me to make!
Oh yeah, and I almost forgot….. Here is the craftermath!
]]>