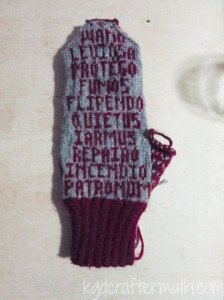
Hour 6.5: Repario
I actually timed this hour, and each row of words does indeed take me about an hour and a half, so my estimations from before are indeed correct.
Hour 8: Iarmus
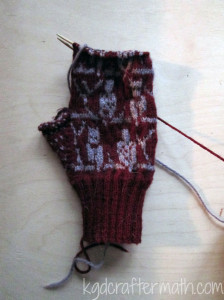
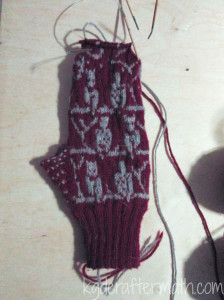
Well, no photos here. I had thought I took photos each step of the way, but I must of missed this row. Does the fact I don’t have photo documentation of this row mean it never happened? I hope not! But wait look ahead, another row (and another photo)! This is also the spot where the thumb was separated off and held on a string for later finishing.
Hour 9.5: Quietus
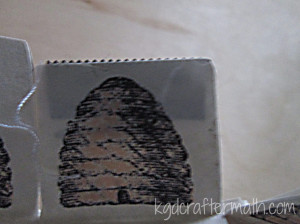
*Phew*! It looks like iarmus did indeed make it into the mittens. I was worried for a moment there (not really). :) Oh! It’s my favorite part of the documentation: the part where the photos switch from wide to tall! Squee! Progress is made!

Hour 11: Flipendo
Hour 12.5: Fumos
Eh, these pictures are a little dark here. Stupid rainy, cloudy days. Or was that the day it snowed? I can’t quite remember.
Hour 14: Protego
Hour 15.5: Leviosa
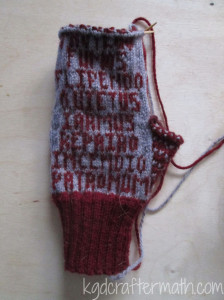
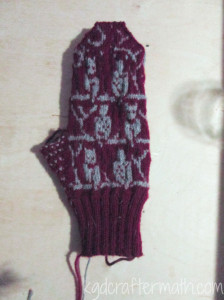
This row is when the decreasing began. I screwed that up a little bit. I knit two together for each decrease, where I should have used a different decrease on one of the sides. I’m relatively confident that it will be ok with Sarah… I hope… She’s pretty cool though, and I’m sure she will be happy all the same. Right? Sarah! Forgive me!
Hour 17: Wand
More decreasing here.
Hour 18.5: Finishing up the top.
This consisted of these last few rows and stitching the top rows together.
Hour 20.5: Finishing the first mitten!
Next up was stitching the thumb up and tucking in all my loose threads. It took me about 2 hours to do this, as you can see in the hourly title. I am so happy it’s done! And, I’m seeing Sarah soon! *Happy dance*! There is nothing better than showing a friend progress on a project you are working on for them. Oh, right, you want to see pictures!
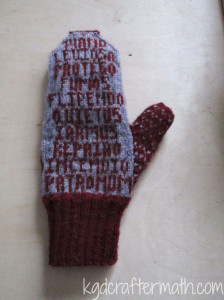
Now, I have to hurry and finish up the other one! We’ve already had our first snow and they are forecasting for more next week (maybe). I promised them to Sarah for Christmas, but I’d love to have them done sooner. If I can do a row a night, then I should have them done by Thanksgiving!
Thanks for checking it out, and don’t forget to join me on Monday. It will be my second Silhouette challenge. I’ll have a craftermath photo for you again as well! And on the note of messes, Laura over at The Experimental Home has a running series called The Monday Mess movement. I’ll be doing a guest post there in December (my first!). I love it! We get to revel in our own messiness and show everyone that no, our homes are not perfect. Though, by the title of my blog you could probably guess that I’m constantly apologizing for my craft mess *blush*. Go check out all the lovely messes there, and some of the really cool projects she does!
Off to craft I go, see you all again on Monday at 9AM central sharp! Well, for me at least, you all can come by any time after then. :)
]]>
This week I’m showing you some of the painting work I’m doing. Right now I’m working on painting up all my Pathfinder goblins from Reaper’s first kickstarter. If you want to get your own, they are sold in two packs: goblin warriors and goblin pyros. I also have the goblin warchanter who is sold on her own.In total I have 18. I decided to paint up one of them first to get the color scheme down and them paint the rest in bulk. So, here’s the progress I’ve made! These are in blocks, since it’s just easier to take a picture each time one of the steps is done. All of the paints are Reaper MSP paints.
All the miniatures are bones miniatures, so they start out as a slightly translucent white plastic. To prep the bones, I boiled them in a pot of water for about 10 min. This allows the bones to set back to their original shape if they warped and helps to clean off any residues.
Hour 1-2: Painting the first Goblin
The first guy took me about 2 hours to paint up. I’ll probably add some more details to him later, but it gives me a basic paint scheme to go with. Here’s how he came out:
Hour 3: Painting the base
The base here is a simple Intense Brown. I’ll wash it later with a Flesh Wash to make it appear more muddy.
Hour 4: Laying down the Green
First coat is adding the skin. One of the nice things about bones is that you don’t have to prime them. Sometimes I put down a grey coat first, but decided not to here. The green looks really bright, but it will get some darker washes later to tone it down. The base green is Jade Green.
Hour 5-6: Adding in the cloth
Next I added the cloth color. Again, the wash later will darken it a bit. I had to do some touch-ups on the green when I was done with this coat. Here I used Terrain Khaki to get a bit of a dirtied look to the linens.
Hour 7: Painting the leather bits
Finally, I went through and painted all the leather bits. I used Lonestar Leather for the paint color here.
That’s where I’m at for now. I’m looking forward to moving forward. Right now I’m still adding base colors, but there will be some washes in there later. I’m not going for as nice a mini as the last one I painted, so I won’t be focusing so much on tiny details. After all the base coats are down, I’ll wash the whole thing with a dark brown and then begin to highlight with selective color dry brushing. Finally, there are a few details that I’ll add (eye color, stitches on the leather, and maybe yellow the claws).
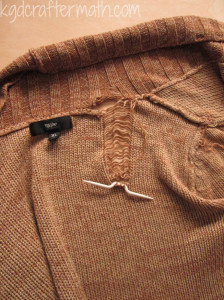
]]>Hour 1: Fixing the bottom run
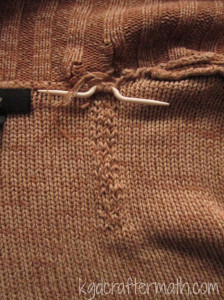
Here’s the cardigan as it was given to me. I have already picked up the bottom most dropped stitches in this picture and placed them on a cable needle.
For each stitch I did the following; Remove a loop from the holder. Push your crochet hook through. Grab the loose yarn closest to the loop. Pull the yarn through with your hook to create a new loop.
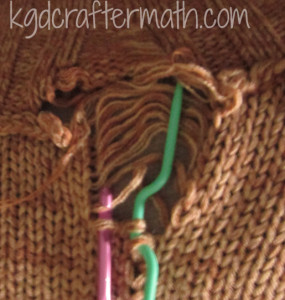
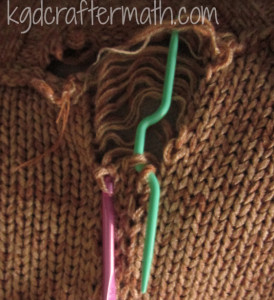
I went left to right across each row and up the run. This took about an hour and was the longest part of the fix.
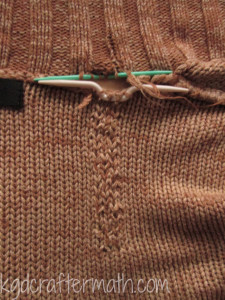
Hour 1.25: Fixing the upper run. There was also a bit of a run on the upper pattern. I fixed it the same way as above, but it took less time since there was significantly less run. I did have to use a smaller hook though, and it would have come out better if I had had an even smaller hook.
Hour 1.5: Binding it all up I purchased a skein of yarn that was almost the same color as the original cardigan. I stitched it through all the stitches that were on the holders. I also ran it through some of the other stitches, made sure to bind up the loose ends of the cardigan, and tied it off at the end.
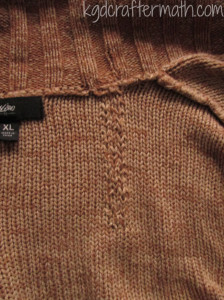
Hopefully this will hold for her longer! You can still see where the run was. I’m not sure if there is anything to be done about that. You might be able to block it back into place, but I didn’t think to try that until afterwards. Thanks to Sam for convincing me to fix it properly! So there you go : 1.5 hours to fix a run in a cardigan. Definitely worth it if the cardigan is like a best friend!
]]>This Saturday something special happened. Two dear friends of mine, Kassie and Adam, were married. I love everything about weddings except that there are too many people there and I’m often expected to dance. Kassie is such a social butterfly though, and she’s always so happy; it was really an honor to be able to celebrate with them.
Earl and I had spent some time thinking about what to get them, and we ended up getting them a copy of 7 wonders. It’s a really fun board game with many different ways to win, and we’ve recently gotten Adam hooked. We also found some gorgeous skull paper to wrap it in. If you know Kassie, you know that it is right up her ally. Kassie focused on physical anthropology, in particular zooarchaeology (the study of bones) for her undergraduate. Currently she has a collection of bobcat skulls on her parents porch weathering. The one thing I hadn’t had the chance to think about was the card! I like to make cards in general, and especially for weddings, so I wasn’t about to run to a card shop.
When I woke up on Saturday and realized I didn’t have a card for them, I was really glad I had my silhouette. I went to my pinterest silhouette board for inspiration and found a style that I liked. I also found a really cute vinyl photo frame project that I made for them that morning. The negative die cut of the card below with the watercolor behind was really pretty. I needed a wedding appropriate image though. For some reason, scherenschnitte came to mind. Scherenschnitte is the art of cutting delicate paper figures by hand. A few years ago I did a scherenschnitte cut from Cindy Bean’s scherenschnitte blog. Her designs are really pretty, and it seemed like the perfect pattern source for the cameo! She offers a number of really nice free patterns, and her Spring Love template fit the bill perfectly.
Watercolor Birthday by Loll Thompson
Spring Love by Cindy Bean
Inspiration in hand, I converted the pattern to a silhouette cut file. Since I knew I wanted to do a negative cut, I needed to find a pattern for the back paper. I didn’t have anything I liked on hand, so I went to the silhouette store and found two patterns I liked. Both were water color, one a white/grey water color and the other a green/brown gradient. I also found a really nice vinyl cut that I thought would work great as a greeting. The text is: “Live Simply, Dream Big, Be Grateful, Give Love, Laugh Lots.” I thought it was great advice for a wedding card. Simple and to the point.
Once the cut file was done, I used the print and cut feature to print the patterns on some calligraphy paper. I’ve decided that I really like calligraphy paper for paper projects. It has a delicacy to it that cardstock doesn’t, but still feels a bit sturdier than printer paper. I ended up with 3 4×6 pieces: the cut out, the watercolor background, and the saying. Originally I had been planning on making 4×6 cardstock card to adhere these to, but ended up deciding I liked them as a single piece, like a little print. Or you could call it a post card, but I like print better.
First I cut out the image for the negative die cut.
Next, I used some transfer tape to remove the paper from the mat while keeping the separate bits in the same place.
With the other two pieces cut, I sprayed on just a little 3M spray on the cut. With some careful positioning, I was able to adhere the cut to the gradient paper.
The same process was used to adhere the saying to the back of the gradient sheet.
I made an envelope with some Tim Holtz craft resist paper, placed the card in, and signed the flap of the envelope. I think the project took about 2 hours including setting up the silhouette, finding the files I wanted, and the actual paperwork. I made a second one during that time as well. I think that took about 20 min. for printing, cutting, and adhering.
Thanks for reading! Are there any cards that you like to make?
]]>Truth be told, I wanted this to be my first silhouette project, but I jumped into the paper so fast that it had to be left out. So what did I do? Well, I decorated my silhouette!
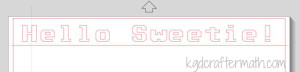
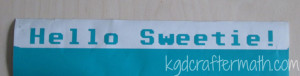
A bit of geeky background: when you learn to code, often the first thing you learn is to print out “Hello World!” on the screen. This is true no matter what type of code you are learning. I wanted to geek it up a bit, so I choose to do “Hello Sweetie!” instead. It’s a common greeting from River Song to the doctor in Dr. Who. I coupled that with the Commodore 64 font. For the font, I choose the angled version. Even though I really like the pixelated version, I was afraid it would just look really weird on the front of my machine. The vinyl I choose was the Silhouette turquoise vinyl, since it was the closest they had to green. I wanted it to be a bit of a throw back to the old black screens with green text.
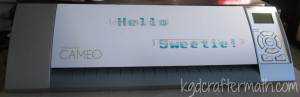
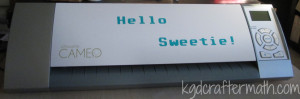
It took me all of 5 minutes to install the font, open up Studio, and write out the phrase. I made it large enough to stretch the 12″ and added a straight line underneath for easy removal of the excess. Here is what my studio file looked like:
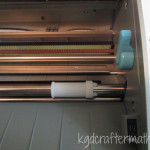
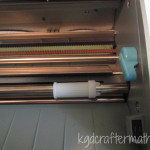
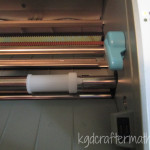
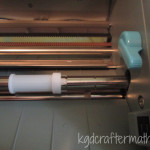
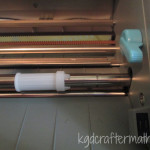
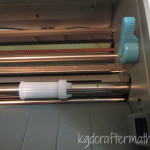
This is the first time that I am cutting directly on the media and without a mat, so I had to figure out how to adjust the rollers. Turns out it’s really easy! Just flip the blue tab down, twist the white roller so that it isn’t locked into place, move it to the right length, twist it to lock, and flip the blue tab back up again! The only trick is that you need to hold the silver rod steady while you twist and move the roller.
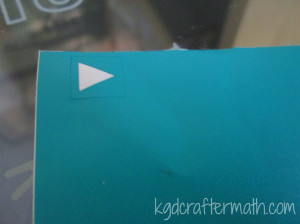
Next, I printed a test cut. This cuts out a square with a triangle inside. Since this was my first vinyl cut, I wanted to make sure it would cut right. It cut perfectly. I’m not sure why I had any doubts. In the picture below, I’ve removed just the triangle.
Now it’s time for the vinyl cut! Here’s a picture with all the extra removed, since it’s hard to see the cut lines.
At this point, all of 15 minutes has passed.
Now for the transfer paper! Ok, tip for all of you newbies out there. The transfer paper is the light paper with the grid lines on it, got that? So don’t crumble up the lighter stuff and toss it aside (oops!). Good thing I didn’t need much! Here is my transfer paper all cut and placed on top of my text.
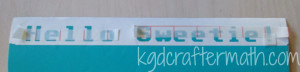
From there, just carefully lift up the transfer paper and align the pieces where they are meant to go.
The transfer paper pulls off really easy, and then I just gave it a quick pat down. I did have to move the point of my “!” separately, but it worked out fine in the end. Now my silhouette gives me a nice greeting every time I see it, and I get a bit of Dr. Who injected into my day. Much like my blinds, this bit of Dr. Who will put a smile on your face even if you don’t get the reference.
Next I want to print out a circuit board paper background for the buttons on the right. It will be really easy and take maybe 10 minutes, but that’s for another day.
All told, this project took me about 20 minutes. I think it took longer to put together the post!
]]>
Monday: The Crafting Hour
I’m switching this series of posts to Mondays for one major reason: they are the easiest for me to write, and therefore to edit. Since Monday is my busiest day, and I tend to leave teaching stuff till way too late, it seems best to do these posts on Monday. So keep your eyes peeled for some Monday hourly updates!
Wednesday: Mid-Week Inspiration
These posts will still probably be from the web, but this allows me to add other media inspiration as well. And who doesn’t need a bit of a pick-me-up come Wednesday?
Friday: Finished Object Friday.
I like the alliteration here. Also, by switching from tutorials to finished objects it allows me to showcase items that I can’t do tutorials for. Some of these will be projects that were completed before I entered blog land. Others will be projects that rely on patterns or directions from other sources to an extant that I am uncomfortable doing them as hourly progress updates. Additionally, I can show of some of the finished hourly projects (like my socks) where you would probably get bored from a second iteration of the first. I’ll still do tutorials when I can, this just expands the possibilities. Finally, since I do my tutorial stuff on the weekends, this gives me a week to be able to write and edit the posts, hopefully making for a better reading experience overall.
Ok, business aside, let’s go on to see some crafting hour goodness!
Today’s crafting hour is all about a paper craft I made. There aren’t too many pictures, but that’s because it’s a really easy project. I recently sold some wedding jewelry I received with my dress, and I wanted to add a little something special to the package for the recipient, but I didn’t really want to spend any money. During our wedding, Earl managed to rip my dress (still not sure how he managed that one…). It was only through the amazing preparedness of Melissa, one of my brides maids, that it was an easy fix. She may not have been the only one with a sewing kit, but I am sure glad she had it!
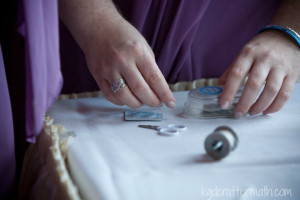
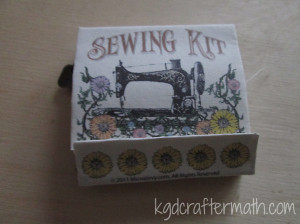
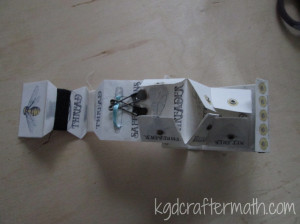
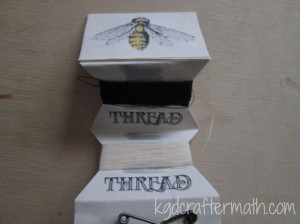
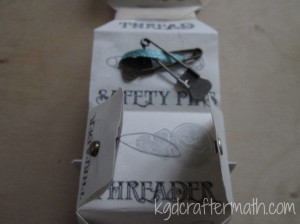
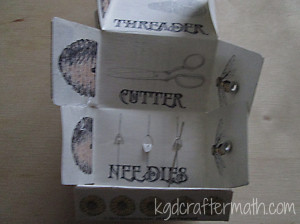
I thought that making a small sewing kit would be appropriate for all occasions, and I happen to have all sorts of thread, needles, and the like around my house. When thinking about the shape, I lit upon the idea of a small folding matchbox with some thread and a needle inside. I have some old matchboxes from our wedding around, so I thought I could use that for a template if I needed. I couldn’t be the first to think of this idea, so checked around online first to see if there was anything out there. Lo and behold, Jivvy from microjivvy.com not only created an amazing matchbook sewing kit that was way cooler than what I could have done, she provided us with the .pdf file to make our own for free!
Matchbox sewing kit. Source: microjivvy
If you are so inclined, you should really check out more photos of her final product over by clicking on the link above.
This project only took me 2 hours, so here is the breakdown.
Hour 1: Editing frenzy
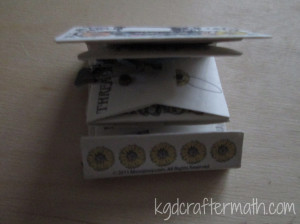
I was insistent that I wanted to use my silhouette to cut my paper. I don’t know why, I just was. New toy syndrome maybe? So, I created a cut and print file in Silhouette Studio. I cannot tell you how much in love I am with cut and print files right now. It places markers on the page so you can print something (like microjivvy’s awesome layout) and then the silhouette will know where to cut. I have also made a paper Tardis for Earl. There are so many paper cut files that this could work amazingly with….. Gushing aside, once I had the layout down, I decided that I didn’t need the black cut lines (or dotted fold lines) from the original file, so I spent some time cleaning those out. Because some of the fold lines are not associated with the outline of the box, I also added in a few cross cuts to help locate those folds later. I used some of my calligraphy paper for the project, since cardstock would have been too heavy. Here is what it all looked like printed out:

Hour 2: Assembly
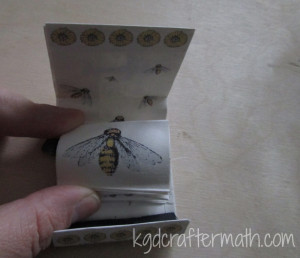
Assembling the paper was really easy. First, I assembled all the parts: two colors of thread, a needle threader (preferably one of those cheap ones that are easy to disassemble), three needles, a small bit of ribbon, and safety pins (I added 2).There are a few parts that need to be glued to the paper: the cutting apparatus, the threader, the inserts for the thread sections (I used card stock here), and I also did the brads ahead of time to hide the back side of those. Jivvy had the most amazing idea for a thread cutter: part of the ripper from an aluminum foil box! Brilliant! Then you adhere the back and front together, for which I used double sided tape, and fold the matchbook into shape (also adhering along the way). I used my scoreboard to help with the folds, but I don’t see why you couldn’t do it by hand. Now, add your sewing materials and the rivets for the parts that close, glue the inside to the outside so it pulls out like an accordion, and viola! A really cute matchbox sewing kit. (Sorry about some of the poor quality photos, they were taken with the puffy bandage on).
Had I done the cutting by hand, I probably would have finished this in around an hour, including gathering the supplies. So it makes the perfect crafting hour post!
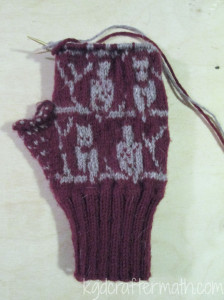
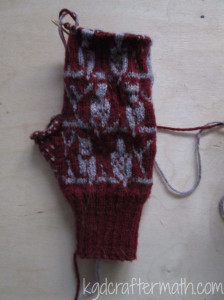
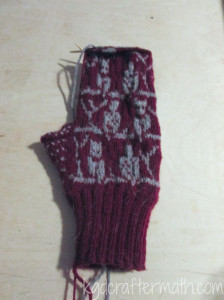
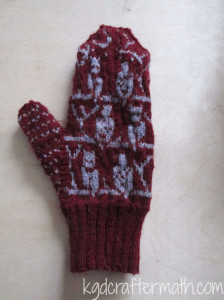
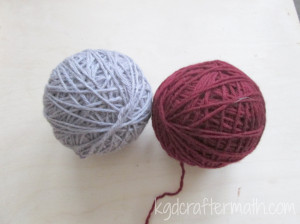
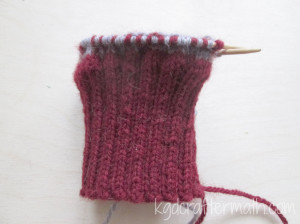
]]>After I wound all of my yarn skeins, I finally caved and cast on not 1, but 2 new knitting projects. One of them I’ll share when I’m done, probably next week, since it’s a relatively small one. The other is the pair of O.W.L. mittens that I am making for a friend for Christmas. She picked out the yarn and I’m doing the knitting. Yay! The pattern comes from the Unofficial Harry Potter Knits magazine that also has the Dumbledore socks in it.
O.W.L. Mitts by Celeste Young
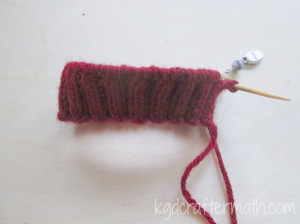
Hour 1: Casting on and rib knitting
Sarah, my friend whom these are for, choose a beutiful burgundy and grey from the Cascade 220 line for her mittens. They happen to be the colors of my high school, so every once and a while I get flash backs and think I’m knitting a bobcat or something. The cast on and the ribbing knit up pretty quickly. I just used a long-tail cast on.
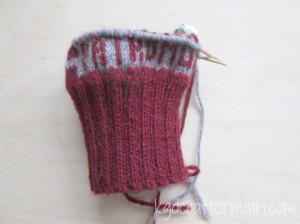
Hour 2: Finishing the ribbing.
These really do seem to be knitting up faster than the socks. I think part of it is that I’m in the knitting groove again, and part of it was that the ribbing pattern is easier for me to follow than the seeded rib from the socks. Anyways, by the end of hour 2 I had finished the ribbing and started on the pattern. I also added an additional row of contrast and color before starting the pattern since I really didn’t care for how close the text is to the bottom in the original pattern.
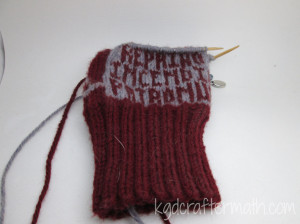
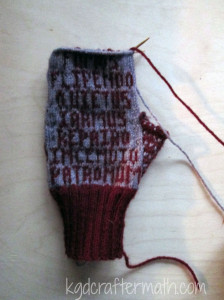
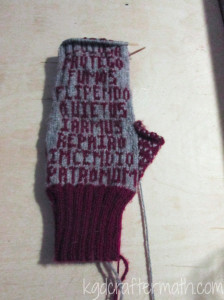
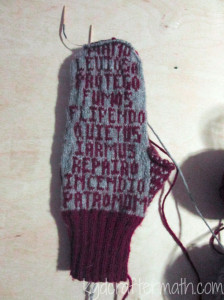
Hour 3.5 – Patronus
Ok, so here is where it gets a bit tricky to document. I took my picture after the first row of text. Since I only did a row at a time here or there, it’s hard for me to get an idea of exactly how long it took to knit up the section. I checked this morning, and it took me about 10 min. or so to knit up a single row. So I think it’s taking me about 1.5 hours. For now, that’s how I will label them. It will help with my OCD to take the picture at the end of each text block, especially since I’m only knitting a row or two at a time.
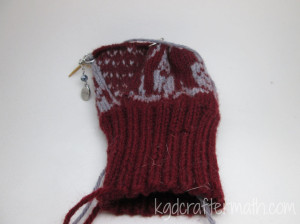
Hour 5: Incendio
Here is the next text block. I’ll try to take a picture from both sides from here on out.
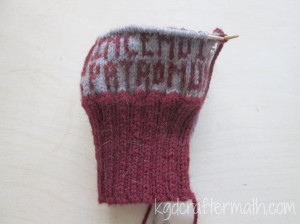
There you have it, a few hours of knitting. At five hours, that’s 1 hour for each week night. Not bad. As you may have noticed, I’ve started to take my pictures on a piece of unfinished wood, and I think I like the results a lot better than the black or the cream canvas. What do you think?
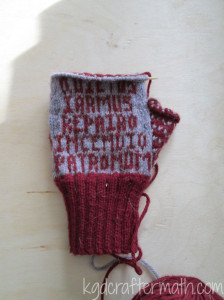
]]>Hour 15: Letter Boxes
I decided pretty quickly that I was happy with the length and switched to working on the letter boxes. It took me a bit to get the centered the way I wanted, but once I did I was off and knitting.
Hour 16: Finishing the Letter Boxes
Not much interesting here to say. The letter boxes went faster though, since most of it was knitting. The knit-purl switch off is something that my fingers still haven’t gotten used to. I’m not sure they ever really will.
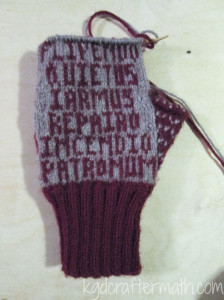
Hour 17: The Cuff
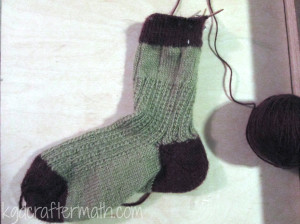
Interestingly, the rib pattern didn’t bother me too much. The title here is a bit of a misnomer. I did start my rib and then have to completely pull it out. I forgot that when working in the round, you don’t need to switch from knit-purl to purl-knit. Oops. That mistake cost me an hour.
Hour 18: Binding Off
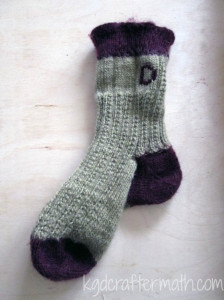
A little more cuff, the bind off, and the first of the letters. I embroidered them in from right to left. I’m not sure why, but it made more sense for me to do it that way.
Hour 19: Stitching the letters in
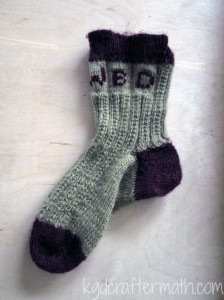
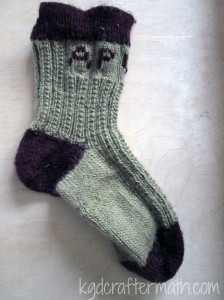
Look, it’s a finished sock! I only have one sock, so this project is really only half way done. Not counting lost hours, it took 19 hours. The final length ended up being maybe about crew length? My sizes last time were off since I was just measuring against my leg without putting it on. Overall, I’m happy with the length though. I know that I need to cast the other sock on soon, but I won’t be posting too much about it here. My plan is to cast the sock on and then start interspersing another craft. Anyone interested in quilts? I have one that I really need to finish by Christmas, so that will be my next set of posts. I’ll try to switch around weekly as well. I have some other knitting projects and a few smaller projects that may or may not merit a tutorial.
All that said, here’s what to expect for my Wednesday crafting hour. The posts will be interspersed with different projects which include a pair of knit gloves, a quilt, and some miniature painting. Since the semester is started up, you might get some metal working in there too. That’s all for today, I’ll see you again on Friday if not sooner!
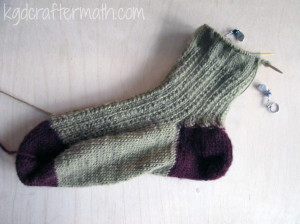
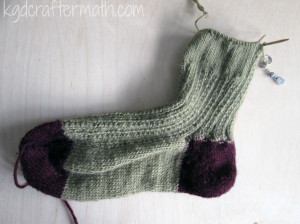
]]>Hour 12: It’s a sock!
So this is the point where I can officially say I have a sock. It’s a no-show invisible sock, but I could ostensibly finish it off here and call it a day. I didn’t though, nor was I tempted too, but it was still an exciting point. For the next sock, I think I will join the heel back with the green with a simple knit stitch. You can kind of see a little bit that using the rib stitch made it a little messier than I would like. I also messed up a bit on the first few rows, but you can’t tell unless you really look for it. You should be proud of me, I didn’t rip out my stitches to fix a little error!
Hour 13: An ankle sock
At this point I’ve pretty much decided to title by the sock length. I’m mostly guessing at the right size based on pictures and how it fits on me. At this point I took the sock off and tried it on to figure out how long I wanted it to be. It fit like a glove. Remember earlier when I said I was worried that I was headed for disaster by putting the heel on at 4″ instead of 6″? Well, I need not have been worried. This is also about how long I usually wear my socks.
Hour 14: Quarter Crew
This is about the right length for an ankle sock. While it isn’t even half of what the pattern suggests before switching to the letter boxes, I will probably switch soon. I’m trying to go for a 3/4 crew I think. The pattern calls for an additional 3.5″ in stitching after switching, so I think it’s about time to switch. I want to count how many rows I’ve done and record that so that I can make the second sock the same height.
Well, that’s all for this week! Join me on Friday for some web inspiration on what to do with fabric scraps. Oh, and let me know in the comments what you think of my website (re)design!
]]>Hour 7: Getting to the heel.
I don’t know why I took this picture from this angle. Maybe it was to show that I went back to working with two needles again? I don’t know, but it’s weird. So, sorry about that. After another hour the sock was long enough that I felt it was time to go onto the heel. I was a little worried that the pattern was having me make the sock too long, so I moved onto shaping the heel a bit early. I am hoping that this was the right decision, but since I’ve never knit a pair of socks before, I could be in for a disaster going forward. I am hoping for the best. When I hit the edge of my heel, I switched back to two needles so I could work the heel and leave the top in tact. I plan to switch back to a single circular needle when I’ve finished the heel.
Hour 8: Starting the heel.
First of all, look at how the sock is now forcing me to photograph it length wise. It makes me happy. Figuring out how to knit a short row heel was somewhat difficult for me having never done it before, as you might have guessed from this week’s tutorials. It took a little while for me to do so, which is why you don’t see too much progress during this hour. But, I eventually figured it out and here you can see the first few rows of the heel.
Hour 9: More Heel
Nothing too special here, just a few more short rows.
Hour 10: Going back towards green
Truth be told, this photo is from between hour 9 and 10. However, it shows a pivotal point for me. This is where I hit the half way point of my heel and started heading back towards working the non-heel part of the sock. Yay!
Hour 11: Finishing the Heel
Woot, the heel is done! I’m ready to switch back to my green and work on the upper part of the sock. Yay! I’ll probably pull it off the needles again after a bit to try it on. I also need to decide just how long I want to wear it. I usually wear low cut socks, but this one won’t work so well that way. And I do wear longer socks in the winter. It’s Minnesota, it gets cold here. I am hoping that at this pace I can finish the first sock in the next two weeks.
I think I addressed this in my Crafting Hour post, but I wanted to take a moment to say that I hope these hourly posts inspire you to try something new. Part of the reason I want to do them is to show people that even if they can only craft in small chunks of time, you can still be productive and create things that make you happy.
Speaking of happy, what types of crafts do you do to wind down or get away from the world? I like to try everything, so I’m always up for something new!
]]>