*Deep breaths*
It’s ok. I”ll just skip crafting hour today and give everyone a look at what my current crafts are shaping up to look like. I know, I know. It’s barely November! Now, I don’t break out the Christmas decorations until after Thanksgiving, but I just have to start earlier when it comes to crafting and gift buying. Otherwise, it would never get done! Also, I happen to know that some of the people who read my blog will be getting crafted gifts from me. So, I’ll be keeping all those crafts a secret.
First up is Christmas Card planning. Earl and I have a tradition we started when we got married. Every year, the day after Thanksgiving, the two of us make Christmas cards. They have to be planned out ahead of time so that we have all the materials, because we certainly don’t want to have to do any last minute shopping on black Friday! This year we’re doing snowman cards, and I figured I’d give you a sneak peak. I’ll probably do a few posts related to these cards, but not until after we make them and send them out in the mail. Keep in mind that the image below is a preview only, the card itself is much cooler!

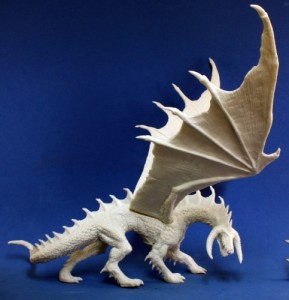
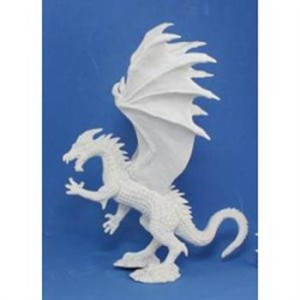
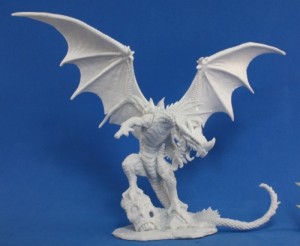
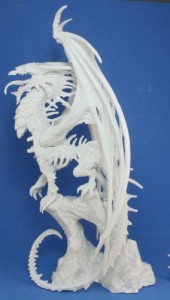
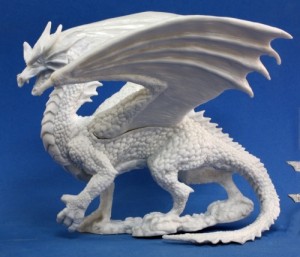
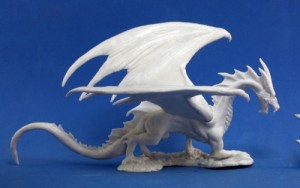
I’m also doing some painting work for a friend of mine. I’ll be painting up as many of the dragons below as I can before Christmas. I’m not sure how many I can get through, but at least one of them is a *must*.
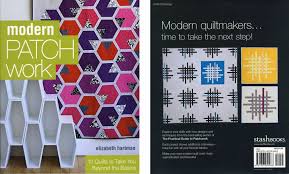
Christmas has another impending deadline for me: I really need to finish my brother’s quilt by then! He got married this summer and I started on a quilt, but haven’t yet finished. I’ve been working slowly away at it, but I’m not really close enough to done yet. I’m hoping to rectify that soon though. The quilt I’m making for them is the one pictured on the front of Elizabeth Hartman’s Modern Patch Work book. The colors I’m using are a variety of blues and greens.
And then of course there’s the *spoiler* that I’m making for my mom, and the *spoilers* I’m making as bulk gifts, oh yeah, and the *spoiler* for my brothers. Yeah… can’t really talk too much about those yet. I’m also trying to convince Earl that we should do yearly ornaments as well, like we do with our cards. Not sure he’s sold yet.
That’s all I got for now! Its a lot of crafting to do, and not much time to do it in, so off to craft I go! Look forward to an ornament inspired post on Wednesday, and maybe I”ll even get a finished Friday out if I can ever find my SD card *grumble grumble*.
]]>
Now, it didn’t start that way of course! Since I took pictures along the way, I thought I’d show you the WIP (work in progress). Please bear with this image heavy post. I’m not sure why I feel the need to tell you all that though, since most of my posts are… Oh well!
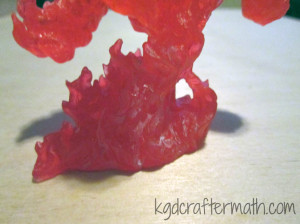
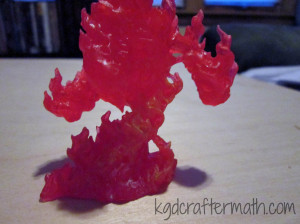
The mini I painted is Reaper’s Large Fire Elemental. It’s made of a translucent red plastic. For the lighting effected, I used a cheap halloween LED tea light.
I wanted to take advantage of the transparency and use some light, so I did some fiddling around. I played around with a Halloween led candle from Target. I also played around with a few other leds, but I found that the target one was the brightest. The only problem is that the light doesn’t penetrate the mini fully. With the non-target led, I placed it at various points behind the mini to see if I could get better spread, but it didn’t look like I could. I did drill a hole into the mini so that the led would go up a little bit, but I didn’t go so far as to de-solder the led from the board to make it longer. I might try that with my other fire elemental, but I didn’t do it here. It did help a little bit, but I would still like to get more light through overall.
The very first thing I did was painted the elemental. Bones, that’s the plastic the mini is made out of, is super hydrophobic. I wanted to keep the transparency, so I knew I wanted to do a thin wash of paint. Normally you would make a wash with water and paint, but the material is hydrophic, remember? So I made my washes with isopropyl alcohol. Fire goes from really light in the center to red. I added the black sooty stuff on the outside to help with the fact that the led didn’t shine through the whole thing. I used a low ISO photo above to help determine how to paint the mini in accordance with the light spread.
First up: a coat of pure white around the bottom
Next: a coat of sun yellow just above the white
Then: a coat of fire orange above that. Note that these coats only go up to about half of the figures. That’s where the light mostly ends.
Next, I dry brushed a bunch of black on.
Then, I dry brushed some crimson red around the bottom. I didn’t want the bottom to be as dark as the top, though you’ll noticed I changed my mind on that later down the line. Somehow I forgot to take pictures of the last three stages, but, you can still see how it came out in the next few steps.
Once the mini was painted, it was time to add the LED light. First, I removed all the casing from the candle. This left me with the board, the bottom housing, the led, and the battery.
I had already drilled a hole into the fire elemental that went in as far as the led would go. This is where I could have done a bit more. I decided I didn’t want to deal with de-soldering and lengthening the led. This would have allowed me to put it further towards the middle of the mini and potentially have gotten a more even lighting throughout the mini. I should note that I wanted to keep the board because it flickered and it had an on/off switch. Sure, I could have done those myself, but it was much easier and cheaper to use the led candle.
Now the electronics and the mini fit together! But… they need a base. I placed it all on a 2×3″ base. Why that size? Well, it’s what they had at my local shop. So there you go. Once I traced out where I wanted the led casing to go, I marked where the switch was. That was where I drilled a hole. You need a pen or something to turn it on and off, but at least you can.
Then it was down to decorating the base. I knew that I wanted to hide the electronics. Also, I wanted a lava effect, so I started by sculpting a crater like thing around the LED strcuture with some milliput. Milliput is also a very strong adhesive, so this keeps the mini attached as well. I like to imagine that the fire elemental is emerging out of the crater.
For the raised bits of pumice and other refuse in the lava, I used some cork. There is a larger piece of cork on each corner and then some crumbled cork that I added around the crater. All the cork is adhered using zap a gap super glue. I used the tutorials by Dark Art Studios and Fantasy Games as inspiration and for help in figuring out how to get the look I wanted.
Once the cork was down, I flooded the base with Elmer’s glue. And waited for it to dry. And waited. And then gave up waiting, and hit it with a blow dryer until it was at least dry enough for me to paint on it. Bonus! Since the glue wasn’t entirely dry, I ended up smudging it some along the way. This gave the lava a swirled effect in some places, which was kind of cool.
Then I started layering on the color. Most of the color is dry brushed or just sort of haphazardly splattered about.
First: a (mostly) solid True White coat.
Dry brushed sun yellow
Dry brushed marigold yellow
Dry brushed lava orange
Dry brushed crimson red
Dry brushed blood red
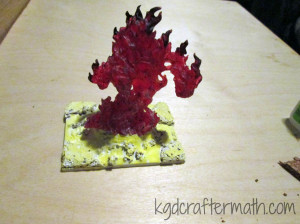
Added a layer of walnut brown to the top of all the cork (I left a little of the red showing). I also added a ring of brown just underneath the elemental.
Added a layer of black to the tops of the cork (I left some of the brown showing). Finally, I decided I wanted to dry brush some more black onto the main figure. That’s it!
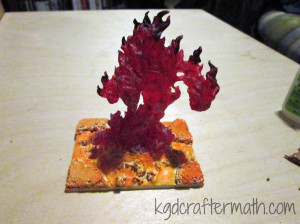
Then it was into the light box for some photos!
It took me evenings, one for the electronics, sculpting, and mini painting, and one for the base construction. Not including drying time, I think it took me 3-4 hours to complete. I hope you enjoy it! I’ll probably apply the same treatment to my other large fire elemental, except try to get better lighting by drilling a deeper hole. I’ll be sure to post it here if I do!
]]>Since the weather is turning cold, I thought I’d round up some cardigan and sweater patterns. Please note that several of these are Ravelry patterns. In order to see those patterns, you will need to make a free account there.
Ophelia’s Willow: Owlish’s notebook, adapted from Verdaia by Jodie St. Clair.
I know that not everyone lives up in the cold north. So, I figured I’d start with a nice light weight shawl. I really like the simple pattern on this shawl. The pointed ends also make it almost reminiscent of a spider web to me.
Ahni: Julia Trice
Ooohhh! Pretty spiral patterns. That was the thought that first went through my head when I saw this one. If/when I make this sweater, I probably won’t do so much on the cuff, especially at the bottom of the sweater itself. Maybe for the sleeves though. I really love the overall look of this one though.
Freija: Mari Muinonen / tikru (image from Dayana’s notebook)
Ok, I admit it, I like things that are just a bit out of the ordinary. Like this gorgeous cable knit sweater. Who knew that cable knitting could have such personality to it? I love the color it is in here as well. One day, my precious, one day…
Wild Thing!: Splendor
When I saw this pattern, how could I not add it here! It’s just so awfully fun! What a better way to refuse to grow up than to dress up as one of the wild things.
Magnum Reversible Vest/Wrap: Karenclements
Ok, now we’re talking cold weather gear. Well, almost. There aren’t any sleeves on this! It shouldn’t bee too hard to add them though. She also has a downright stunning pattern for a honeycomb sweater as well. I have a feeling that once my socks and mittens are done, these two projects will be up next. Oh, how I like to wrap myself up in blankets and call them clothes. :)
There you are! Five knitting projects to keep yourself warm as the weather cools down. To see more, don’t forget to stop by my pinterest knitting board where you will find more warm wraps, a few summertime ones, and plenty of other knitting projects! I hope to see you all again on Friday, but if not then I’ll certainly be back to regular posting schedule by Monday. Thanks for reading!
]]>Those of you who’ve ready my ‘About’ page will recall that I am a grad student, which pretty much defines my life. One of the things that comes with that is grant applications. And we are currently in the midst of grant season. I am working on a grant that’s due Nov 1. This will be my second all-nighter this week (ugh).
With that in mind, I must suspend my activities here. I will try hard to get something up this weekend, but cannot promise much. At the very latest, I will return on Monday 11/4. Until then, stay inspired!
Also, I leave you with this awesome picture of molten bronze as penance.
]]>This week I’m showing you some of the painting work I’m doing. Right now I’m working on painting up all my Pathfinder goblins from Reaper’s first kickstarter. If you want to get your own, they are sold in two packs: goblin warriors and goblin pyros. I also have the goblin warchanter who is sold on her own.In total I have 18. I decided to paint up one of them first to get the color scheme down and them paint the rest in bulk. So, here’s the progress I’ve made! These are in blocks, since it’s just easier to take a picture each time one of the steps is done. All of the paints are Reaper MSP paints.
All the miniatures are bones miniatures, so they start out as a slightly translucent white plastic. To prep the bones, I boiled them in a pot of water for about 10 min. This allows the bones to set back to their original shape if they warped and helps to clean off any residues.
Hour 1-2: Painting the first Goblin
The first guy took me about 2 hours to paint up. I’ll probably add some more details to him later, but it gives me a basic paint scheme to go with. Here’s how he came out:
Hour 3: Painting the base
The base here is a simple Intense Brown. I’ll wash it later with a Flesh Wash to make it appear more muddy.
Hour 4: Laying down the Green
First coat is adding the skin. One of the nice things about bones is that you don’t have to prime them. Sometimes I put down a grey coat first, but decided not to here. The green looks really bright, but it will get some darker washes later to tone it down. The base green is Jade Green.
Hour 5-6: Adding in the cloth
Next I added the cloth color. Again, the wash later will darken it a bit. I had to do some touch-ups on the green when I was done with this coat. Here I used Terrain Khaki to get a bit of a dirtied look to the linens.
Hour 7: Painting the leather bits
Finally, I went through and painted all the leather bits. I used Lonestar Leather for the paint color here.
That’s where I’m at for now. I’m looking forward to moving forward. Right now I’m still adding base colors, but there will be some washes in there later. I’m not going for as nice a mini as the last one I painted, so I won’t be focusing so much on tiny details. After all the base coats are down, I’ll wash the whole thing with a dark brown and then begin to highlight with selective color dry brushing. Finally, there are a few details that I’ll add (eye color, stitches on the leather, and maybe yellow the claws).
]]>Simply Gloria: Pumpkin Chocolate Chip Cookies
Yum! An old professor of mine used to bring these to his final exams. I haven’t had this particular recipe yet, but I’m sure it’s delicious! What, you haven’t had pumpkin chocolate chip cookies yet? Well, what are you waiting for? Start baking!
Crafty Nest: Pumpkins Carved with a Drill
These are super cute, and look so much easier to do than traditional pumpkin carving. They might even look decent if I did them myself. My jack-o-lanterns usually end up missing teeth or something.
Key Ingredient: Cleo’s Pumpkin Dog Biscuits

If you are going to make a treat for yourself, why not make one for your dog as well?
Chicago Tribune: Roasted Pumpkin-apple Soup
Mmmmm…. I’m not much of a soup person, but this sounds delicious! Perfect for the turning weather! It’s the third recipe in, so don’t worry if you see mayo biscuits first!
UnOriginal Mom: Glitter Monogramed Pumpkin
And Tanya’s Creative Space: Decorated Pumpkins
I’m sort of glad that I didn’t do this post earlier, because look at these pumpkins! I’m not really a glitter fan, BUT I really like it here! Another fun and easy way to decorate pumpkins. Both of these are posts from Monday’s blog hops. Maybe I’m cheating a bit, but I don’t care. I just love them that much!
Ok. That’s it for today’s Pumpkin inspiration. To see more, head over to my pinterest pumpkin board. Thanks for joining me!
]]>
For my challenge I wanted to work with vinyl since every one says how wonderful it is. While I’ve read that the silhouette vinyl is much nicer than other vinyls, I used Oracle indoor vinyl as they have a better color choice. And that mattered for my project! I was inspired by a pin I pinned on pinterest (too many pins?) of a vinyl back splash. It’s a really pretty quarter foil print. The original post at Landeelu seems to be gone, but you can see the pin image below.
Landeelou vinyl backsplash
Step 1: Inspiration
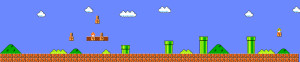
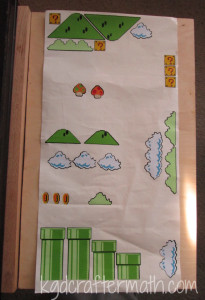
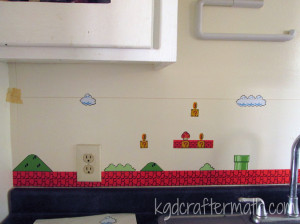
But, I couldn’t just stop with a simple repeating back splash, could I? Nope. I had to go for something a bit more… me? nerdy? fun? All of the above. Since back splashes are long and thin, I immediately thought of side scrolling video games. And what’s more iconic than Mario Bros.!? So, off to work I went, hi ho, hi ho, and all that. I decided to work with just the first level of Mario Bros., so I went and found myself a screen shot of the level. You can see the image below, but I didn’t need nearly that much for my back splash. So I sized it to the right height and cropped out everything I didn’t need. It worked wonderfully, since I only needed up to the first drop off in the game!
Step 2: Photoshop Wizardry
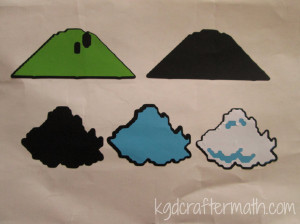
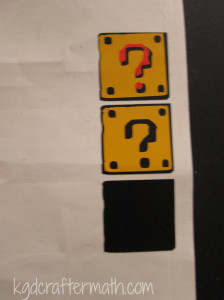
Once I had a screen shot, it was off to Photoshop I went. (See what I did there?) I won’t bore you with the details, but suffice it to say that the original Mario is an early 8-bit game, so it uses pixel blocks and relatively few colors. I just separated out shapes by color and spent some time thinking about negative space. Why negative space? Well, it turns out it’s easier to use negative space and layer than to make all those little bits separately. You’ll see what I mean in a bit. Here are all the shapes that I needed for my Mario back splash:
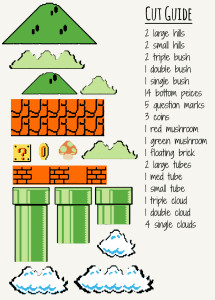
You can see how I simplified some of the shapes a bit, such as removing the light orange on the bricks. I was just worried that that I was doomed to failure with that particular layering trick.
The colors there are also based on the vinyl colors I chose, which were pretty close to the originals, but not quite exact. I used either Oracle 631 or Mactac 12×24# vinyl sheets, all of which I purchased from Just For Crafters. By using those colors in my shapes, it was easier for me to lay out my shapes by color in Silhouette Studio. The yellow below is the only Mactac sheet I used.

Step 3: Silhouette Layout
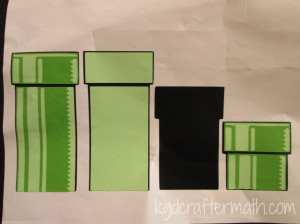
I had 10 Colors, which means 10 sheets of vinyl! I purchased 20 though, just in case I messed up. Thankfully, I didn’t need any. To lay out the images in silhouette, I first made a master file of all my shapes. This consisted of saving each layer in my Photoshop document as a different .jpg, importing it into Studio, and using the trace feature to create the shape. Once I had all my shapes in studio, I set it up just like my Photoshop file. Then, I created a separate studio file for each color and made sure to put as many of each shape into the file as I needed. I also cut a box around each group of shapes to make weeding easier. The only one that came close to needing two sheets was the black. Here’s what my light green file layout looked like to give you an idea:

Side note: I keep waffling back and forth about whether or not I want to share my silhouette files with you. Mario Bros. is copyright of Nintendo (with which I have no affiliation), but they are one of the companies that are generally more accepting of fan art, which this is. They state on their copyright page that while they have a blanket policy to deny permission to use their work, they don’t have a problem if you do so long as it fits within relevant laws. And since the US is still in this weird denial that fandoms exists, the laws pertaining to screenshots and copyright are pretty much non-existent. From what I’ve seen, it really comes down to how the company feels. For the moment, I have decided that I need more time to think about sharing this particular file since I can’t change my mind once I put it out there. That might change in the future, but for now please accept this explanation of why.
Step 4: Cutting the vinyl
For the most part, cutting the vinyl went as smooth as pie. The only hiccup I had was with the black detail for the bricks. I was able to pause the machine and slow down the speed to 4, and that worked beautifully. I only had to re-cut the one piece. Well, that and I forgot to tell it that the yellow vinyl wasn’t on the cutting mat, and so it cut all the way through the vinyl! Another easy fix, as I just cut off the bad part and started again. At least I caught it right away! Please excuse the lack of picture here, I lost the SD card with the pictures of the cut vinyl on it. :(
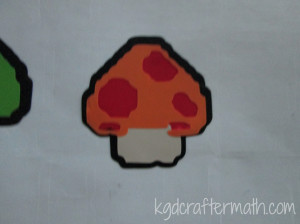
Step 5: Layering the vinyl.
Next up came layering. I’ll show you how I layered each piece so you can get an idea of what I meant by negative space before. This is better done with pictures, so I’ll keep my chattering to a minimum here. The only ones I don’t have are the black and red, where the black detail was layered on top of the red block. I used my transfer tape a lot for this part.
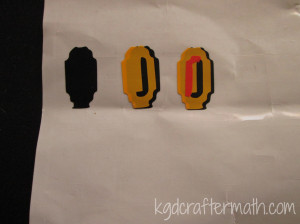
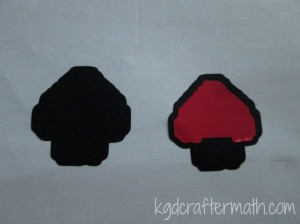
Once you have all of the vinyl layered, you will have 2 sheets of vinyl that look something like this:

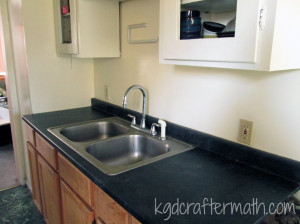
Step 6: Prepping the wall
Once all the vinyl is done, it’s time to clear the counter tops and clean the wall. So bonus, this project means you clean your counter tops!
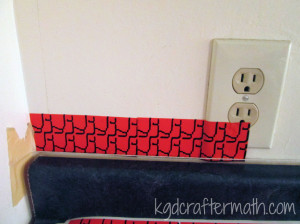
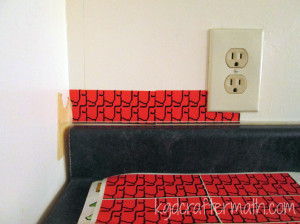
Step 7: Placing the bricks
I started by using the transfer paper, but realized that I didn’t need to since the shapes were pretty solid. After placing the first piece, we realized that we needed to use a string level since our counter tops themselves weren’t quite level. So, my engineer husband got to have fun with measuring. Goody!
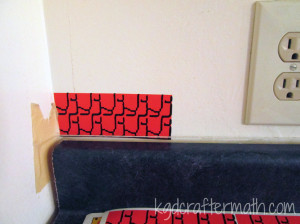
For the outlets, we simply cut around them carefully with an X-acto knife while it was on the wall. With some careful measuring, I could have had the cameo do this for me. I like this way better though, so you have some wiggle room in alignment.
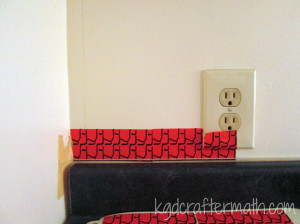
Step 8: Ground cover
This next step got a bit tedious, but thankfully I had Earl to help. He counted the number of bricks on the image and told me where to place each ground piece. The first one was easy, since it was right at the start! We only had 1 piece that started on an outlet, and we were able to count back from the end since it was so close.
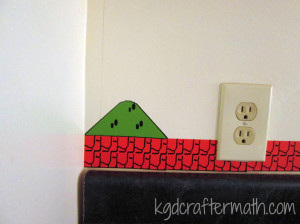
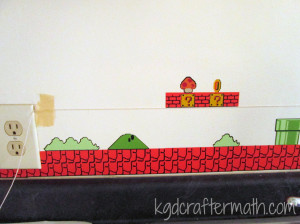
Step 8: Stuff in the air
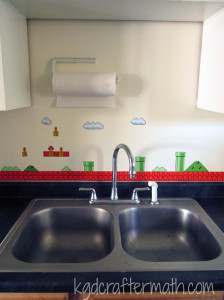
The best thing to do here was to align things in relation to pieces that were already down. The first set of bricks was in line with the height of the second tube. Then, some of the extra blocks were aligned with the largest tube. I’m not sure how Earl figured out where the lower clouds were, but hey, it worked! And the final cloud cover aligns with the middle of the first cloud cover. You can see some of the alignment process below, note the continuous use of that string from before!
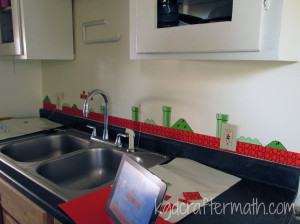
Step 9: Enjoy! (And put everything back!)
And then we were done! I was surprised that it only took about an hour to put it all up. That’s not counting the time I spent designing, printing, and layering the vinyl, but I still expected it to take longer!
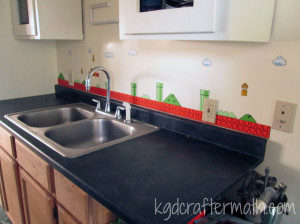
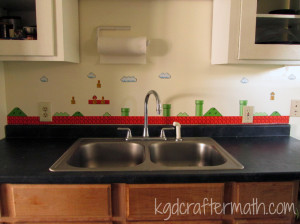
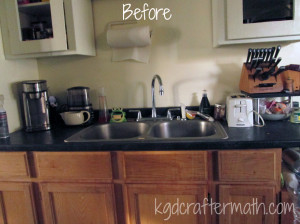
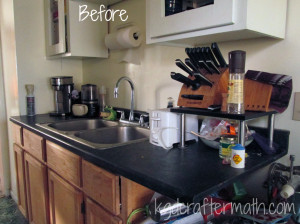
Here are some before and after shots of my kitchen to give you an idea of the difference:
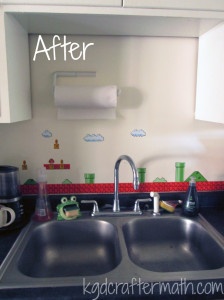
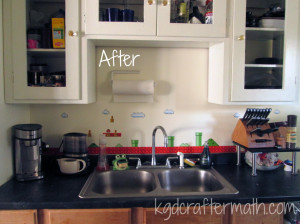
It was a ton of fun and adds a bit of personality to my apartment. Plus, the vinyl comes off clean (I already tested this), so it’s really landlord friendly!

Ready for more fun? Head over to these other Silhouette Challenge posts!
Crafting with Glitter Just Got Easier by Create & Babble
Birthday Invitations Homer Simpson Style by Black & White Obsession
DIY Planner Dividers by The House on Hillbrook
3D Haunted Forest by Chicken Scratch NY
Pumpkins and Peacocks Fall Mantel by joy & gladness of heart
DIY Cheers Garland by Rain on a Tin Roof
Wedding Gift Wrapping by It Happens in a Blink
Glitter Monogrammed Pumpkin by unOriginal Mom
Halloween Family Rules by Tried & True
Faux Stitched Speech Bubbles by Get Silvered Craft
Halloween Spooky Eye Luminaries by A Tossed Salad Life
Addressing Invitations with a Silhouette Cameo by My Favorite Finds
Halloween Party Treat Bags by The Thinking Closet
“Create” Wooden Pallet by Lil’ Mrs. Tori
Spooky Halloween Bats Garland by TitiCrafty
Decorated Pumpkins by Tanya’s Creative Space
Cute Wedding Card by Zanaree
Learn to Tie Your Shoes by From Wine to Whine
Fussy Cutting Making You Fussy? by My Paper Craze
Cut Fabric With Your Silhouette by Cutesy Crafts
Cookie Lee Jewelry’ Gift Bags with a Purpose: Sharing Thankfulness by An Elegant Touch
Halloween Banner by Sowdering About
Interested in joining us for our group posting event next month? We’d love to have you. Simply fill out the new member request form, and Lauren from The Thinking Closet will get you squared away.
]]>Program gets stuck in Initializing
From what I can tell, it’s probably a graphics drive error. If you are using win 8 on a surface, you will need to roll back your driver and set your computer to not allow updates. This wasn’t acceptable for me, so I just use the program on my win 7 desktop.
Silhouette can’t read SD card
Make sure you are saving through the Studio software. Try saving both to the root folder as well as to a secondary folder named studio.
Silhouette cuts the top of your mat
You probably hit “load media’ instead of ’load cutting mat’. It’s annoying, but you can pause and cancel the cut using the buttons on the front panel of the machine.
Silhouette cuts off center, tearing up the side of your mat
Eek! Pause and cancel the job as soon as you see this happening. Then, turn off the machine, have a hot cup of tea, and try again. I have no idea why this happened, but giving the machine a time out seemed to help.
The machine doesn’t register print and cut marks properly
As before, pause and cancel your cut to try and salvage the paper. Check your paper, do the registration marks look slanted? If so, it was a bad print and you’ll need to re-print. Otherwise, turn off the machine, shut down the program, open the program back up, and turn the machine back on in that order. You might want to give it another time out as well.
The mat isn’t sticky
There are a few things you can do: you can rinse it with water to remove paper debris and let it dry, you can get some re positional adhesive spray, or you can use a third party re-stick adhesive that goes over the whole mat. I use the third method and will have to find the brand I use. Also, try really hard to keep the protective cover on your mat to keep it sticky. This is the number one reason my mats aren’t sticky any more. I’m in the process of making a brief case like thing to help have a protective home for them.
The mat is too sticky
Keep using it. It will tame down pretty quickly. If it’s a problem, do a few cuts of something you don’t care about just to tone down the sticky.
The Silhouette Pen didn’t draw consistently
Try using the double cut option from the machine. If that doesn’t work, you might just have a bum pen. Sorry.
Still stumped?
Contact silhouette support. Their FAQ page is a bit odd to try and poke around, but their customer service is excellent. I did have to send them an email about the Surface, and they knew right away what the issue was and how to help me. The turn around response was also pretty quick. Customer service is never my first choice (I like to fiddle, and I never want to wait for a reply), but I was pleased with the service they provided.
This is not a comprehensive list of silhouette problems, just the ones I had during my first cuts. I”ll do another one of these again if the need arises. Feel free to post questions below about troubleshooting and I’ll help if I can!
This post is part of my First Cuts Series! Want to read the rest? Here’s the whole group of them!
Silhouette Cameo: The Unboxing
Silhouette Cameo: Installing the Software and Shapes
Silhouette: First Contact with the Software
Silhouette: First Cuts
Silhouette: Trouble Shooting
Once you’ve got your file ready, you are all set to start cutting! I admit that these are not quite the first cuts. There are a few reasons for this, mostly being that I ran into some issues my first few times. And since I was working at night, the light was terrible for picture taking. So, these are really the nearly first cuts. Don’t worry, the last post in this short mini series will talk about some of the trouble-shooting I did with my machine.
One issue I had to deal with was working from an SD card. I didn’t have room in my office for the silhouette yet, and my mobile computer was having problems with the software. For ‘ease’ I just decided to use the sd card. It isn’t hard to use, but I ended up saving the files both to the card itself as well as in a folder named ‘studio’. Only one of each design showed up, so I’m not exactly sure which one it was, even after troubleshooting. I’ve since been able to hook it up to my computer, and that is much easier!
Loading the machine was pretty simple, but I made what seems to be a pretty typical mistake. First, remove the blue paper and press your cardstock gently onto the sticky side of the mat.
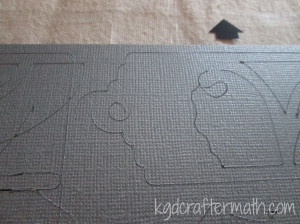
Next, place your mat up next to the rollers and choose “Load Cutting Mat”. This is important, unless you are not using the cutting mat don’t choose “Load Media”! I”ll show you why in the next photo. I didn’t need to move the rollers at this point, which made lining it up a no brainer. Not that changing the rollers is hard.
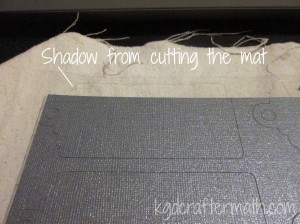
I chose the “Load Media” option, and it cut up my mat a bit. Not enough to destroy it, but enough to make me mildly annoyed.
Inserting the blade and changing it’s settings is super simple. There is a turn key right on the machine. Drop the blade into the turn key and then turn the top until it’s at the number you’ve set. Then drop it into the holder and click that baby shut.
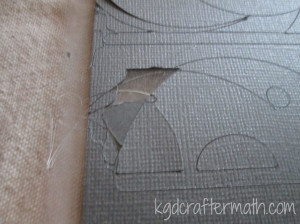
With the mat properly loaded and the blade in place, I was able to cut out my first sheets! For the tags, I needed to cut 2 pieces: the plane colored background and the fancy scroll work. Each of those was done in a different color. This is important now – for the blue sheet I needed to leave it in place for the next step.
When set this project up, I also added a sketch to the plain side of the tag. This required an extra step when cutting. First I cut the plain tags. Once the tags were cut, I left the cutting mat in place. So, no unloading. Next, I switched out the blade for my pen (I chose glitter green) and set it to draw. It needs to stay in place so that it aligns correctly.
Sadly, I wasn’t happy with the results. The pen didn’t draw consistently. I’ve asked around and some people have this problem, but others don’t. Of the 8 pens I have, this is the only one that it’s an issue for. So, I switched it up and used the black glitter pen.
Once the cut was done, weeding began. Weeding is the process of removing all the extra paper that you don’t need. I’m glad that I did this as my first project, because the weeding was really easy. Once or twice the paper didn’t cut right, but that ended up meaning I just needed to re-cut a new piece.
These were so easy to make, and I had extra paper left over from the wall boxes I did. I used that left over paper to make more cards of different colors! Here’s all three of the variants I’ve made so far.
Well, that was my first cut! For the most part, pretty easy. One more part to talk about in another post, and that’s trouble shooting. Then I’ll go through and link them all up together for easy reference. Thanks for reading, and I hope this is helpful if this is you’re first time with the silhouette!
This post is part of my First Cuts Series! Want to read the rest? Here’s the whole group of them!
Silhouette Cameo: The Unboxing
Silhouette Cameo: Installing the Software and Shapes
Silhouette: First Contact with the Software
Silhouette: First Cuts
Silhouette: Trouble Shooting
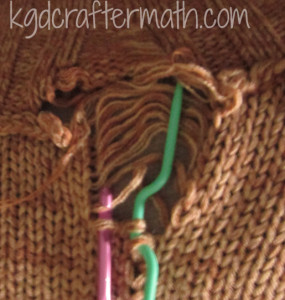
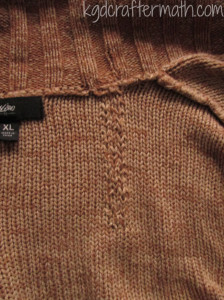
Hour 1: Fixing the bottom run
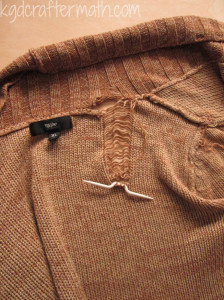
Here’s the cardigan as it was given to me. I have already picked up the bottom most dropped stitches in this picture and placed them on a cable needle.
For each stitch I did the following; Remove a loop from the holder. Push your crochet hook through. Grab the loose yarn closest to the loop. Pull the yarn through with your hook to create a new loop.
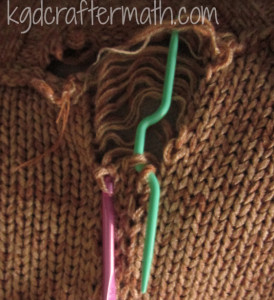
I went left to right across each row and up the run. This took about an hour and was the longest part of the fix.
Hour 1.25: Fixing the upper run. There was also a bit of a run on the upper pattern. I fixed it the same way as above, but it took less time since there was significantly less run. I did have to use a smaller hook though, and it would have come out better if I had had an even smaller hook.
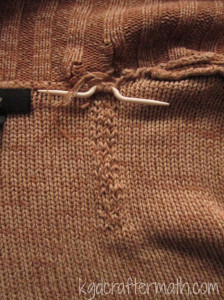
Hour 1.5: Binding it all up I purchased a skein of yarn that was almost the same color as the original cardigan. I stitched it through all the stitches that were on the holders. I also ran it through some of the other stitches, made sure to bind up the loose ends of the cardigan, and tied it off at the end.
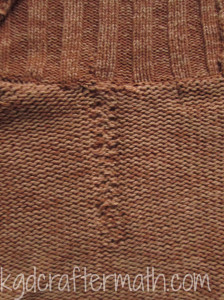
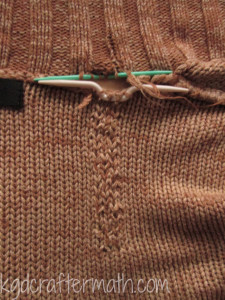
Hopefully this will hold for her longer! You can still see where the run was. I’m not sure if there is anything to be done about that. You might be able to block it back into place, but I didn’t think to try that until afterwards. Thanks to Sam for convincing me to fix it properly! So there you go : 1.5 hours to fix a run in a cardigan. Definitely worth it if the cardigan is like a best friend!
]]>